
Preciva 939 III
Preciva Wood Burning Station 939 III Instruction Manual
Comprehensive guide for setup, operation, and maintenance.
Introduction
This manual provides detailed instructions for the safe and effective use of your Preciva Wood Burning Station 939 III. Please read this manual thoroughly before operating the device to ensure proper function and to prevent injury or damage.

Image: The Preciva Wood Burning Station 939 III, showcasing the main unit, two burning pens, a pen stand, and a selection of 20 different pyrography tips.
Important Safety Information
- Always operate the wood burning station in a well-ventilated area to avoid inhaling fumes.
- Ensure the device is placed on a stable, heat-resistant surface.
- Keep flammable materials away from the heated tips and the working area.
- The burning tips reach very high temperatures. Avoid direct contact with skin to prevent severe burns.
- Always use the provided pen stand to rest the hot pens when not in use.
- Unplug the device when changing tips, cleaning, or when not in use. Allow tips to cool completely before handling.
- This product is rated for 110~127V USA Specification. DO NOT connect this product to a 220V power socket. Doing so will damage the unit and void the warranty.
- Keep out of reach of children and pets.
Package Contents
Verify that all components are present in your package:
- 1 x Pyrography Soldering Station (Main Unit)
- 2 x Professional Soldering Iron (Burning Pens with foam grips)
- 1 x Bakelite Soldering Iron Base (Pen Stand)
- 1 x 304 Stainless Steel Holder (Coil for pens)
- 1 x Screwdriver (for tip replacement)
- 20 x Wood Burning Tips (various shapes)
- 1 x User Manual
- 1 x Brand Carton (Packaging)

Image: An overview of all items included in the Preciva Wood Burning Station package, including the main unit, two pens, pen stand, screwdriver, and 20 tips.
Setup Instructions
- Place the Station: Position the main pyrography station unit on a stable, flat, and heat-resistant surface. Ensure adequate ventilation.
- Assemble the Pen Stand: Attach the 304 Stainless Steel Holder (coil) to the Bakelite Soldering Iron Base. Place the cleaning sponge in its designated tray on the base.
- Connect Burning Pens: Insert the connectors of the burning pens into the "TOOL A" and "TOOL B" ports on the front of the main unit. Twist the connectors clockwise to secure them firmly.

Image: A hand connecting one of the burning pens to the main unit, demonstrating the secure locking mechanism for professional thermal insulation.
- Install a Tip: Using the provided screwdriver, loosen the two screws on the pen's tip holder. Carefully insert your desired wood burning tip between the two metal contacts. Tighten the screws to secure the tip. Ensure the tip is properly seated and makes good contact.

Image: A close-up view of the pen stand, showing the storage tin for the 20 different burning tips and the cleaning sponge.
- Power Connection: Plug the power cord into a standard 110~127V AC outlet.
Operating Instructions
- Power On: Flip the main power switch on the front of the unit to the "ON" position. The power indicator light will illuminate.
- Select Tool: Use the "TOOL A / TOOL B" switch to select which burning pen you intend to use. Only the selected tool will heat up.
- Adjust Temperature: Rotate the temperature adjustment knob to set the desired temperature. The range is 250°C to 750°C. Start with a lower temperature and gradually increase it as needed for your material and desired effect. The unit heats up quickly, reaching operating temperature within 10 seconds.

Image: A detailed view of the control panel, highlighting the temperature adjustment knob, power indicator, tool selection switch, and pyrography handle interfaces.
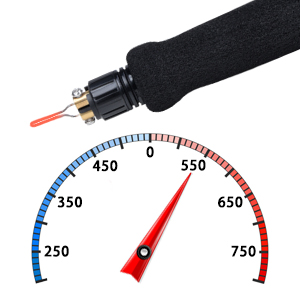
Image: A graphic representation of the adjustable temperature range, from 250°C to 750°C.
- Begin Pyrography: Once the tip is heated (it may glow red at higher temperatures), carefully touch it to your chosen material (wood, leather, cork, pumpkin, gourd, hard plastic). Apply gentle, consistent pressure to create your desired designs.

Image: A close-up of a burning pen in action, creating a design on a small wooden disc, demonstrating the precision of the tool.
- Using Different Tips: The kit includes 20 different tips for various effects, from fine lines to shading. Experiment with different tips to achieve diverse artistic designs.
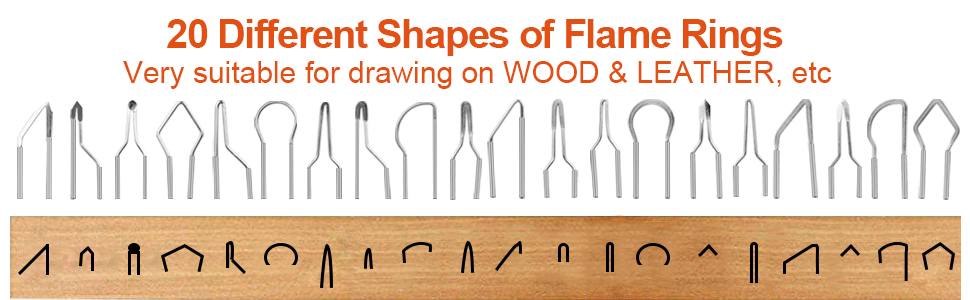
Image: A display of 20 distinct wood burning tips, illustrating the variety available for different pyrography techniques.
- Hot Knife Function: Certain tips can be used as a hot knife for stencil cutting on soft plastics, foam, paper, and synthetic fabrics. Exercise caution and ensure proper ventilation.
- Resting the Pen: Always place the hot pen in the assembled pen stand when not actively burning.
- Power Off: When finished, turn the main power switch to "OFF" and unplug the unit from the power outlet. Allow the tips to cool completely before storing.
Maintenance
- Cleaning Tips: Regularly clean the burning tips using the provided sponge (dampened, not wet) to remove carbon buildup. This helps maintain optimal performance and extends tip life. Ensure the tip is hot when cleaning with the sponge.
- Replacing Tips: Only replace tips when the unit is unplugged and the pen and tip are completely cool. Use the screwdriver to loosen the screws, remove the old tip, insert the new one, and tighten the screws securely.
- Unit Cleaning: Wipe the main unit and pen handles with a dry, soft cloth. Do not use abrasive cleaners or immerse any part of the unit in water.
- Storage: Store the wood burning station and all accessories in a dry, safe place, away from dust and moisture, and out of reach of children.
Troubleshooting
| Problem | Possible Cause | Solution |
|---|---|---|
| Pen tip not heating or heating inconsistently. |
|
|
| Unit does not power on. |
|
|
| Burning is too light or too dark. |
|
|
Specifications
- Brand: Preciva
- Model: 939 III
- Power: 40 Watts
- Voltage: 110-127 Volts (USA Specification)
- Adjustable Temperature Range: 250°C - 750°C (482°F - 1382°F)
- Item Weight: Approximately 4.07 pounds
- Product Dimensions: 6.1"D x 4.92"W x 3.54"H
- Display Type: Digital (referring to the temperature scale on the knob)
- UPC: 791107826807
- Part Number: CS1452S
Warranty and Support
The Preciva Wood Burning Station 939 III comes with a one-year product warranty for the USA. For technical support or any inquiries, please contact our customer service team. We offer 24-hour support to assist you with any issues or questions you may have.
For warranty claims or support, please refer to the contact information provided in your product packaging or visit the official Preciva website.
Ask a question about this manual
Ask about setup, troubleshooting, compatibility, parts, safety, or missing instructions. Manuals+ will review the question and use this page’s manual context to help answer it.