
1. Introduction
This manual provides detailed instructions for the safe installation, operation, and maintenance of your UOFUS Farmhouse 5-Light Semi Flush Mount Ceiling Light Fixture, Model D-1018. Please read this manual thoroughly before beginning installation and retain it for future reference.
2. Safety Information
WARNING: Risk of Electric Shock. Disconnect power at the fuse box or circuit breaker before installation or servicing.
- Ensure all electrical connections comply with local codes and ordinances, as well as the National Electric Code (NEC).
- Consult a qualified electrician if you are unsure about the installation process.
- Handle the fixture with care to avoid damage.
- Do not exceed the maximum wattage specified for the bulbs (60W per bulb).
- This fixture is designed for indoor use only.
3. Package Contents
Verify that all components are present before discarding packaging materials.
- 1 x UOFUS 5-Light Semi Flush Mount Ceiling Light Fixture (Model D-1018)
- Mounting Hardware (screws, wire nuts, mounting bracket)
- Instruction Manual
- Note: E26 bulbs are not included and must be purchased separately.
4. Specifications
| Feature | Detail |
|---|---|
| Brand | UOFUS |
| Model Number | D-1018 |
| Product Dimensions | 16.62"L x 16.62"W x 5.9"H |
| Color | Matte Black and Gold |
| Material | Metal |
| Style | Mid-Century Modern / Farmhouse |
| Light Fixture Form | Close to Ceiling |
| Bulb Base | E26 |
| Number of Light Sources | 5 |
| Maximum Wattage | 60 Watts per bulb |
| Voltage | 110 Volts |
| Special Feature | Dimmable (with compatible bulbs and dimmer switch, not included) |
| Installation Type | Semi Flush Mount |
| Indoor/Outdoor Usage | Indoor |
Product dimensions: 16.92 inches (length) x 5.9 inches (width) x 5.9 inches (height).

Figure 4.1: Diagram showing the dimensions of the UOFUS 5-Light Semi Flush Mount Ceiling Light Fixture.
5. Setup and Installation
Follow these steps carefully for proper installation. It is recommended to have two people for installation.
- Prepare for Installation: Turn off power at the circuit breaker or fuse box. Ensure the power is completely disconnected before proceeding.
- Mounting Bracket Installation: Attach the mounting bracket to the junction box in the ceiling using the provided screws.
- Assemble Lamp Arms: Carefully thread the lamp arms onto the central body of the fixture. Ensure they are securely tightened.
- Wiring: Connect the fixture's wires to the corresponding wires in the junction box (black to black, white to white, ground to ground) using wire nuts. Ensure all connections are secure.
- Secure Fixture: Carefully push the fixture up to the ceiling, aligning the holes in the canopy with the mounting bracket. Secure the fixture to the mounting bracket with the provided screws.
- Install Bulbs: Screw E26 base bulbs (not included) into each of the five sockets. Do not exceed 60 watts per bulb.
- Restore Power: Turn the power back on at the circuit breaker or fuse box.

Figure 5.1: Visual guide for the installation process, showing steps from mounting to bulb insertion.

Figure 5.2: Close-up details of the fixture's components, including the baked ceiling tray, thickened lamp body, and E26 universal lamp head.
6. Operating Instructions
Once installed and powered, the UOFUS 5-Light Semi Flush Mount Ceiling Light Fixture operates like any standard ceiling light.
- Turning On/Off: Use your existing wall switch to control the light fixture.
- Dimmable Feature: This fixture is dimmable. To utilize this feature, you must use dimmable E26 bulbs and a compatible dimmer switch (both sold separately).
- Bulb Compatibility: The fixture is compatible with various E26 base bulbs, including incandescent, halogen, and LED.
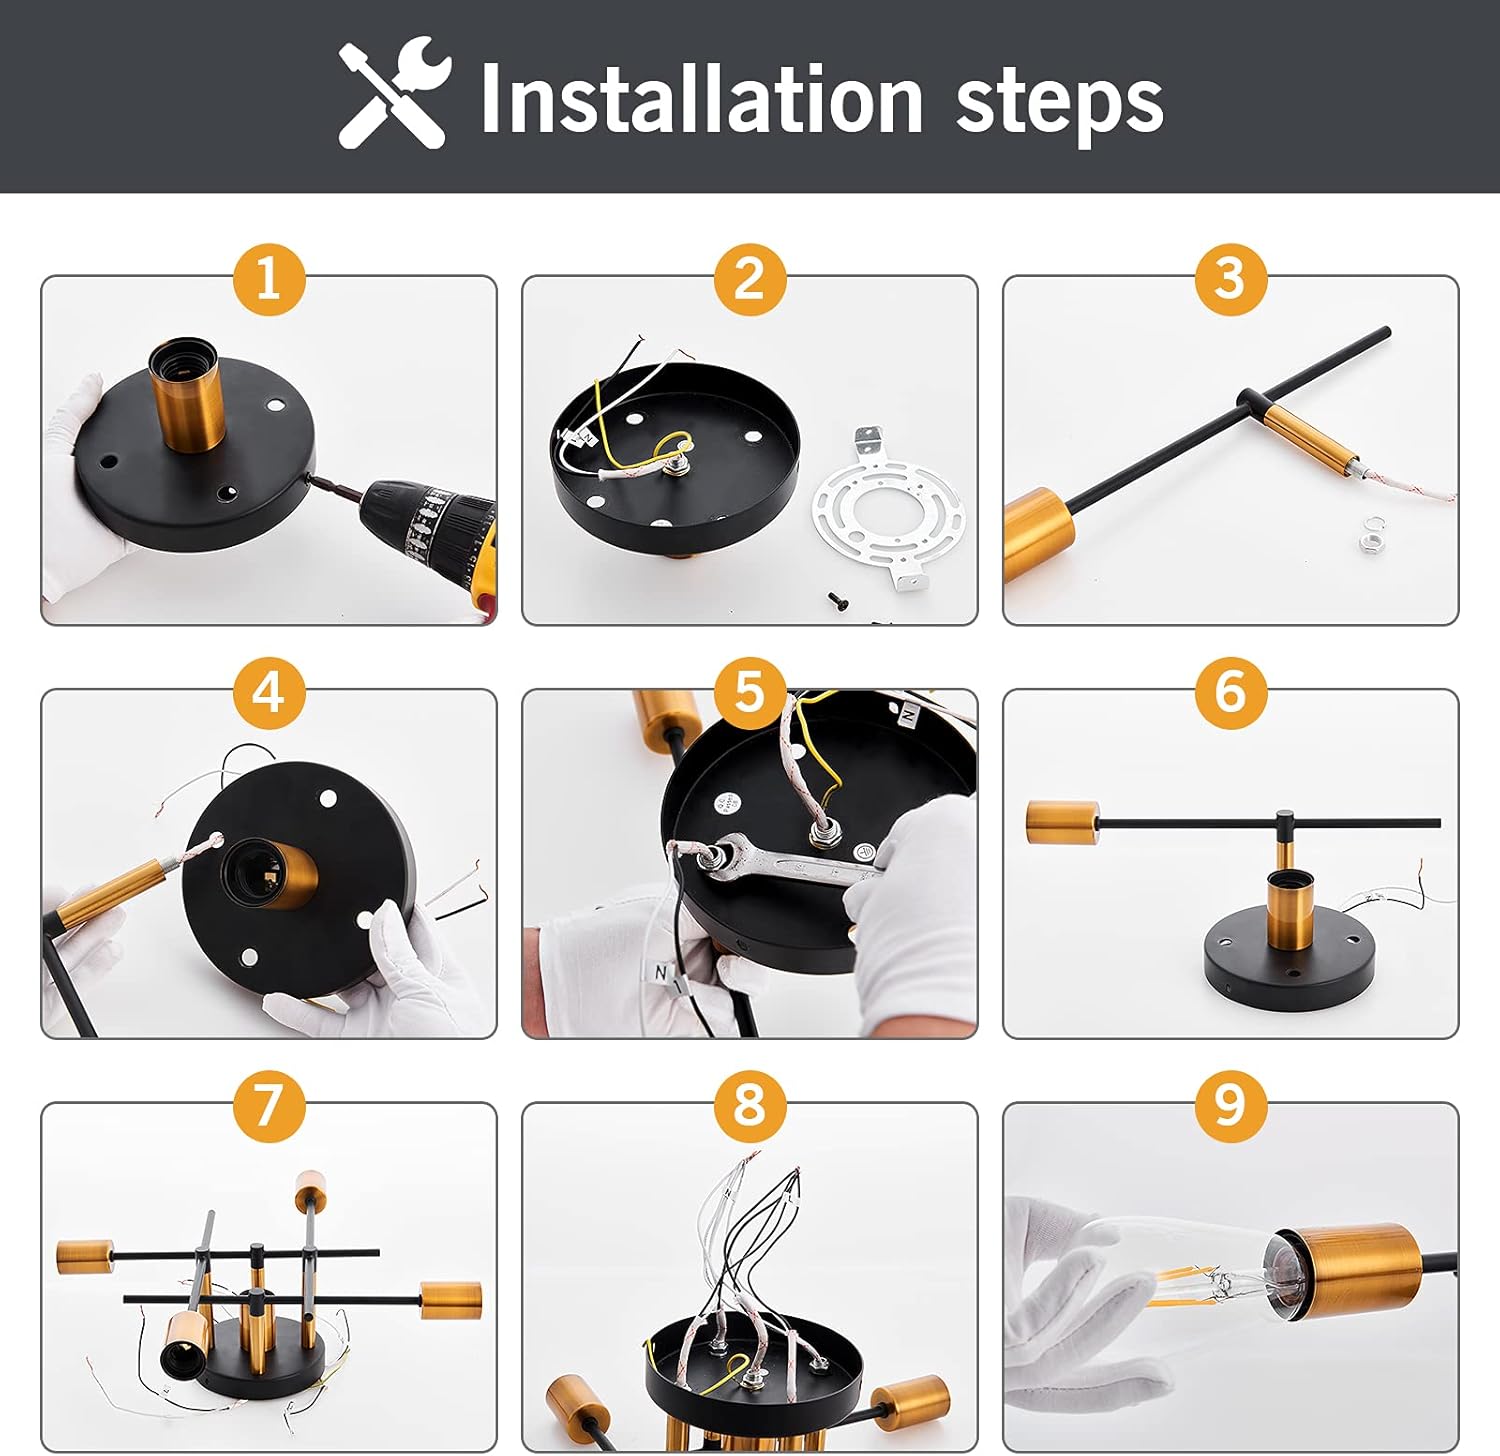
Figure 6.1: Images demonstrating the light fixture in both the "on" and "off" states, and from different angles.

Figure 6.2: Illustration of various E26 bulb types compatible with the fixture, highlighting energy saving and dimmable options.
7. Maintenance
Regular maintenance will help preserve the appearance and functionality of your light fixture.
- Cleaning: Disconnect power before cleaning. Wipe the fixture with a soft, dry cloth. Do not use abrasive cleaners or solvents, as they may damage the finish.
- Bulb Replacement: Ensure power is off before replacing bulbs. Allow bulbs to cool completely before touching. Screw in new E26 bulbs, ensuring they do not exceed 60 watts.
- Inspection: Periodically check all connections and mounting hardware to ensure they remain secure.
8. Troubleshooting
If you encounter issues with your light fixture, refer to the following common problems and solutions:
| Problem | Possible Cause(s) | Solution |
|---|---|---|
| Light does not turn on |
|
|
| Some bulbs do not light up |
|
|
| Light flickers |
|
|
If the problem persists after trying these solutions, please contact customer support.
9. Warranty Information
UOFUS products are manufactured to high-quality standards. This product is covered by a standard limited warranty against defects in materials and workmanship. Please refer to the manufacturer's official website or contact customer support for specific warranty terms and conditions.
10. Customer Support
For any product-related inquiries, technical assistance, or warranty claims, please contact UOFUS customer support. We are committed to providing solutions within 24 hours.
Contact Information: Refer to the contact details provided on the product packaging or the official UOFUS website.