1. Introduction
This manual provides essential information for the safe and effective use of your STIGMA Rotary Tattoo Machine Short Pen EM146-3. Please read it thoroughly before operation and retain it for future reference.

Image 1.1: STIGMA Rotary Tattoo Machine Short Pen EM146-3. This image displays the overall design of the tattoo machine.
2. Safety Information
Always prioritize safety when operating tattoo equipment. Failure to follow safety guidelines can result in injury or damage to the device.
- Ensure the machine is always operated under 12V to prevent damage to the power supply and the machine.
- Use only compatible and sterile tattoo cartridges.
- Maintain a clean and sterile working environment.
- Disconnect power before cleaning or performing any maintenance.
- Keep out of reach of children.
3. Product Overview
The STIGMA EM146-3 is a compact rotary tattoo machine designed for precision and stability. It features a coreless Germany motor and adjustable stroke options.
3.1 Key Components
- Machine Body: Durable metal construction.
- Coreless Germany Motor: Provides quiet and stable operation.
- RCA Connector: For power supply connection.
- Adjustable Stroke Cam: Includes 3.0mm, 3.5mm (default), and 4.0mm options.
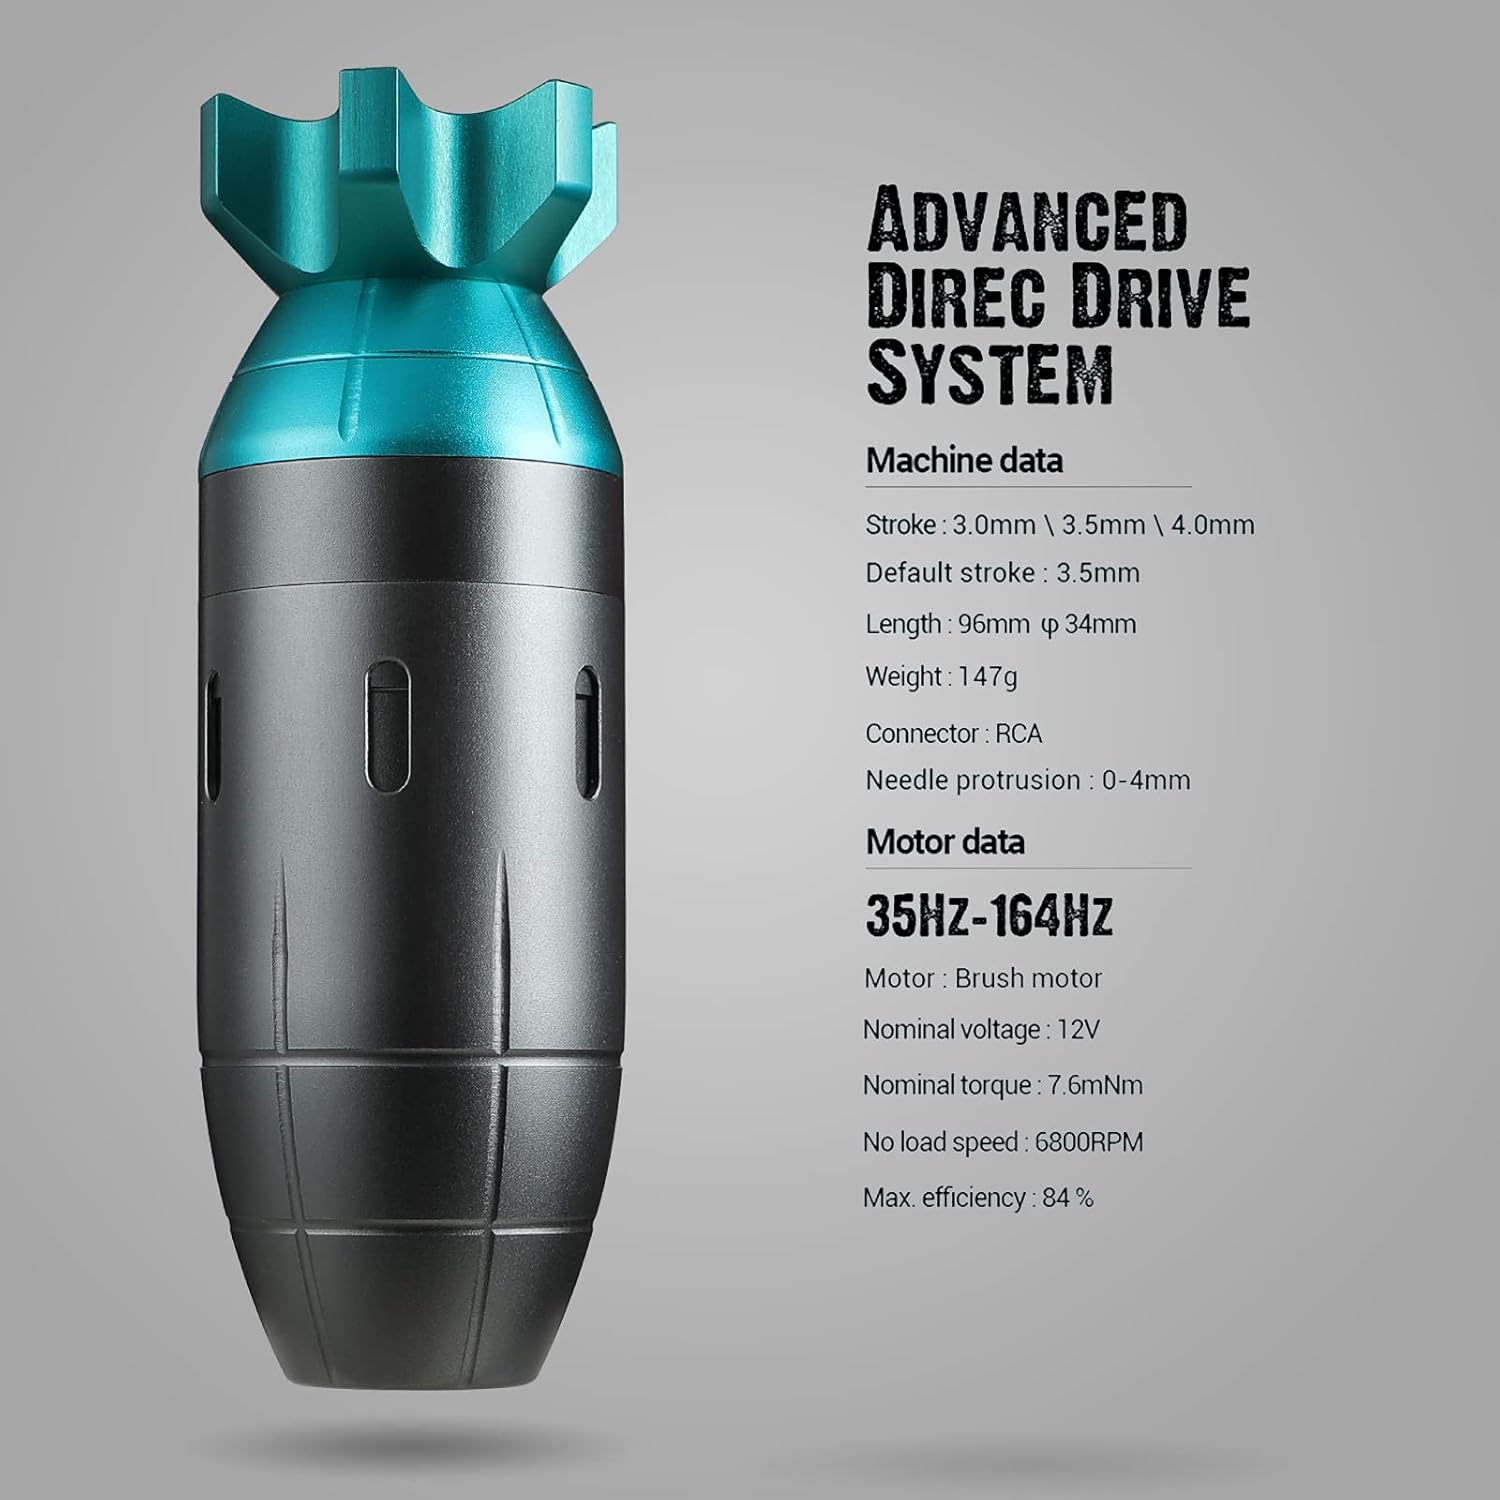
Image 3.1: Detailed view of the STIGMA EM146-3 with technical specifications. This image highlights the machine's data and motor data.

Image 3.2: Illustration of the interchangeable stroke cams (3.0mm, 3.5mm, 4.0mm) for stroke adjustment.
4. Setup
Follow these steps to set up your STIGMA EM146-3 tattoo machine:
- Prepare Your Workspace: Ensure your work area is clean, sterile, and well-lit.
- Connect Power: Attach the RCA cord to the machine's RCA connector and to a compatible power supply.
- Install Cartridge: Gently insert a sterile tattoo cartridge needle into the machine's grip until it clicks into place.
- Adjust Needle Protrusion: Rotate the grip to adjust the needle protrusion from 0-4mm according to your preference.
- Select Stroke (Optional): The machine comes with a default 3.5mm stroke. If you wish to change it, refer to the maintenance section for instructions on replacing the stroke cam with the included 3.0mm or 4.0mm options.

Image 4.1: A hand demonstrating how to hold the STIGMA tattoo machine during operation.
5. Operating Instructions
Operating the STIGMA EM146-3 is straightforward. Always ensure you have proper training and adhere to all local regulations for tattooing.
- Power On: Turn on your power supply.
- Set Voltage: The machine starts working at 5V. The optimal working voltage range is 8V to 12V. Adjust the voltage on your power supply to achieve the desired speed and needle force.
- Begin Tattooing: Apply the needle to the skin with appropriate technique. The machine is designed for smooth blending and easy saturation.
- Monitor Performance: The machine operates quietly and with minimal vibration, allowing for focused work.
Video 5.1: Official product video demonstrating the STIGMA CLIMBER rotary tattoo short pen in use. This video provides a visual guide to the machine's operation.
6. Maintenance
Proper maintenance ensures the longevity and optimal performance of your STIGMA EM146-3.
6.1 Cleaning
- After each use, disconnect the machine from the power supply.
- Remove and dispose of the used cartridge needle safely.
- Wipe down the exterior of the machine with a suitable disinfectant solution. Avoid submerging the machine in liquids.
- Ensure all surfaces are dry before storage.
6.2 Stroke Cam Replacement
To change the stroke cam:
- Carefully disassemble the machine according to the manufacturer's guidelines (if provided, otherwise consult a professional).
- Locate the existing stroke cam.
- Remove the current cam and replace it with the desired 3.0mm or 4.0mm cam.
- Reassemble the machine, ensuring all components are securely in place.

Image 6.1: Close-up of a stroke cam, illustrating the component responsible for adjusting needle stroke length.
7. Troubleshooting
If you encounter issues with your STIGMA EM146-3, refer to the following common problems and solutions:
| Problem | Possible Cause | Solution |
|---|---|---|
| Machine not turning on | Loose power connection, faulty power supply, machine damage. | Check RCA cable connection. Test with a different power supply. If issues persist, contact support. |
| Machine running inconsistently | Low voltage, worn-out motor, debris in mechanism. | Increase voltage within the recommended range (8V-12V). Ensure machine is clean. Contact support if motor issues are suspected. |
| Excessive vibration or noise | Loose components, damaged motor, incorrect cartridge installation. | Ensure cartridge is properly seated. Check for any loose parts. If noise persists, contact support. |
8. Specifications
Technical details for the STIGMA Rotary Tattoo Machine Short Pen EM146-3:
- Stroke: 3.0mm, 3.5mm (default), 4.0mm (interchangeable cams included)
- Length: 96mm
- Diameter: 34mm
- Weight: 147g
- Connector: RCA
- Needle Protrusion: 0-4mm
- Motor Type: Coreless Germany Motor (Brush motor)
- Nominal Voltage: 12V
- Best Working Voltage: 8V-12V
- No-load Speed: 6800 RPM
- Max Efficiency: 84%
- Package Dimensions: 5.55 x 3.5 x 2.68 inches
- Package Weight: 12.28 ounces
9. Warranty and Support
The STIGMA Rotary Tattoo Machine Short Pen EM146-3 comes with a one-year warranty.
9.1 Warranty Information
For warranty claims or service, please retain your proof of purchase. The warranty covers manufacturing defects under normal use. Damage due to misuse, unauthorized modification, or operation outside recommended voltage (above 12V) is not covered.
9.2 Customer Support
For technical assistance, troubleshooting, or any questions regarding your STIGMA product, please contact STIGMA customer support through the retailer where the product was purchased or visit the official STIGMA website.
You can also visit the STIGMA Store on Amazon for more information and product resources.