mc-toolparts ZL-6231A
User Manual: ZL-6231A Incubator Controller Thermostat with Timer
Model: ZL-6231A | Brand: mc-toolparts
1. Introduction
This manual provides comprehensive instructions for the installation, operation, and maintenance of the ZL-6231A Incubator Controller Thermostat with Timer. This device is designed to precisely control temperature and timing functions, making it suitable for various applications requiring accurate environmental regulation, such as incubators.
2. Product Overview
The ZL-6231A is a robust and reliable replacement part for incubator systems. It integrates temperature control and timing capabilities into a single unit, featuring a clear digital display for current temperature readings and intuitive buttons for parameter adjustment. Its design emphasizes durability and high quality for consistent performance.

Figure 2.1: Front view of the ZL-6231A Incubator Controller, showing the digital display, control buttons (P, Up, Down, S), and the attached temperature sensor cable.
3. Key Features
- Precise temperature control and timing functions.
- Clear digital display for easy monitoring.
- Intuitive button interface for parameter settings.
- Durable construction for long-term reliability.
- Designed as a direct replacement part for compatible systems.
- Includes a temperature sensor for accurate readings.
4. Package Contents
Upon opening the package, verify that all components are present and undamaged:
- 1 x ZL-6231A Incubator Controller Thermostat with Timer
- 1 x Temperature Sensor (integrated or separate, as pictured)
Note: The real color of the item may be slightly different from the pictures shown on the website due to monitor brightness and light conditions.
5. Setup and Installation
Before installation, ensure the power supply is disconnected from the incubator system. Always compare the replacement part with your original unit to confirm compatibility.
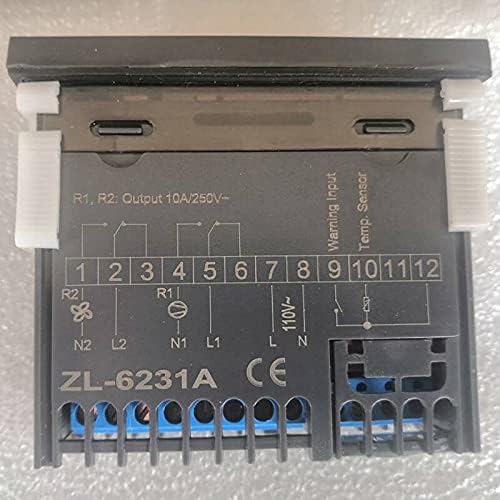
Figure 5.1: Rear view of the ZL-6231A Incubator Controller, detailing the wiring terminals (1-12) and the integrated schematic diagram for electrical connections.
5.1 Wiring Instructions
Refer to the wiring diagram located on the back of the ZL-6231A unit (Figure 5.1) for correct electrical connections. Ensure all connections are secure and comply with local electrical codes.
- Power Input: Connect the main power supply (e.g., 110V or 220V as indicated on the unit) to the designated terminals (L1, N1).
- Output Relays (R1, R2): These terminals (1-6) are for connecting heating elements, fans, or other controlled devices. R1 and R2 are typically rated for 10A/250V.
- Temperature Sensor: Connect the temperature sensor cable to the "Temp. Sensor" terminals (10, 11). Ensure correct polarity if specified.
- Warning Input: If applicable, connect external warning signals to the "Warning Input" terminals (8, 9).
WARNING: Incorrect wiring can cause damage to the unit or pose electrical hazards. If you are unsure about wiring, consult a qualified electrician.
6. Operating Instructions
Once installed and powered on, the ZL-6231A will display the current temperature. Use the control buttons to set desired parameters.
6.1 Button Functions
- P (Program/Set): Enters programming mode to adjust settings. Pressing it repeatedly cycles through parameters.
- ▲ (Up Arrow): Increases the value of the selected parameter.
- ▼ (Down Arrow): Decreases the value of the selected parameter.
- S (Save/Confirm): Confirms the selected value and saves the setting.
6.2 Setting Temperature
- Press the P button to enter the temperature setting mode. The display will likely show a flashing set point.
- Use the ▲ or ▼ buttons to adjust the desired temperature.
- Press the S button to confirm and save the new temperature setting.
6.3 Setting Timer (if applicable)
The ZL-6231A includes a timer function. Specific timer settings (e.g., delay, duration) will be accessible through the programming mode.
- Press the P button multiple times until the timer parameter (e.g., 't1', 't2') is displayed.
- Use the ▲ or ▼ buttons to adjust the timer value (e.g., hours, minutes).
- Press the S button to confirm and save the timer setting.
Consult the original equipment manual or specific ZL-6231A programming guide for detailed parameter codes and advanced settings.
7. Maintenance
Regular maintenance ensures the longevity and accurate operation of your ZL-6231A controller.
- Cleaning: Gently wipe the unit's exterior with a soft, dry cloth. Do not use abrasive cleaners or solvents. Ensure the unit is powered off before cleaning.
- Sensor Care: Keep the temperature sensor clean and free from debris. Avoid bending or damaging the sensor cable.
- Connections: Periodically check all electrical connections to ensure they remain secure.
8. Troubleshooting
This section addresses common issues you might encounter with the ZL-6231A controller.
| Problem | Possible Cause | Solution |
|---|---|---|
| No power/Display off | No power supply; Loose wiring; Blown fuse (external) | Check power source; Verify all wiring connections; Check external fuse. |
| Incorrect temperature reading | Sensor faulty; Sensor not properly connected; Sensor placed incorrectly | Check sensor connection; Replace sensor if faulty; Ensure sensor is in the correct measurement environment. |
| Controller not heating/cooling | Output relay issue; Wiring to heating/cooling element faulty; Set temperature not reached | Verify output wiring; Check heating/cooling element; Adjust set temperature. |
| Buttons unresponsive | Temporary software glitch; Physical button damage | Power cycle the unit; If issue persists, contact support. |
If the problem persists after attempting these solutions, please contact customer support.
9. Specifications
| Parameter | Value |
|---|---|
| Model Number | ZL-6231A |
| Manufacturer | mc-toolparts |
| Part Number | TPS-TNH-240321-25676 |
| Item Package Quantity | 1 |
| ASIN | B0948VB8MK |
| Date First Available | May 6, 2021 |
| Output Relay Rating | 10A/250V (R1, R2) |
| Type | Hand Tool Parts (Black) |
10. Warranty and Support
This product is manufactured by mc-toolparts. For specific warranty information, please refer to the terms provided at the time of purchase or contact the seller directly. As a replacement part, warranty terms may vary.
For technical support, troubleshooting assistance beyond this manual, or inquiries regarding replacement parts, please contact your original point of purchase or the manufacturer, mc-toolparts, through their official channels.
Related Documents - ZL-6231A
 |
AutomationDirect BRX 36/36E MPUs: Programmable Logic Controllers Detailed specifications, features, and accessories for the AutomationDirect BRX 36/36E Micro PLC Units (MPUs). Covers CPU and I/O specifications, programming software, wiring solutions, and mounting guidelines. |
 |
Automotive Technical Index - Wiring Diagrams and System References A comprehensive alphabetical index of automotive system references, wiring diagrams, and technical terms, including codes and page numbers, for service and repair. |
 |
Meross MSG100 Smart Garage Door Opener Compatibility Guide Discover compatible garage door opener brands and models for your Meross MSG100 Smart Garage Door Opener. This comprehensive guide helps ensure seamless integration with a wide range of openers. |
 |
Arctic Cat Snowmobile Carburetor Flange Compatibility List A comprehensive list of Arctic Cat snowmobile models and their compatible carburetor flange part numbers and related identifiers. This guide helps identify the correct parts for various Arctic Cat snowmobile engines from 1973 to 2024. |
 |
Monroe Mae Catalog: Sustainable Leather, Wood, and Wool Felt Products Explore the Monroe Mae catalog featuring handcrafted leather, wood, and wool felt items including earrings, keychains, ornaments, coasters, and more, all made sustainably in the USA. |
 |
Medaval Blood Pressure Monitor Ratings by Stride BP: Clinical Validation Guide Explore Medaval's comprehensive clinical validation ratings for blood pressure monitors (BPMs) recommended by Stride BP. Find accurate, certified devices categorized by star ratings and specific population suitability. |
Ask a question about this manual
Ask about setup, troubleshooting, compatibility, parts, safety, or missing instructions. Manuals+ will review the question and use this page’s manual context to help answer it.