1. Introduction
This manual provides essential information for the safe and effective use of your Elifecity HRDM-01 Home Radon Detector. Please read it thoroughly before operating the device.
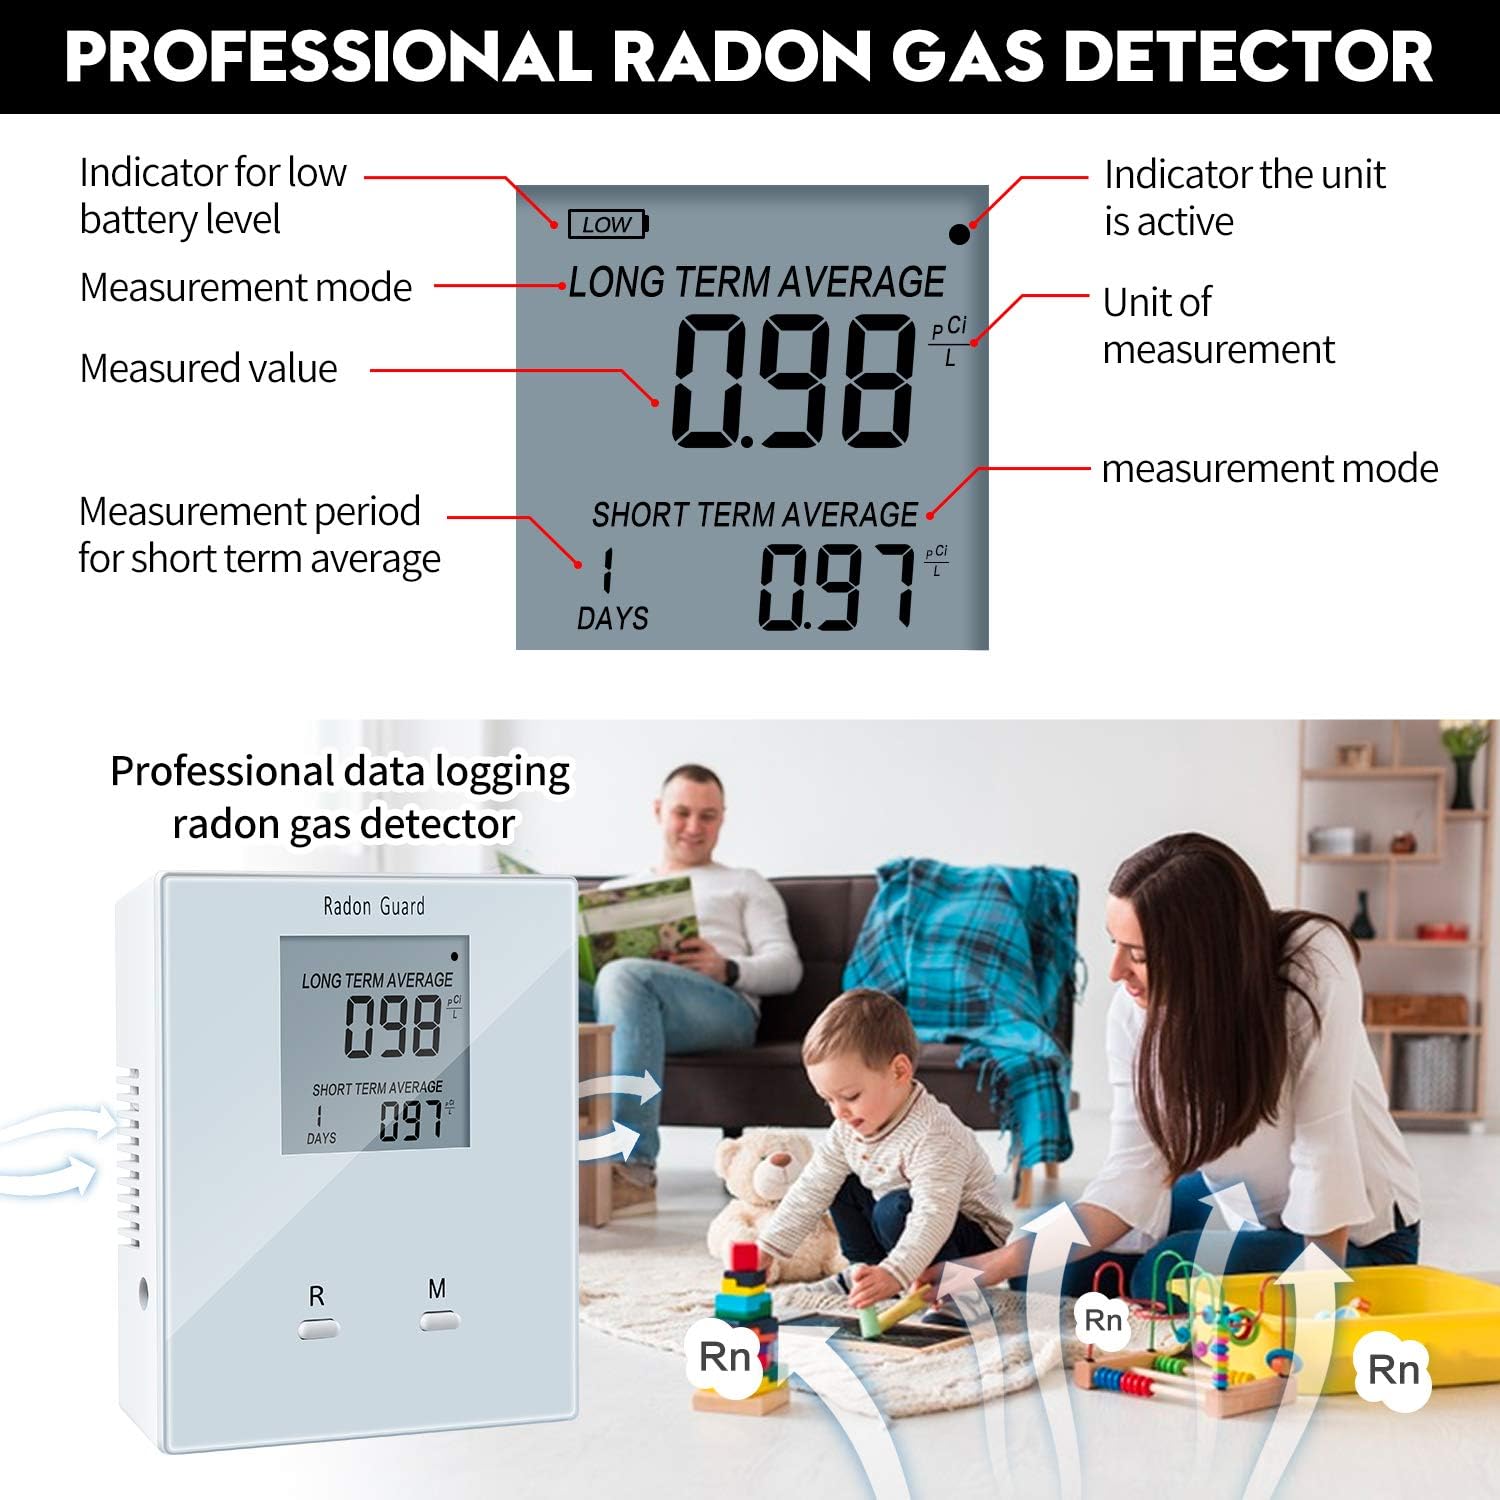
The Elifecity HRDM-01 is a state-of-the-art measuring instrument designed to monitor radon gas levels in various indoor environments. It provides both long-term and short-term average concentrations, helping you assess and manage radon exposure.
What is Radon?
Radon is a naturally occurring radioactive gas that is colorless, odorless, and tasteless. It originates from the radioactive decay of uranium in soil, rock, and water, and can enter buildings through cracks in foundations, floor-wall joints, and other openings. Prolonged exposure to elevated radon levels is a significant health risk.
2. Safety Information
- Do not attempt to open or modify the device. This may void the warranty and compromise its accuracy.
- Keep the device away from direct sunlight, extreme temperatures, and high humidity.
- Ensure the device is placed in a stable location where it will not be easily knocked over.
- Use only the specified battery type (AA batteries, not included).
- Dispose of batteries according to local regulations.
- This device is for informational purposes regarding radon levels. Consult with certified radon professionals for mitigation strategies if high levels are detected.
Important Note on Initial Readings
For the most accurate initial reading, allow the device to operate for a minimum of 24 hours before interpreting the results. Radon levels fluctuate daily, and a longer monitoring period provides a more representative average.
3. Product Overview
The Elifecity HRDM-01 Radon Detector features a clear LCD screen displaying radon concentrations and operational status.
Device Components
- LCD Display: Shows long-term average, short-term average, and measurement period.
- "R" Button: Reset button.
- "M" Button: Mode button (for cycling through display modes, if applicable).
- Battery Compartment: Located on the back (requires AA batteries).
- Air Inlet Vents: For radon gas sampling.

4. Setup
Installing Batteries
- Locate the battery compartment on the back of the device.
- Open the battery compartment cover.
- Insert two AA batteries (not included), ensuring correct polarity (+/-).
- Close the battery compartment cover securely.
The device will power on automatically once batteries are installed.
Initial Placement
For optimal results, place the radon detector in a central location within the room you wish to monitor.
- Place it at least 20 inches (50 cm) from the floor and 6 inches (15 cm) from walls.
- Avoid placing it near drafts, vents, windows, or doors that are frequently opened.
- Do not place it in areas of high humidity, such as bathrooms or laundry rooms.
- Keep it away from direct heat sources or direct sunlight.

5. Operation
Powering On/Off
The device powers on automatically when batteries are inserted. There is no manual power off button; remove batteries to power off.
Understanding the Display
The LCD screen displays two primary readings:
- Long Term Average: This value represents the average radon concentration over the entire monitoring period since the last reset. This is the most reliable indicator of your home's average radon level.
- Short Term Average: This value represents the average radon concentration over the last 24 hours. This reading updates daily and is useful for observing daily fluctuations or the immediate impact of mitigation efforts.
The unit of measurement is pCi/L (picocuries per liter).
Resetting the Device
To reset all stored data and begin a new measurement period, press and hold the "R" (Reset) button for approximately 5 seconds until the display clears.
Monitoring Radon Levels
The device continuously monitors radon levels. Readings will appear on the display after approximately 24 hours of initial operation.
It is recommended to monitor radon levels for an extended period (e.g., several weeks to months) to get a comprehensive understanding of your home's radon profile, as levels can vary significantly due to weather, ventilation, and other factors.

6. Maintenance
Cleaning
Wipe the device with a soft, dry cloth. Do not use abrasive cleaners or solvents. Ensure no liquid enters the air inlet vents.
Battery Replacement
When the low battery indicator appears on the display, replace the AA batteries promptly to ensure continuous monitoring.
Storage
If storing the device for an extended period, remove the batteries to prevent leakage. Store in a cool, dry place.
7. Troubleshooting
| Problem | Possible Cause | Solution |
|---|---|---|
| Display is blank | No batteries or incorrect battery installation | Install new AA batteries, ensuring correct polarity. |
| Display shows dashes (----) | Device is in initial measurement phase | Wait for at least 24 hours for initial readings to appear. |
| Readings seem unusually high or low | Improper placement or environmental factors | Review placement guidelines. Ensure no strong drafts or extreme temperatures. Allow for longer monitoring periods for stable averages. |
| Low battery indicator | Batteries are low | Replace with new AA batteries. |
If problems persist, contact customer support.
8. Specifications
| Feature | Detail |
|---|---|
| Model | HRDM-01 |
| Sampling Method | Passive radon diffusion chamber |
| Detection Method | Alpha spectrometry |
| Power Supply | 2 x AA Batteries (not included) |
| Measurement Range | 0 - 9999 pCi/L |
| Accuracy | ± 5% ± 0.14 pCi/L |
| Operation Temperature | 32 - 104°F (0 - 40°C) |
| Relative Humidity | Up to 85% |
| Dimensions | 2 x 1 x 1 inches (approx. 5.1 x 2.5 x 2.5 cm) |
| Weight | 4.6 ounces (approx. 130 grams) |

9. Warranty and Support
For warranty information or technical support, please refer to the contact details provided with your product packaging or visit the official Elifecity website. Keep your purchase receipt as proof of purchase.