Introduction
This manual provides detailed instructions for the installation, operation, and maintenance of your ROVOGO RVG1861 Shower System. This complete system includes a 10-inch rain shower head, a 5-function handheld shower, and a tub spout, all finished in chrome. Please read these instructions carefully before installation and use to ensure proper function and longevity of your product.
Package Contents
Verify that all components listed below are present in your package:
- 1 x Brass Valve
- 1 x Handle
- 1 x Diverter Handle
- 1 x Trim Plate
- 1 x Brass Shower Arm
- 1 x Shower Arm Cover Plate
- 1 x 10-inch Rain Shower Head
- 1 x ABS Handheld Shower
- 1 x Brass Shower Holder Bracket
- 1 x Shower Holder Plate
- 1 x 59-inch Shower Hose
- 1 x Bathtub Spout
- 1 x User Manual
Setup and Installation
Professional installation is recommended. Ensure water supply is turned off before beginning installation.
1. Rough-in Valve Installation
The solid brass rough-in valve features NPT1/2 inch female threads for easy installation. It includes a Sedal ceramic cartridge for smooth control of water temperature and volume. The valve is designed for wall-mount installation.

Image: Components of the rough-in valve and trim kit. This image illustrates the brass valve body, the Sedal ceramic cartridge, and the external trim pieces including the handle, diverter knob, and trim plate.
Important Note on Valve Depth: When installing the rough-in valve, ensure its depth is precisely set relative to the finished wall surface. Incorrect depth can prevent the diverter knob from engaging properly with the stem. It is often recommended to set the valve slightly proud (1/4" to 1/2") of the finished wall, rather than flush, to allow for proper trim engagement. Consult a professional plumber for precise measurements and installation.
2. Shower Arm and Rain Shower Head Installation
Attach the 14-inch shower arm to the wall connection. The 10-inch rain shower head connects to the end of the shower arm. The shower head features an angle-adjustable design for optimal water coverage.
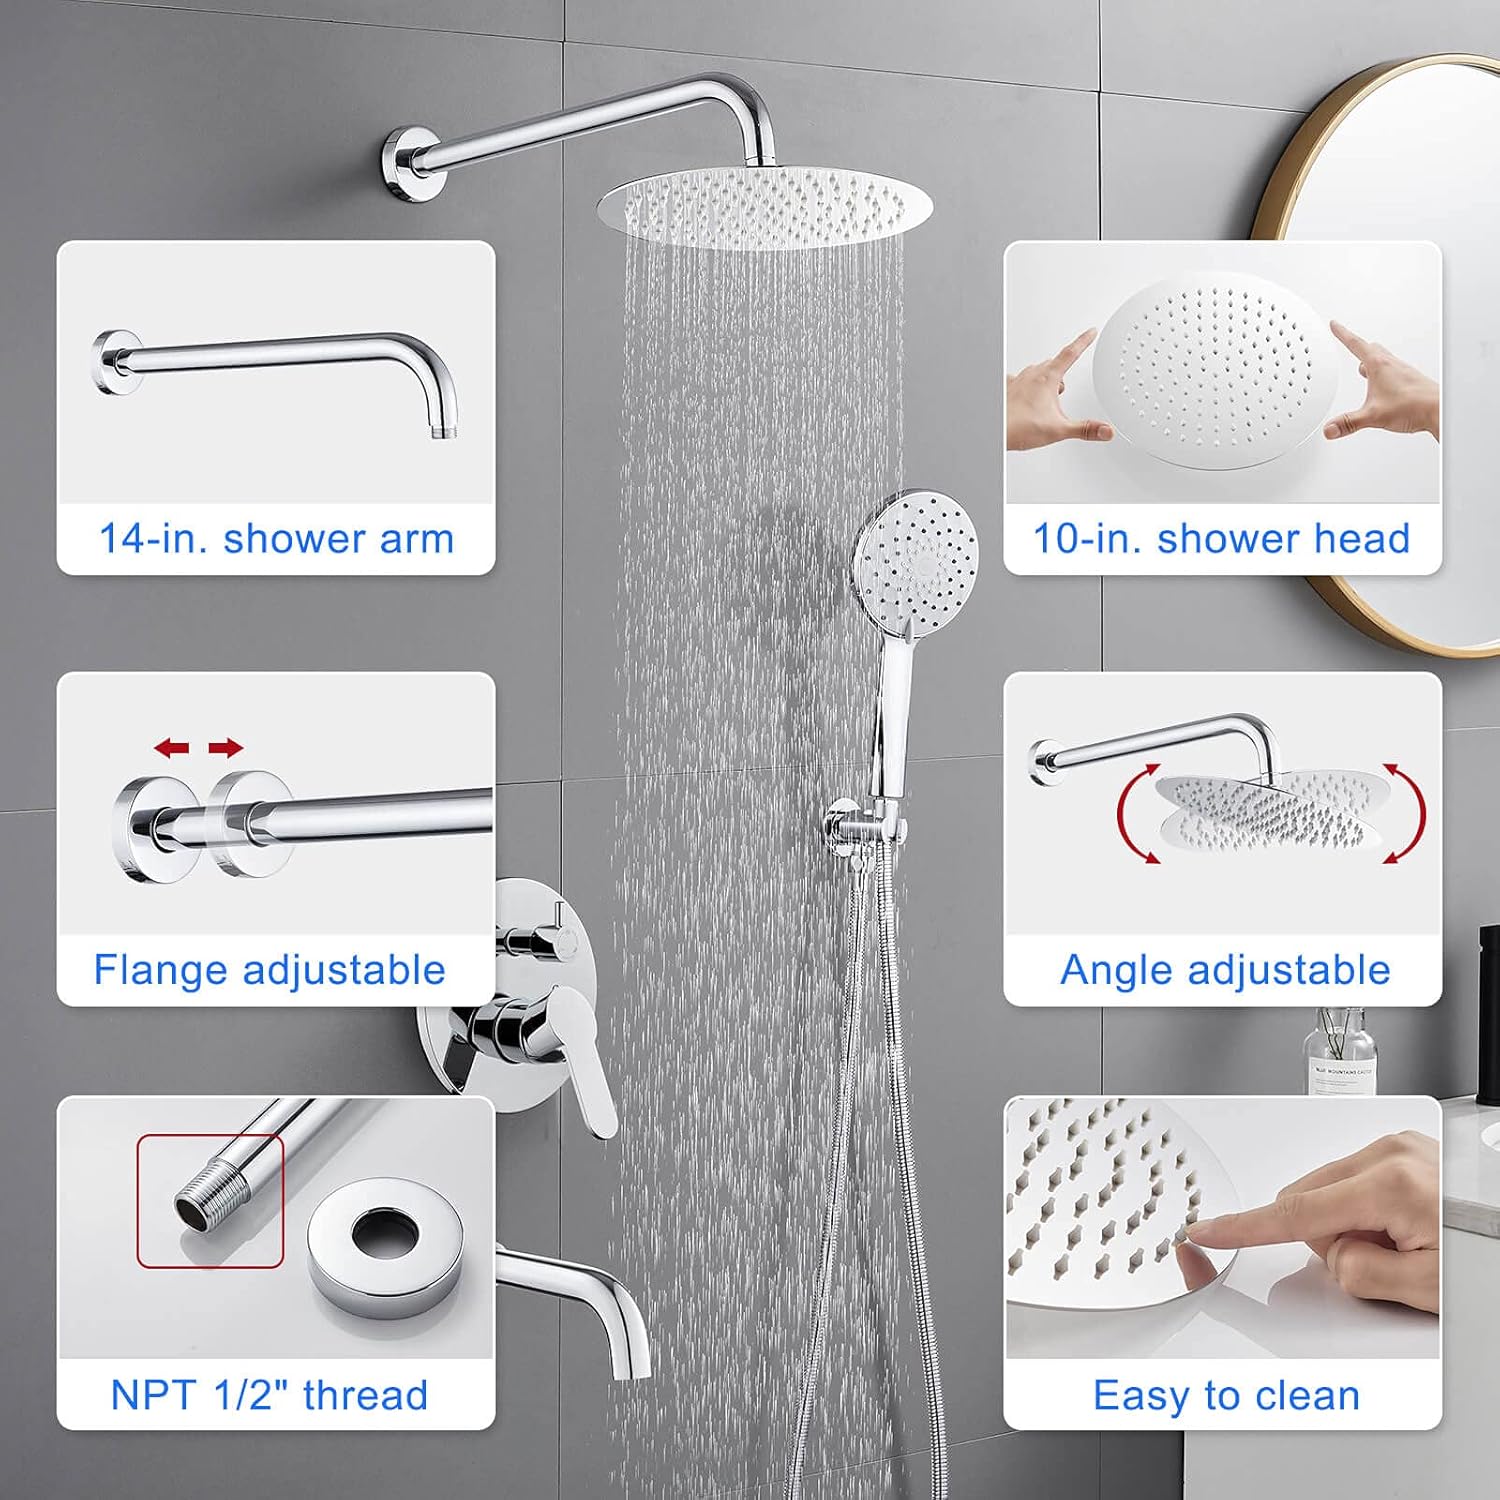
Image: Detailed view of the shower arm and rain shower head. This image highlights the dimensions of the shower arm and head, the adjustable flange, the NPT 1/2 inch thread connection, and the flexible, easy-to-clean nozzles on the shower head.
3. Handheld Shower and Tub Spout Installation
Install the brass shower holder bracket to the wall. Connect the 59-inch stainless steel shower hose to the handheld shower and the wall outlet. The tub spout, made of brass, should be securely installed below the main valve assembly.
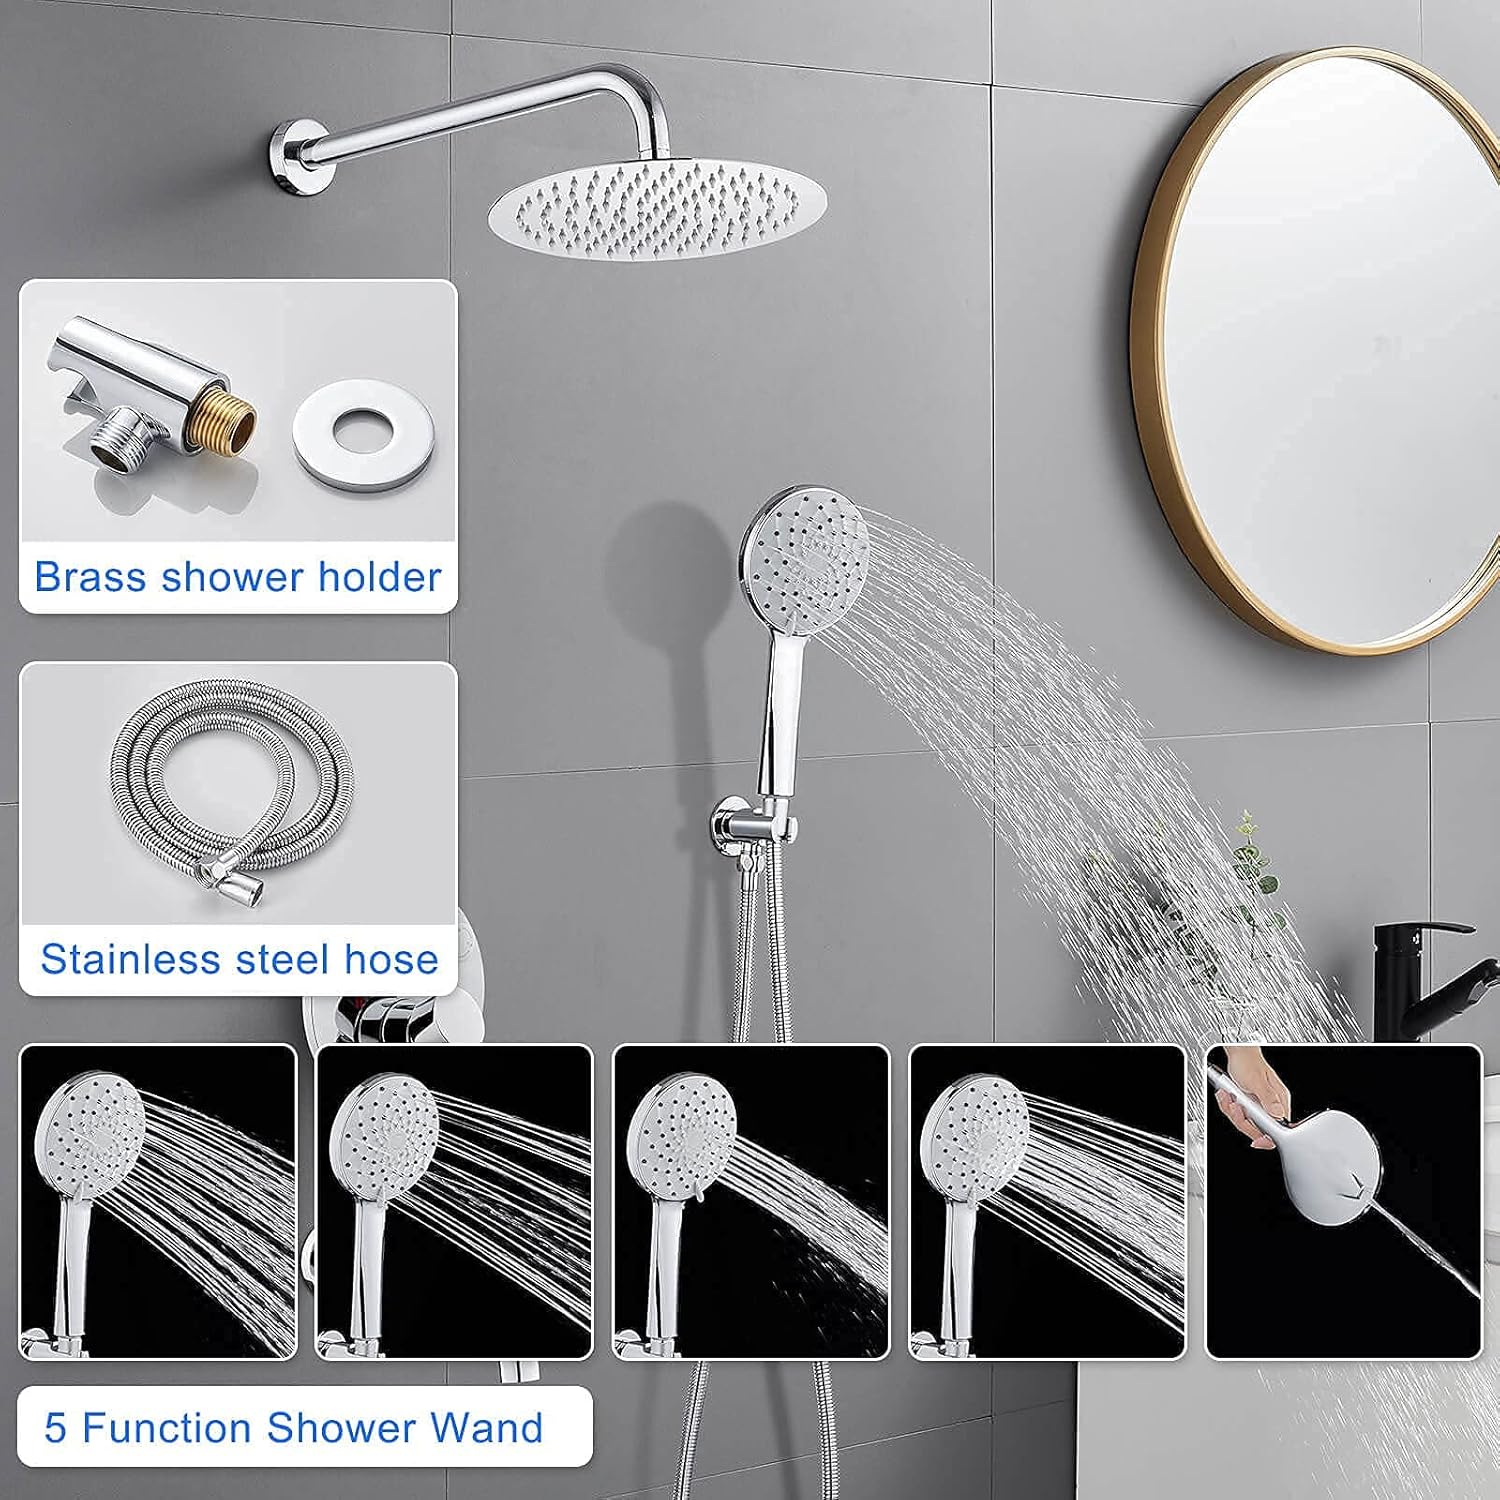
Image: Components of the handheld shower. This image displays the brass shower holder, the flexible stainless steel hose, and the handheld shower wand, illustrating its five distinct spray functions.

Image: Details of the tub spout. This image highlights the brass construction of the tub spout, the integrated honeycomb aerator for low noise, and its 8-inch reach.
Operating Instructions
Your ROVOGO RVG1861 shower system offers versatile water delivery options.
1. Water Flow and Temperature Control
The main handle controls both water flow (ON/OFF) and temperature. Rotate the handle to adjust the temperature from cold to hot. Pull the handle outwards to turn on the water and push it inwards to turn it off.
2. Diverter Function
The diverter knob allows you to switch between the three water outlets: the 10-inch rain shower head, the 5-function handheld shower, and the tub spout. Rotate the diverter knob to select your desired water source.
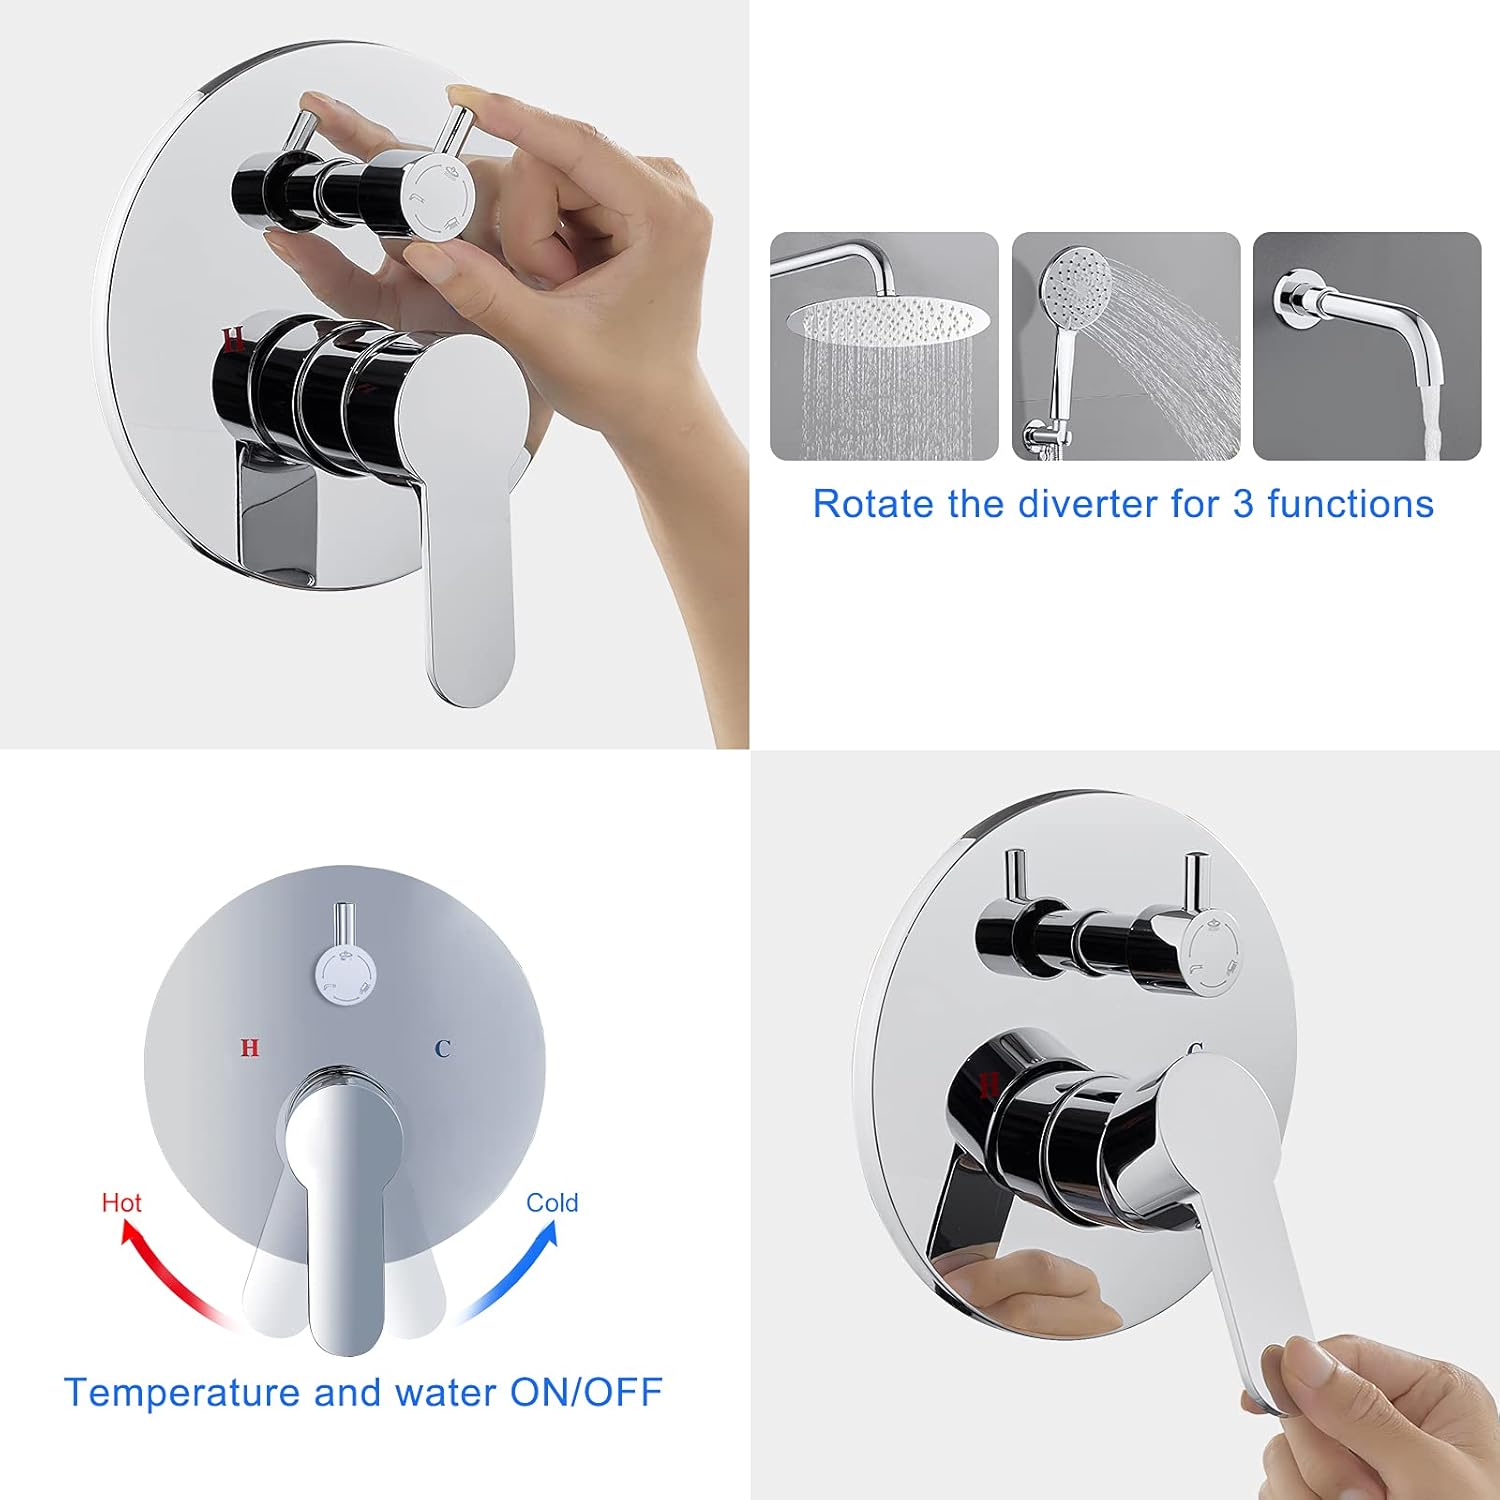
Image: Operation of the diverter and temperature control. This image demonstrates how to rotate the diverter knob to select between the rain shower, handheld shower, and tub spout, and how the main handle controls water temperature and flow.
3. Handheld Shower Functions
The handheld shower features five distinct spray settings. Adjust the spray pattern by rotating the shower head or pressing a button, depending on the specific design of your handheld unit. These settings provide options from a gentle mist to a powerful massage spray.
Maintenance
Regular maintenance will help preserve the appearance and functionality of your shower system.
1. Cleaning the Chrome Finish
Clean the chrome surfaces regularly with a soft cloth and mild soap or a non-abrasive cleaner specifically designed for chrome. Avoid using harsh chemicals, abrasive cleaners, or scouring pads, as these can damage the finish. Rinse thoroughly with water and dry with a soft cloth to prevent water spots.
2. Cleaning Shower Head Nozzles
The rain shower head and handheld shower nozzles are designed for easy cleaning. If mineral deposits build up, gently rub the rubber nozzles with your finger or a soft brush to dislodge them. For stubborn deposits, a solution of white vinegar and water can be used, applied with a soft cloth.
Troubleshooting
If you encounter issues with your shower system, refer to the following common problems and solutions:
| Problem | Possible Cause | Solution |
|---|---|---|
| Low Water Pressure | Clogged nozzles; partially closed shut-off valve; debris in the system. | Clean shower head nozzles. Ensure main water supply valves are fully open. Flush the system if debris is suspected. |
| Leaking from Shower Head/Handheld | Loose connections; worn washers/seals; damaged cartridge. | Check and tighten all connections. Replace worn washers or seals. If the leak persists, the ceramic cartridge may need replacement (contact support). |
| Diverter Not Switching Properly | Improper valve installation depth; debris in diverter mechanism; faulty diverter cartridge. | Verify rough-in valve depth relative to the finished wall. Clean any visible debris. If the issue persists, the diverter cartridge may be faulty (contact support). |
| Water Temperature Fluctuations | Issues with water heater; pressure imbalance; faulty thermostatic cartridge. | Check water heater settings. Ensure consistent water pressure. If problem persists, the cartridge may need inspection or replacement by a professional. |
If you cannot resolve the issue using the information above, please contact ROVOGO customer support.
Specifications
- Model Number: RVG1861
- Manufacturer: ROVOGO
- Color: Chrome
- Style: Round
- Finish: Chrome
- Material: Brass / 304 Stainless Steel / ABS Plastic
- Installation Method: Wall Mount
- Number of Handles: 2
- Handle Material: Brass
- Included Components: Handheld shower holder and hose, handheld shower, shower arm, rain shower head, valve and trim, tub spout
- Item Weight: 3.72 Kilograms
- Package Dimensions: 43.99 x 34.59 x 15.09 cm
Warranty and Support
ROVOGO provides the following support for your shower system:
- Quality Warranty: 5-year quality warranty (excluding finish scratches).
- Technical Support: Lifetime technical support.
For any issues or inquiries, please contact ROVOGO customer service. We aim to respond within 12 hours to ensure prompt resolution.