Galanz GRH1209BERM151
Galanz GRH1209BERM151 Retro Toaster Oven
Instruction Manual
1. Important Safety Information
Please read all instructions carefully before using this appliance. Failure to follow these instructions may result in electric shock, fire, or serious injury.
- Electrical Safety: Ensure the voltage rating on the appliance matches your household electrical supply. Do not immerse the cord, plug, or appliance in water or other liquid. Always unplug the appliance from the outlet when not in use and before cleaning.
- Heat Safety: This appliance generates heat during use. Do not touch hot surfaces. Use oven mitts or gloves when handling hot materials. Allow the appliance to cool completely before cleaning or storing.
- Placement: Place the toaster oven on a stable, heat-resistant surface, away from walls and other appliances to allow for proper ventilation. Do not operate near flammable materials such as curtains or paper.
- Supervision: Close supervision is necessary when any appliance is used by or near children.
- Maintenance: Do not operate any appliance with a damaged cord or plug, or after the appliance malfunctions or has been damaged in any manner.
2. Product Overview
2.1 Components
The Galanz Retro Toaster Oven comes with the following components:
- 1 x Toaster Oven Unit
- 1 x Baking & Roasting Pan
- 1 x Crumb Tray
- 1 x Oven Rack
- 1 x Power Cord

Image: The Galanz Retro Toaster Oven shown with its essential accessories: a baking and roasting pan, an oven rack, and a crumb tray, all designed for easy use and cleaning.
2.2 Controls and Features
The toaster oven features intuitive controls for easy operation and a clear view of your cooking progress.
- Temperature Control Knob: Adjusts cooking temperature from 200°F to 450°F in precise 5°F increments.
- Function Control Knob: Selects one of the 8 cooking programs.
- Time Control Knob: Sets the cooking duration.
- True Convection Cooking: Ensures even heat distribution for consistent results.
- Indicator Light: Illuminates when the oven is operating, providing better visibility without opening the door.
- Glass Door: Allows monitoring of food during cooking.
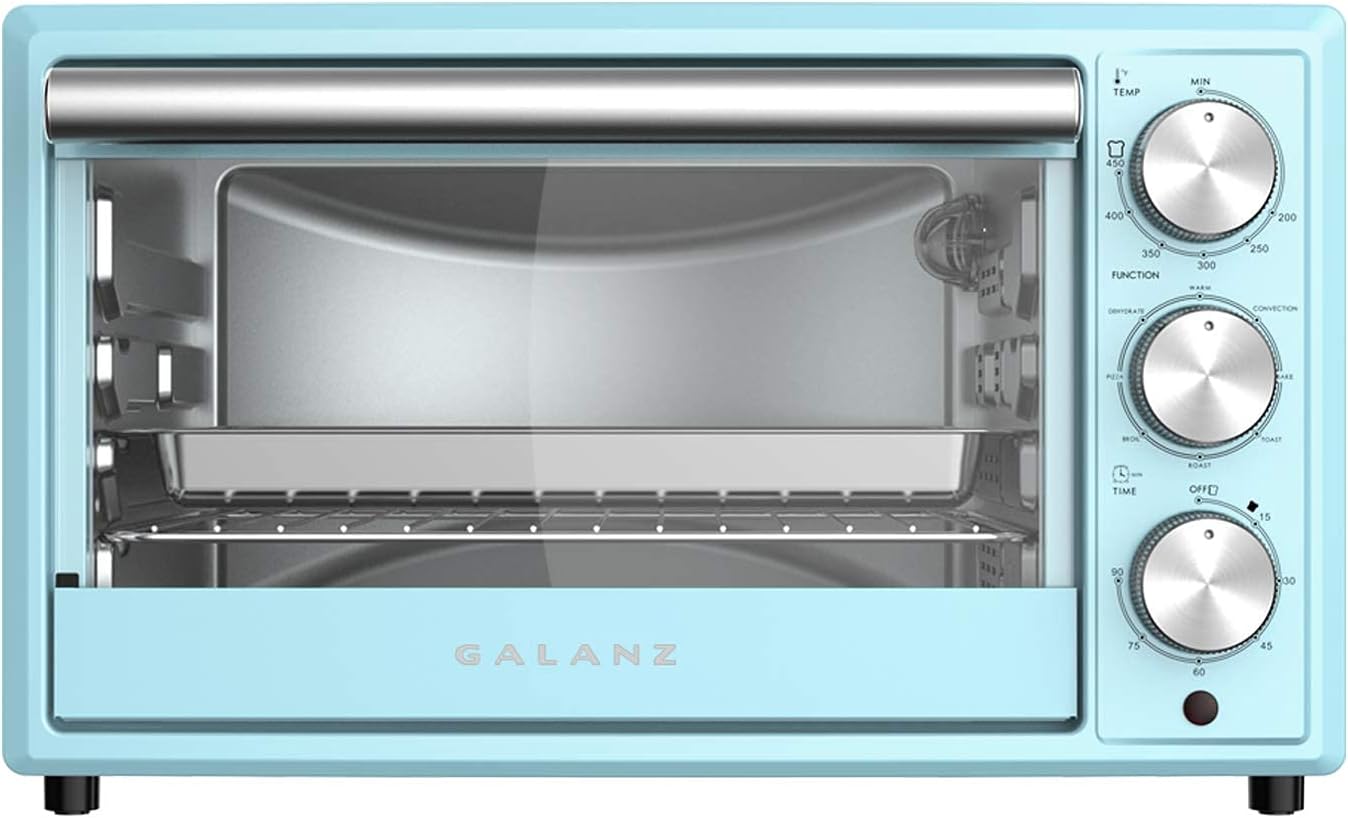
Image: A detailed front view of the Galanz Retro Toaster Oven, highlighting its three control knobs for temperature, function, and time, along with the clear glass door for monitoring.
3. Setup
- Unpacking: Carefully remove the toaster oven and all accessories from the packaging. Remove any protective film or packing materials from the unit.
- Placement: Place the toaster oven on a flat, stable, and heat-resistant surface. Ensure there is at least 4 inches (10 cm) of clearance on all sides and above the oven for proper ventilation. Do not place it directly under a cabinet.
- Initial Cleaning: Before first use, wipe the interior and exterior of the oven with a damp cloth. Wash the baking pan, oven rack, and crumb tray in warm, soapy water, rinse thoroughly, and dry completely.
- First Use Burn-Off: It is recommended to run the oven empty for about 15 minutes at 400°F (200°C) on the "Bake" setting before first use. This will help burn off any manufacturing oils and odors. A slight odor or smoke is normal during this process. Ensure the area is well-ventilated.
4. Operating Instructions
4.1 Cooking Programs
The Galanz Retro Toaster Oven offers 8 versatile cooking programs to suit various culinary needs:
- Bake: Ideal for cakes, cookies, and casseroles.
- Toast: Perfect for bread, bagels, and frozen waffles.
- Roast: Suitable for meats and vegetables.
- Broil: For browning, melting cheese, or cooking thin cuts of meat.
- Pizza: Optimized setting for baking pizzas.
- Dehydrate: For drying fruits, vegetables, and herbs.
- Keep Warm: Maintains food at a serving temperature.
- Convection: Utilizes a fan for faster and more even cooking, especially for baking and roasting.

Image: A visual representation of the eight distinct cooking functions available on the Galanz Toaster Oven, including options for baking, toasting, roasting, broiling, pizza, dehydrating, keeping warm, and convection cooking.
4.2 Setting Temperature and Time
- Place Food: Place food on the appropriate rack or pan inside the oven.
- Select Function: Turn the Function Control Knob to select the desired cooking program (e.g., Bake, Toast, Convection).
- Set Temperature: Turn the Temperature Control Knob to set the desired temperature. The range is 200°F to 450°F.
- Set Time: Turn the Time Control Knob to set the desired cooking duration. The oven will begin heating once the time is set.
- Monitoring: The indicator light will illuminate during operation. Use the glass door to monitor cooking progress.
- Completion: The oven will automatically turn off when the set time expires. Carefully remove food using oven mitts.
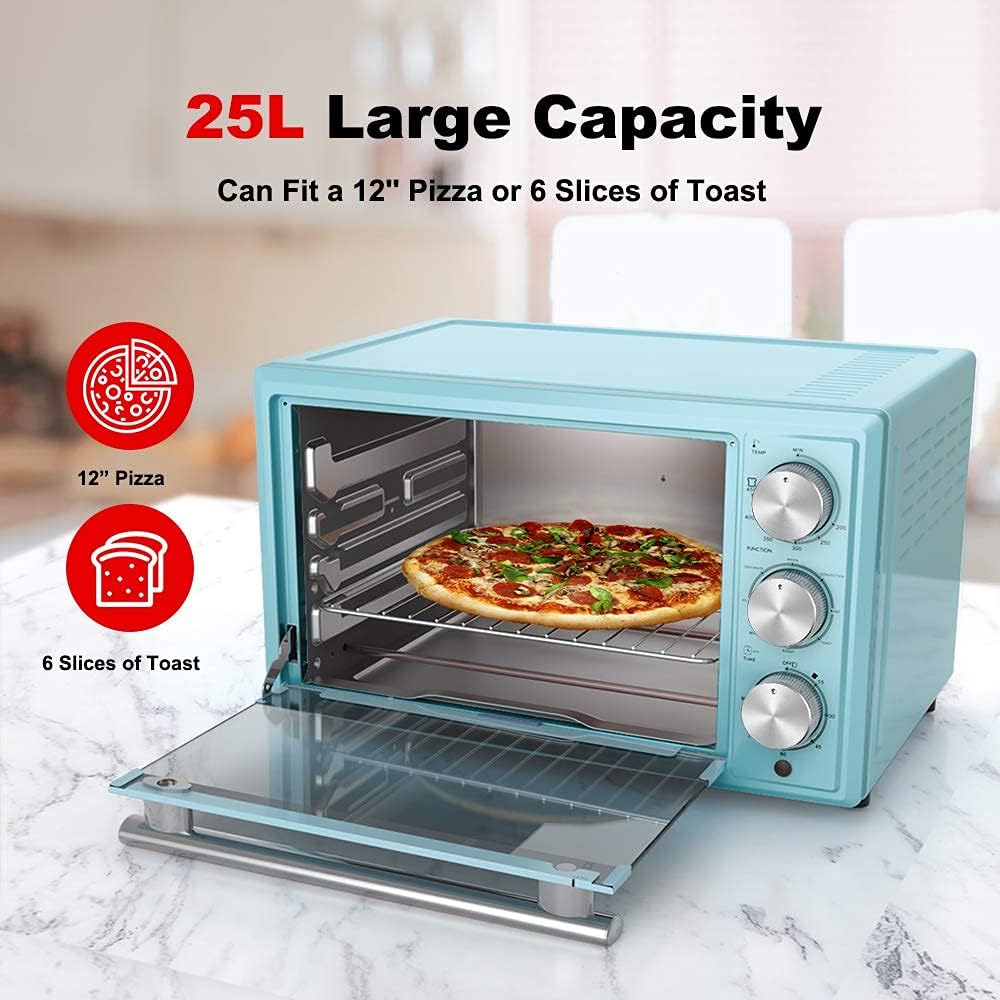
Image: The Galanz Toaster Oven demonstrating its spacious 0.9 Cu.Ft (25L) interior, easily accommodating a 12-inch pizza or up to 6 slices of toast, showcasing its practical capacity for various meals.
5. Maintenance and Cleaning
Regular cleaning will ensure the longevity and optimal performance of your toaster oven. Always unplug the appliance and allow it to cool completely before cleaning.
- Interior and Exterior: Wipe the exterior and interior surfaces with a damp cloth and mild detergent. Avoid abrasive cleaners or scouring pads, as they can damage the non-stick finish.
- Crumb Tray: The crumb tray should be emptied and cleaned regularly to prevent grease buildup and potential fire hazards. Slide out the tray, discard crumbs, and wash with warm, soapy water. Rinse and dry thoroughly before replacing.
- Baking Pan and Oven Rack: These accessories are non-stick and can be washed with warm, soapy water. For stubborn food residue, soak them in warm water before cleaning.
- Glass Door: Clean the glass door with a glass cleaner or a damp cloth.
- Storage: When not in use, store the toaster oven in a clean, dry place.
6. Troubleshooting
If you encounter issues with your Galanz Retro Toaster Oven, please refer to the following common troubleshooting steps:
| Problem | Possible Cause | Solution |
|---|---|---|
| Oven does not turn on. | Not plugged in; power outlet issue; circuit breaker tripped. | Ensure the power cord is securely plugged into a working outlet. Check your household circuit breaker. |
| Food not cooking evenly. | Improper rack position; overcrowding; convection fan issue. | Adjust rack position for optimal heat distribution. Avoid overcrowding the oven. Ensure convection fan is not obstructed. |
| Excessive smoke during cooking. | Food residue or grease buildup; high-fat foods. | Clean the interior and crumb tray thoroughly. Use a baking pan to catch drips from high-fat foods. |
| Oven light not working. | Bulb burnt out (if replaceable); electrical issue. | Consult customer support if the light is essential for operation and not easily replaceable. |
If the problem persists after trying these solutions, please contact customer support.
7. Specifications
| Feature | Detail |
|---|---|
| Brand | Galanz |
| Model | GRH1209BERM151 |
| Color | Bebop Blue |
| Capacity | 0.9 Cu.Ft (approx. 25 Liters) |
| Power | 1500W / 120Volts |
| Control Type | Knob |
| Cooking Programs | 8 (Bake, Toast, Roast, Broil, Pizza, Dehydrate, Keep Warm, Convection) |
| Temperature Range | 200°F – 450°F (with 5°F increments) |
| Finish Type | Non-stick |
| Product Dimensions | 18.3 x 15.8 x 11.3 inches |
| Item Weight | 12.1 pounds |
| UPC | 649661982241 |

Image: A clear diagram illustrating the external dimensions of the Galanz Toaster Oven, providing measurements for width (18.3"), depth (15.8"), and height (11.3") for proper placement planning.
8. Warranty and Support
This product is offered as a renewed item. As such, it is covered by the Amazon Renewed Guarantee.
- Amazon Renewed Guarantee: If you are not satisfied with your purchase, renewed products are eligible for replacement or refund under the Amazon Renewed Guarantee. Please refer to the Amazon Renewed program terms for full details.
- Customer Support: For any questions, issues, or support needs regarding your Galanz Retro Toaster Oven, please contact the seller or Amazon customer service directly through your purchase history.
Ask a question about this manual
Ask about setup, troubleshooting, compatibility, parts, safety, or missing instructions. Manuals+ will review the question and use this page’s manual context to help answer it.