ECG DM-817
ECG DM-817 Digital Multimeter User Manual
Model: DM-817
Introduction
The ECG DM-817 is an auto-ranging digital multimeter designed for precise electrical measurements. It features a 6000-count display and 3-5/6 digit resolution, making it suitable for a wide range of applications. This manual provides detailed instructions for the safe and effective operation, maintenance, and troubleshooting of your DM-817 multimeter.
Safety Information
Always observe the following safety precautions when using the DM-817 multimeter:
- Do not exceed the maximum input limits for any function.
- Use extreme caution when working with voltages above 60V DC or 30V AC RMS.
- Ensure the test leads are properly connected and the function switch is in the correct position before making measurements.
- Do not use the multimeter if it appears damaged or if the test leads are frayed.
- Replace the battery and fuses only with the specified type and rating.
- Always disconnect the test leads from the circuit before changing functions.
- Adhere to all local and national safety codes.
WARNING: This product contains chemicals known to the State of California to cause cancer and birth defects or other reproductive harm. For more information, visit www.P65Warnings.ca.gov.
Package Contents
Verify that all items are present in the package:
- ECG DM-817 Digital Multimeter
- Test Leads (one red, one black)
- Carrying Case
- 2 x AAA Batteries (pre-installed or included separately)
- User Manual (this document)

Image: The ECG DM-817 Digital Multimeter displayed alongside its included test leads, carrying case, and batteries.
Product Overview
Familiarize yourself with the components of your DM-817 multimeter:

Image: Front view of the ECG DM-817 Digital Multimeter, showing the display, function dial, and input jacks.
- LCD Display: Shows measurement readings, units, and function indicators. Features a backlight for low-light conditions.
- Function Dial: Rotary switch to select measurement functions (Voltage, Current, Resistance, Capacitance, Temperature, Frequency, Diode, Continuity).
- SELECT Button: Toggles between AC/DC, Diode/Continuity, or other sub-functions within a dial setting.
- HOLD Button: Freezes the current reading on the display.
- Backlight Button: Activates or deactivates the display backlight.
- Input Jacks:
- VΩHzCAP°C: Input for Voltage, Resistance, Frequency, Capacitance, and Temperature measurements.
- mAµA: Input for milliampere and microampere current measurements (fused).
- 10A: Input for high current measurements up to 10A (fused).
- COM: Common (ground) input for all measurements.
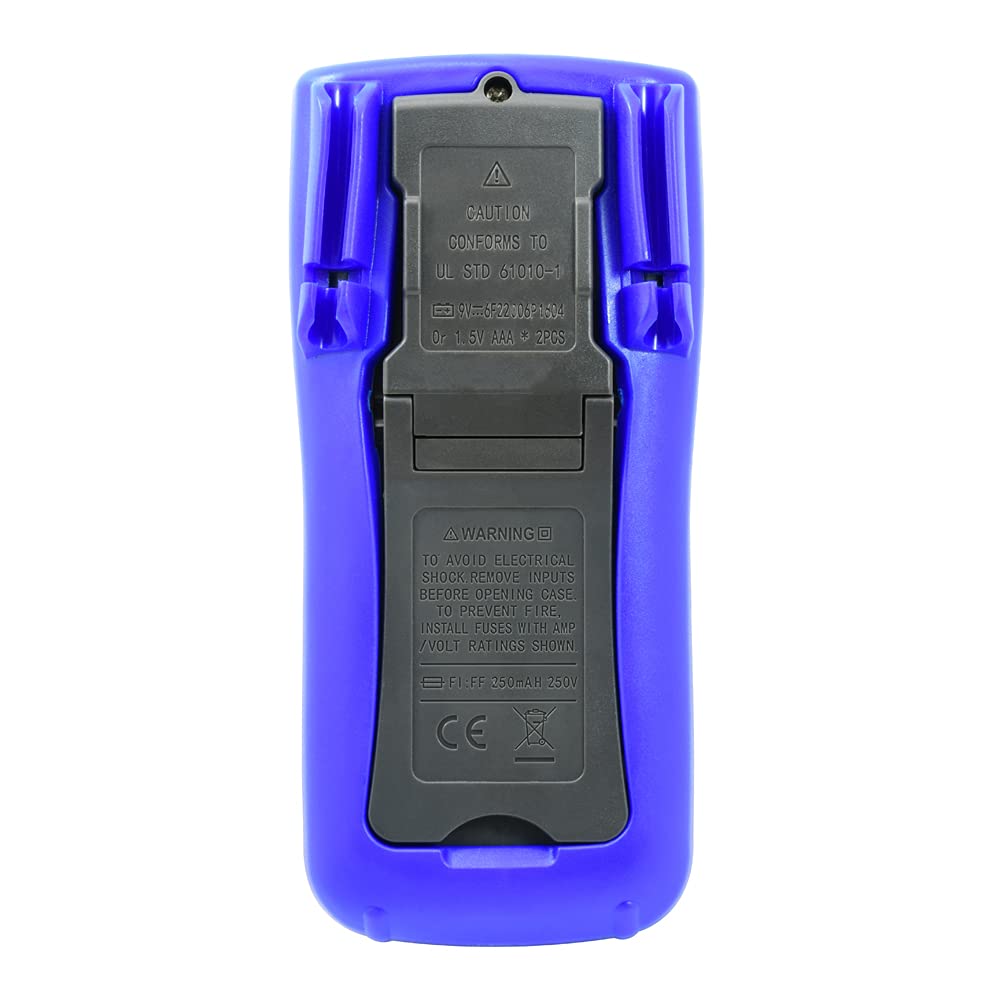
Image: Back view of the ECG DM-817 Digital Multimeter, showing the battery compartment and kickstand.
The back of the multimeter features a battery compartment cover and a foldable kickstand for convenient hands-free operation.
Setup
Battery Installation
The DM-817 requires two AAA batteries for operation. These are typically included. If not, or if the low battery indicator appears on the display, follow these steps:
- Ensure the multimeter is turned OFF and disconnect all test leads.
- Locate the battery compartment cover on the back of the unit.
- Use a screwdriver to loosen the screw securing the battery cover.
- Remove the cover.
- Insert two AAA batteries, observing the correct polarity (+ and -) as indicated inside the compartment.
- Replace the battery cover and secure it with the screw.
Operating Instructions
Before any measurement, ensure the test leads are securely plugged into the correct input jacks and the function dial is set to the desired measurement type.
Measuring DC Voltage (VDC)
- Plug the red test lead into the VΩHzCAP°C jack and the black test lead into the COM jack.
- Turn the function dial to the V (DC Voltage) position. The multimeter is auto-ranging.
- Connect the test leads across the component or circuit to be measured, observing polarity.
- Read the voltage value on the LCD display.
Measuring AC Voltage (VAC)
- Plug the red test lead into the VΩHzCAP°C jack and the black test lead into the COM jack.
- Turn the function dial to the V~ (AC Voltage) position. The multimeter is auto-ranging.
- Connect the test leads across the component or circuit to be measured.
- Read the voltage value on the LCD display.
Measuring DC Current (DCA)
- Turn off power to the circuit.
- For currents up to 600mA, plug the red test lead into the mAµA jack. For currents up to 10A, plug the red test lead into the 10A jack. Plug the black test lead into the COM jack.
- Turn the function dial to the A (DC Current) position.
- Break the circuit and connect the multimeter in series with the circuit.
- Apply power to the circuit and read the current value on the LCD display.
- Turn off power and disconnect the multimeter before restoring the circuit.
Measuring AC Current (ACA)
- Turn off power to the circuit.
- For currents up to 600mA, plug the red test lead into the mAµA jack. For currents up to 10A, plug the red test lead into the 10A jack. Plug the black test lead into the COM jack.
- Turn the function dial to the A~ (AC Current) position.
- Break the circuit and connect the multimeter in series with the circuit.
- Apply power to the circuit and read the current value on the LCD display.
- Turn off power and disconnect the multimeter before restoring the circuit.
Measuring Resistance (Ω)
- Plug the red test lead into the VΩHzCAP°C jack and the black test lead into the COM jack.
- Turn the function dial to the Ω (Resistance) position.
- Ensure the circuit is de-energized before measuring resistance.
- Connect the test leads across the component to be measured.
- Read the resistance value on the LCD display.
Measuring Capacitance (F)
- Plug the red test lead into the VΩHzCAP°C jack and the black test lead into the COM jack.
- Turn the function dial to the CAP (Capacitance) position.
- Ensure the capacitor is fully discharged before measurement.
- Connect the test leads across the capacitor.
- Read the capacitance value on the LCD display.
Measuring Temperature (°C/°F)
- Plug the temperature probe (if included, otherwise use appropriate adapter) into the VΩHzCAP°C and COM jacks, observing polarity.
- Turn the function dial to the °C/°F (Temperature) position.
- The display will show the ambient temperature. Place the probe on or near the object whose temperature is to be measured.
- Read the temperature value on the LCD display. Use the SELECT button to toggle between Celsius and Fahrenheit.
Measuring Frequency (Hz)
- Plug the red test lead into the VΩHzCAP°C jack and the black test lead into the COM jack.
- Turn the function dial to the Hz (Frequency) position.
- Connect the test leads across the signal source.
- Read the frequency value on the LCD display.
Diode Test and Continuity Check
- Plug the red test lead into the VΩHzCAP°C jack and the black test lead into the COM jack.
- Turn the function dial to the Diode/Continuity position.
- Diode Test: Connect the red lead to the anode and the black lead to the cathode of the diode. A forward voltage drop will be displayed. Reverse the leads; an open circuit (OL) should be displayed.
- Continuity Check: Connect the test leads across the circuit or component. If continuity exists (resistance below approximately 50Ω), the buzzer will sound.
Maintenance
Cleaning
Wipe the case with a damp cloth and mild detergent. Do not use abrasives or solvents. Keep the input terminals free of dirt and moisture.
Fuse Replacement
If the current measurement functions stop working, the fuses may need replacement. Always use fuses with the specified ratings:
- mAµA input: F1 250mA/250V fast-blow fuse.
- 10A input: F2 10A/250V fast-blow fuse.
To replace fuses:
- Ensure the multimeter is turned OFF and disconnect all test leads.
- Open the battery compartment cover as described in the "Battery Installation" section.
- The fuses are located inside the battery compartment. Carefully remove the old fuse.
- Insert a new fuse of the correct type and rating.
- Replace the battery cover and secure it.
Storage
If the multimeter is not used for an extended period, remove the batteries to prevent leakage and damage to the unit. Store the multimeter in its carrying case in a cool, dry place away from direct sunlight and extreme temperatures.
Troubleshooting
| Problem | Possible Cause | Solution |
|---|---|---|
| No display or dim display | Dead or low batteries | Replace batteries. |
| "OL" (Overload) displayed | Input value exceeds range; incorrect function selected | Select a higher range (if manual ranging) or correct function. Ensure leads are connected properly. |
| No current measurement | Blown fuse; incorrect lead connection | Check and replace fuse if necessary. Ensure leads are in the correct current input jacks (mAµA or 10A). |
| Inaccurate readings | Low battery; poor lead contact; external interference | Replace batteries. Ensure leads are clean and make good contact. Move away from strong electromagnetic fields. |
Specifications
The following table outlines the key specifications of the ECG DM-817 Digital Multimeter:

Image: Detailed specifications printed on the back of the ECG DM-817 product packaging.
| Measurement Type | Range | Accuracy |
|---|---|---|
| DC Voltage | 600mV to 1000V | ±(0.5% + 5 digits) to ±(0.8% + 5 digits) |
| AC Voltage (True RMS) | 600mV to 750V | ±(0.8% + 5 digits) to ±(1.2% + 10 digits) |
| DC Current | 600µA to 10A | ±(1.0% + 5 digits) to ±(2.0% + 30 digits) |
| AC Current | 600µA to 10A | ±(1.2% + 5 digits) to ±(2.5% + 30 digits) |
| Resistance | 600Ω to 60MΩ | ±(0.8% + 5 digits) to ±(2.0% + 20 digits) |
| Capacitance | 10nF to 6000µF | ±(3.5% + 20 digits) to ±(5.0% + 10 digits) |
| Frequency | 10Hz to 10MHz | ±(0.1% + 3 digits) |
| Temperature | -20°C to 1000°C / -4°F to 1832°F | ±(1.0% + 5 digits) to ±(2.0% + 5 digits) |
General Specifications:
- Display: 6000 Counts, 3-5/6 Digit LCD with Backlight
- Auto Power Off: Yes
- Data Hold: Yes
- Power Source: 2 x AAA Batteries (included)
- Dimensions: 7.25 x 3.5 x 1.78 inches
- Weight: 1 Pound
- Safety Rating: CAT IV 600V, CAT III 1000V
Warranty and Support
For warranty information and technical support, please contact ECG customer service. Refer to the product packaging or the official ECG website for the most current contact details.
Manufacturer: ECG, NTE
Ask a question about this manual
Ask about setup, troubleshooting, compatibility, parts, safety, or missing instructions. Manuals+ will review the question and use this page’s manual context to help answer it.