Introduction
Thank you for choosing HELESIN Solar Pathway Lights. This manual provides detailed instructions for the proper installation, operation, and maintenance of your new solar lights. Please read this manual carefully before use to ensure optimal performance and longevity of your product.
Product Features
- Outdoor Solar Garden Lights: HELESIN LED solar lights for outdoor use feature a rhombic shadow effect, creating an artistic ambiance. The light shines clearly and radiantly, establishing a romantic atmosphere. These outdoor solar lights will add a brilliant accent to your garden.
- IP44 Waterproof: With IP44 waterproofing, the solar garden lights remain stable and functional even in rain, snow, frost, and hail. Additionally, the outdoor solar lights, made from superior quality materials, provide excellent illumination while protecting the integrated LEDs.
- Upgraded Solar Panels: Compared to monocrystalline solar panels, upgraded polycrystalline solar panels have a lower decrease in electricity production efficiency. They also feature a more favorable temperature coefficient, meaning that at high temperatures, the efficiency of polycrystalline solar panels decreases less.
- Automatic Control: The solar garden lights are entirely powered by sunlight, automatically turning on at dusk thanks to the light sensor. After 6 to 8 hours of charging in the sun, they can shine for 8 to 10 hours. These outdoor solar lights ensure sufficient outdoor lighting and shine all night, ideal for decorating your garden.
- Easy Installation: Installing the outdoor solar light is extremely simple: just unscrew the top of the outdoor solar lights, remove the insulating tab, assemble the different components, and insert them into the ground.
- Wide Application: The 6 outdoor solar lights can be placed freely, creating a perfect lighting atmosphere in various outdoor spaces – such as gardens, flower beds, courtyards, paths, terraces, pool solar lighting, sidewalks, driveways, landscape installations, or curtains.
Package Contents
Your HELESIN Solar Pathway Lights package includes:
- 6 x Outdoor Solar Lights
- 6 x Steel Poles with Ground Spikes

Image: The package contains six solar lights, each with a ground spike. Dimensions are approximately 42cm total height, 31cm pole height, and 9cm lamp head diameter. Each light includes a replaceable AA rechargeable battery.
Setup and Installation
Follow these steps to set up your HELESIN Solar Pathway Lights:
- Unscrew the Lamp Cover: Gently twist and remove the top cover of the solar light to access the internal components.
- Remove the Insulation Tab: Locate the battery compartment and remove the plastic insulation tab. This activates the battery.
- Assemble the Spikes and Poles: Connect the steel pole sections and attach the ground spike to the bottom and the lamp head to the top. Ensure all connections are secure.
- Insert into the Ground: Choose a location that receives direct sunlight for at least 6-8 hours daily. Firmly insert the assembled solar light into the ground.
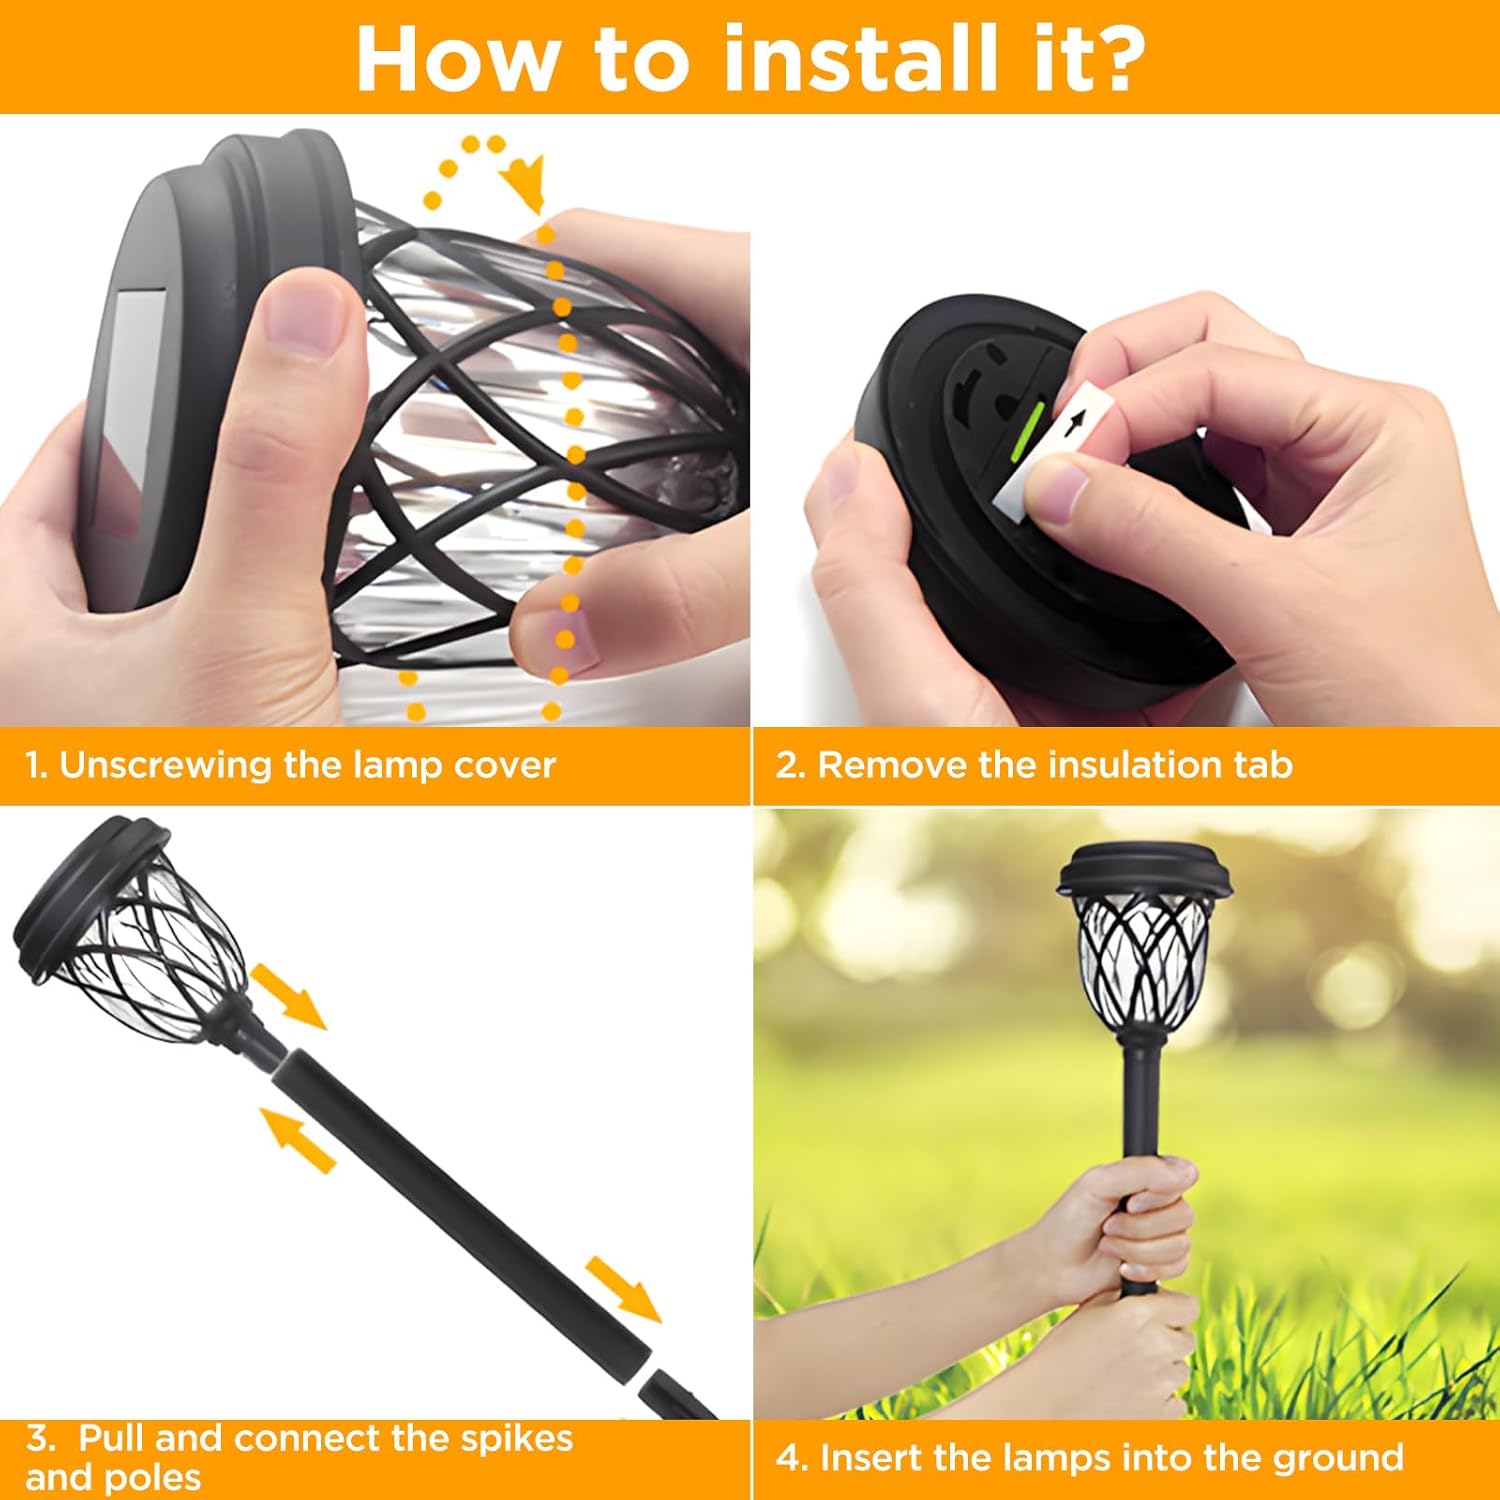
Image: A visual guide showing the four installation steps: 1. Unscrewing the lamp cover. 2. Removing the insulation tab. 3. Pulling and connecting the spikes and poles. 4. Inserting the assembled lights into the ground.
Operating Instructions
Your HELESIN Solar Pathway Lights are designed for automatic operation:
- Automatic Charging: During the day, the integrated solar panel charges the internal AA rechargeable battery using sunlight. Ensure the solar panel is clean and exposed to direct sunlight for 6-8 hours for optimal charging.
- Automatic On/Off: The built-in light sensor detects ambient light levels. The lights will automatically turn on at dusk and turn off at dawn. A full charge provides 8-10 hours of illumination.

Image: Depicts solar lights along a pathway, showing '6-8 Hours AUTO Charging' during the day and '8-10 Hours AUTO ON' at night, illustrating the automatic functionality.
Maintenance
To ensure the best performance and extend the lifespan of your solar lights, follow these maintenance tips:
- Clean Solar Panels: Regularly wipe the solar panel with a soft, damp cloth to remove dust, dirt, and debris. A clean panel ensures efficient charging.
- Battery Replacement: The lights use 1 AA rechargeable battery. If the light duration significantly decreases, the battery may need replacement. Use only rechargeable AA batteries of the same type and capacity.
- Seasonal Storage: If storing the lights for an extended period, ensure they are fully charged and store them in a dry place.
Troubleshooting
| Problem | Possible Cause | Solution |
|---|---|---|
| Light does not turn on at night. | Insulation tab not removed. | Remove the insulation tab from the battery compartment. |
| Light does not turn on at night. | Insufficient sunlight exposure. | Relocate the light to an area that receives 6-8 hours of direct sunlight daily. |
| Light is dim or only stays on for a short time. | Solar panel is dirty. | Clean the solar panel with a soft, damp cloth. |
| Light is dim or only stays on for a short time. | Battery is old or not fully charged. | Ensure the light is in direct sunlight for a full day. If the problem persists, replace the rechargeable AA battery. |
| Light flickers. | Loose battery connection. | Check the battery compartment and ensure the battery is securely seated. |
Specifications
| Feature | Specification |
|---|---|
| Model Number | HX-TYD-001 |
| Mounting Type | Ground Mount |
| Water Resistance Level | IP44 Waterproof |
| Battery Type | 1 x AA Rechargeable (included) |
| Voltage | 12 Volts (DC) |
| Max Light Output | 300 Lumens |
| Product Dimensions (L x W x H) | 17.3 x 16.8 x 25 cm |
| Item Weight | 900 grams |
| Material | Stainless Steel |
| Finish Type | Brushed |
| Number of Bulbs | 6 (LED) |
| Specific Uses | Garden, Pathway |
| Shade Color | Warm White |
| Shade Material | Durable Plastic |
| Color Temperature | 3000 Kelvin |
| Power Source | Solar Powered |
Safety Information
- Do not dispose of batteries in fire, as they may explode.
- Do not mix old and new batteries, or different types of batteries.
- Keep out of reach of children.
- Ensure the solar panel is not covered by leaves, snow, or debris to allow for proper charging.
- Avoid placing the lights near other strong light sources at night, as this may prevent them from turning on automatically.
Warranty and Support
Information regarding specific warranty details and customer support contact is not available in the provided product data. For any issues or inquiries, please refer to the seller or retailer where the product was purchased.