1. Introduction
This manual provides detailed instructions for the installation, operation, and maintenance of your Cestovet Android 10 Car Radio. Please read this manual thoroughly before using the product to ensure proper functionality and safety. This unit is specifically designed for Honda CRV models manufactured between 2012 and 2016.

Image 1.1: Cestovet Android 10 Car Radio Main Unit
Video 1.1: Product Overview for Honda CRV 2012-2016 Car Radio. This video provides a general visual overview of the car radio's features and compatibility.
2. Safety Information
- Always operate the device responsibly and in accordance with local traffic laws.
- Do not attempt to install or repair the unit if you are not qualified. Refer to a professional installer.
- Avoid prolonged exposure to direct sunlight or extreme temperatures.
- Keep the screen clean and free from obstructions.
3. Package Contents
Verify that all items listed below are included in your package. If any items are missing or damaged, please contact customer support.

Image 3.1: Package Contents. This image displays the main unit, various cables, and installation tools included with the product.
- Main Head Unit (10-inch display)
- Power Cable Harness
- USB Cables (x2)
- GPS Antenna
- RCA Cable
- CanBus Decoder
- External Microphone
- Screwdriver
- Plastic Removal Tool (Crowbar)
- User Manual (this document)
4. Setup and Installation
Professional installation is recommended. Ensure the vehicle's battery is disconnected before beginning installation.
4.1 Pre-Installation Checks
- Confirm vehicle compatibility (Honda CRV 2012-2016).
- Inspect all components for damage.
- Familiarize yourself with your vehicle's dashboard removal process.
4.2 Wiring Connections
Connect the provided wiring harness to the car radio and then to the vehicle's factory wiring. Ensure all connections are secure. The CanBus decoder should be connected as per the wiring diagram to ensure proper communication with the vehicle's systems, including steering wheel controls.
4.3 Physical Installation
- Carefully remove the factory radio and dashboard trim.
- Mount the new Cestovet unit into the dashboard opening.
- Secure the unit using appropriate screws or clips.
- Reconnect the vehicle's battery and test the unit before reassembling the dashboard trim.
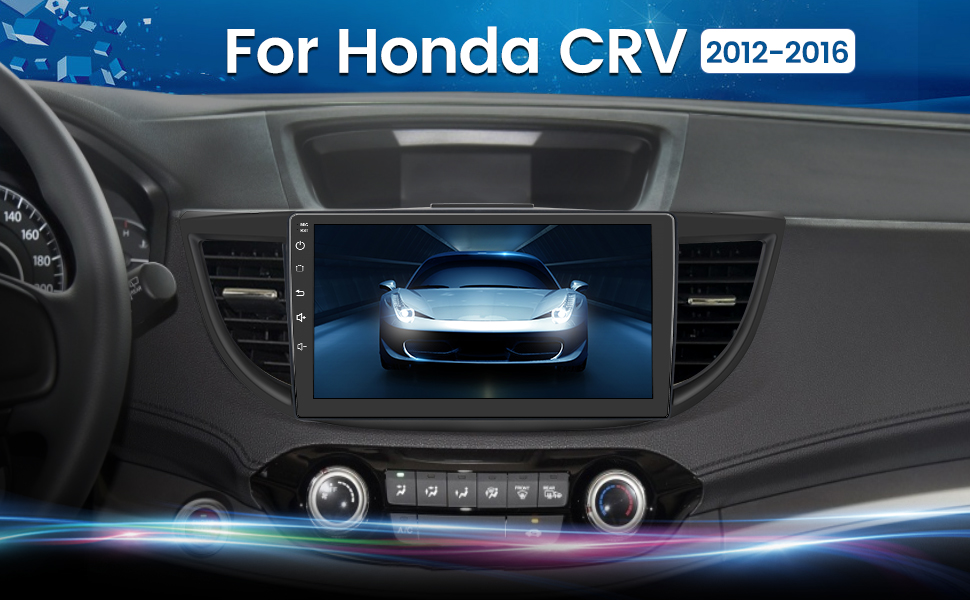
Image 4.1: Installed Car Radio. This image shows the Cestovet Android 10 Car Radio seamlessly integrated into a Honda CRV dashboard.
5. Operating Instructions
5.1 Basic Functions
- Power On/Off: Press and hold the power button on the unit's side panel.
- Volume Control: Use the volume buttons on the side panel or steering wheel controls.
- Home Button: Returns to the main Android home screen.
- Back Button: Navigates to the previous screen or menu.
5.2 Carplay and Android Auto
Connect your iPhone or Android phone via a USB cable to enable Carplay or Android Auto functionality. This allows for seamless integration of navigation, music, calls, and messages directly on the car radio's display.
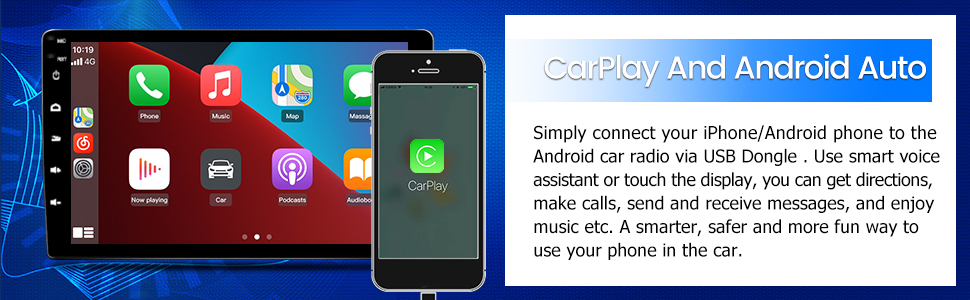
Image 5.1: Carplay and Android Auto. This image illustrates the user interface for Carplay and Android Auto on the car radio's display.
5.3 Bluetooth Connectivity
Pair your mobile device via Bluetooth for hands-free calling and audio streaming. Navigate to the Bluetooth settings on the car radio, enable Bluetooth, and search for your device. Select your device from the list to pair.
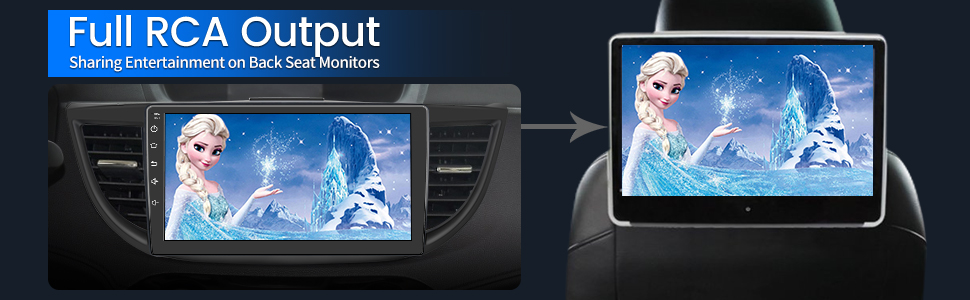
Image 5.2: Bluetooth Music. This image shows the Bluetooth music interface, allowing for wireless audio playback from a paired device.
5.4 WiFi Connection
Connect the car radio to a WiFi hotspot (e.g., from your smartphone) to access online features, download apps, and browse the internet. Go to Settings > Network & Internet > Wi-Fi, then select your desired network and enter the password.

Image 5.3: WiFi Connection. This image displays the car radio's screen with various app icons, indicating internet access via WiFi.
5.5 GPS Navigation
The unit supports both online and offline navigation. Ensure the GPS antenna is properly installed for optimal signal reception. Pre-installed maps or downloadable map applications can be used for guidance.

Image 5.4: GPS Functionality. This graphic illustrates the global positioning system (GPS) satellites providing navigation data to the car radio.
5.6 Steering Wheel Controls (SWC)
The unit supports integration with your vehicle's existing steering wheel controls. After installation, you may need to configure the SWC settings in the unit's menu to map the buttons correctly.
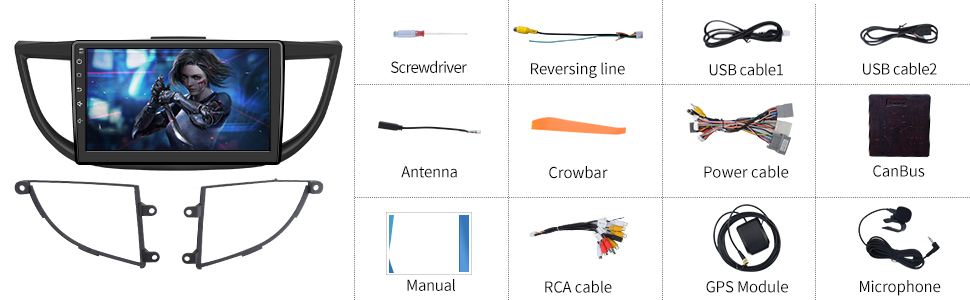
Image 5.5: Steering Wheel Controls. This image shows the on-screen interface for configuring steering wheel controls.
5.7 Rear View Camera Support
The car radio supports a rearview camera (sold separately). When a compatible camera is connected and the vehicle is shifted into reverse, the screen will automatically display the camera feed, assisting with parking maneuvers.

Image 5.6: Rear View Support. This graphic demonstrates how the car radio supports a rearview camera, displaying parking guidelines.
5.8 Full RCA Output
The unit features full RCA output, allowing you to connect external monitors, such as backseat displays, to share entertainment with passengers.

Image 5.7: Full RCA Output. This image shows video content from the car radio being displayed on a backseat monitor.
6. Maintenance
- Screen Cleaning: Use a soft, lint-free cloth to gently wipe the screen. Avoid abrasive cleaners or solvents.
- Software Updates: Periodically check for available software updates through the unit's settings menu or the manufacturer's website to ensure optimal performance and access to new features.
- General Care: Keep the unit free from dust and moisture.
7. Troubleshooting
If you encounter issues, refer to the following common problems and solutions:
| Problem | Possible Solution |
|---|---|
| No Power | Check power cable connections and vehicle's fuse box. Ensure the ignition is on. |
| No Sound | Verify speaker connections. Check volume levels and audio output settings. Ensure the amplifier (if external) is powered. |
| GPS Signal Lost | Ensure the GPS antenna is properly connected and has a clear view of the sky. Move the vehicle to an open area. |
| Bluetooth Pairing Failure | Ensure Bluetooth is enabled on both devices. Delete previous pairings and try again. Restart both devices. |
| Touch Screen Unresponsive | Perform a soft reset using the 'RST' button (if available) or power cycle the unit. |
8. Specifications
Key technical specifications of the Cestovet Android 10 Car Radio:
- Operating System: Android 10
- Display Size: 10 Inches
- Resolution: 720 x 1280
- RAM: 2GB
- Internal Storage (ROM): 32GB
- Connectivity: Wi-Fi, Bluetooth
- Special Features: Carplay, Android Auto, GPS Navigation, Touchscreen, Steering Wheel Control Support, Rear View Camera Support, DSP (Digital Sound Processor)
- Audio Output Mode: Speaker, Stereo
- Item Weight: Approximately 4.93 pounds
- Package Dimensions: Approximately 17.87 x 10.12 x 7.56 inches
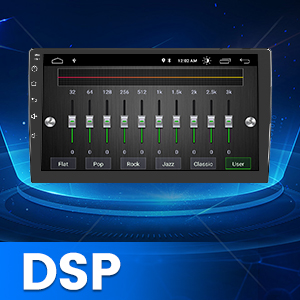
Image 8.1: DSP Functionality. This graphic illustrates the Digital Sound Processor (DSP) for enhanced audio customization.
9. Warranty and Support
For warranty information, technical support, or any inquiries regarding your Cestovet Android 10 Car Radio, please refer to the contact information provided at the point of purchase or visit the official Cestovet website. Keep your purchase receipt as proof of purchase for warranty claims.