Introduction
The Etrogo Intelligent Pulse Repair Charger is designed for charging 12V and 24V lead-acid batteries, including AGM, GEL, MF, and SLA types, with capacities ranging from 3Ah to 200Ah. This charger features advanced microcomputer control and broadband pulse technology for efficient and safe battery charging and repair. It automatically detects battery voltage and adjusts charging parameters, offering multiple protection features to ensure battery longevity and user safety.

Image: Front view of the Etrogo Intelligent Pulse Repair Charger, showing the LED display, control switch, and battery clamps. This image illustrates the overall design and key interface elements of the charger.
Safety Precautions
To ensure safe operation and prevent damage, please observe the following precautions:
- Before use, inspect the charger for any damage or loose internal parts. Do not use if damaged.
- This charger is designed exclusively for lead-acid batteries (12V/24V, 3Ah-200Ah). Do not attempt to charge lithium batteries.
- Avoid over-discharging lead-acid batteries or leaving them unused for extended periods, as this can cause significant damage and prevent charging.
- Operate the charger in a well-ventilated area. Avoid humid, high-temperature, or flammable/explosive gas environments.
- Ensure cooling holes are not blocked during charging. If the cooling fan does not operate after power-on, disconnect power immediately and do not use the charger.
- Do not leave the charger unattended during operation.
- Do not use the battery while it is being charged by this unit.
Product Features
- Pulse Repair Charger: Equipped with an intelligent microcomputer chip and broadband pulse technology for automatic 5-stage charging and battery repair.
- Automatic Voltage Identification: Automatically detects and adapts to 12V (8-14.5V) or 24V (18-29V) lead-acid batteries.
- Two Charging Modes: "MOTOR" mode for 3AH to 20AH batteries and "AUTO" mode for 20AH to 200AH batteries, selectable via a button.
- Automatic Stop at Full Power: Input current automatically drops to 0A when the battery is fully charged, preventing overcharging.
- Intuitive Interface: LED display shows power percentage, charging status, and progress.
- Multi-Protection System: Includes overheat, short circuit, reverse polarity, over-current, and over-voltage protection.
- Efficient Cooling: Built-in cooling fan and good cooling structure for effective heat dissipation.

Image: Visual representation of the charger's multi-protection features, including short circuit, reverse connection, overcurrent, overheating, low voltage, and overvoltage protection.
Setup
Follow these steps to set up your Etrogo battery charger:
- Connect Battery Clamps:
- Connect the red (+) clamp to the positive terminal of the battery.
- Connect the black (-) clamp to the negative terminal of the battery.
Ensure a secure connection. Incorrect polarity connection will trigger reverse polarity protection.
- Plug into Power Outlet: Insert the charger's AC power plug into a standard AC 110V-250V, 50-60Hz electrical outlet.
- Automatic Voltage Detection: The charger will automatically detect whether it is connected to a 12V or 24V battery. The corresponding indicator light (12V or 24V) on the display will illuminate.

Image: Connection diagram illustrating how to connect the charger to a single 12V or 24V battery, and how to connect to two 12V batteries in series to achieve 24V charging.

Image: Physical dimensions of the charger (17cm x 13cm x 7cm) and cable lengths (AC cable 1.5m, DC clamps cable 1.2m).
Operating Instructions
Once connected, the charger will begin its operation sequence:
- Voltage Recognition: The charger automatically identifies the battery voltage (12V or 24V) upon connection. The corresponding LED will light up.

Image: The charger's display highlighting the automatic recognition of 12V or 24V battery types based on internal real voltage.
- Select Charging Mode: Use the "Charging Mode" switch (AUTO/MOTOR) on the charger's front panel to select the appropriate mode:
- MOTOR Mode: Suitable for smaller batteries, typically 3AH to 20AH. This is often the smart/default mode.
- AUTO Mode: Recommended for larger batteries, typically 20AH to 200AH, or when the MOTOR mode cannot initiate charging.

Image: The charger's front panel indicating the switch for selecting between AUTO and MOTOR charging modes.
- Charging Process: The charger will initiate a 5-stage charging process, including No-load, Constant Current, Constant Voltage, Floating Charge, and Turbulence modes. The LED display will show the charging progress.

Image: A visual representation of the 5-stage charging process (No-load, Constant Current, Constant Voltage, Floating Charge, Turbulence) employed by the intelligent pulse battery charger.
- Automatic Stop: When the battery reaches full charge, the input current will automatically drop to 0A, and the charging indicator light will turn off. The power indicator will remain on. This prevents overcharging.
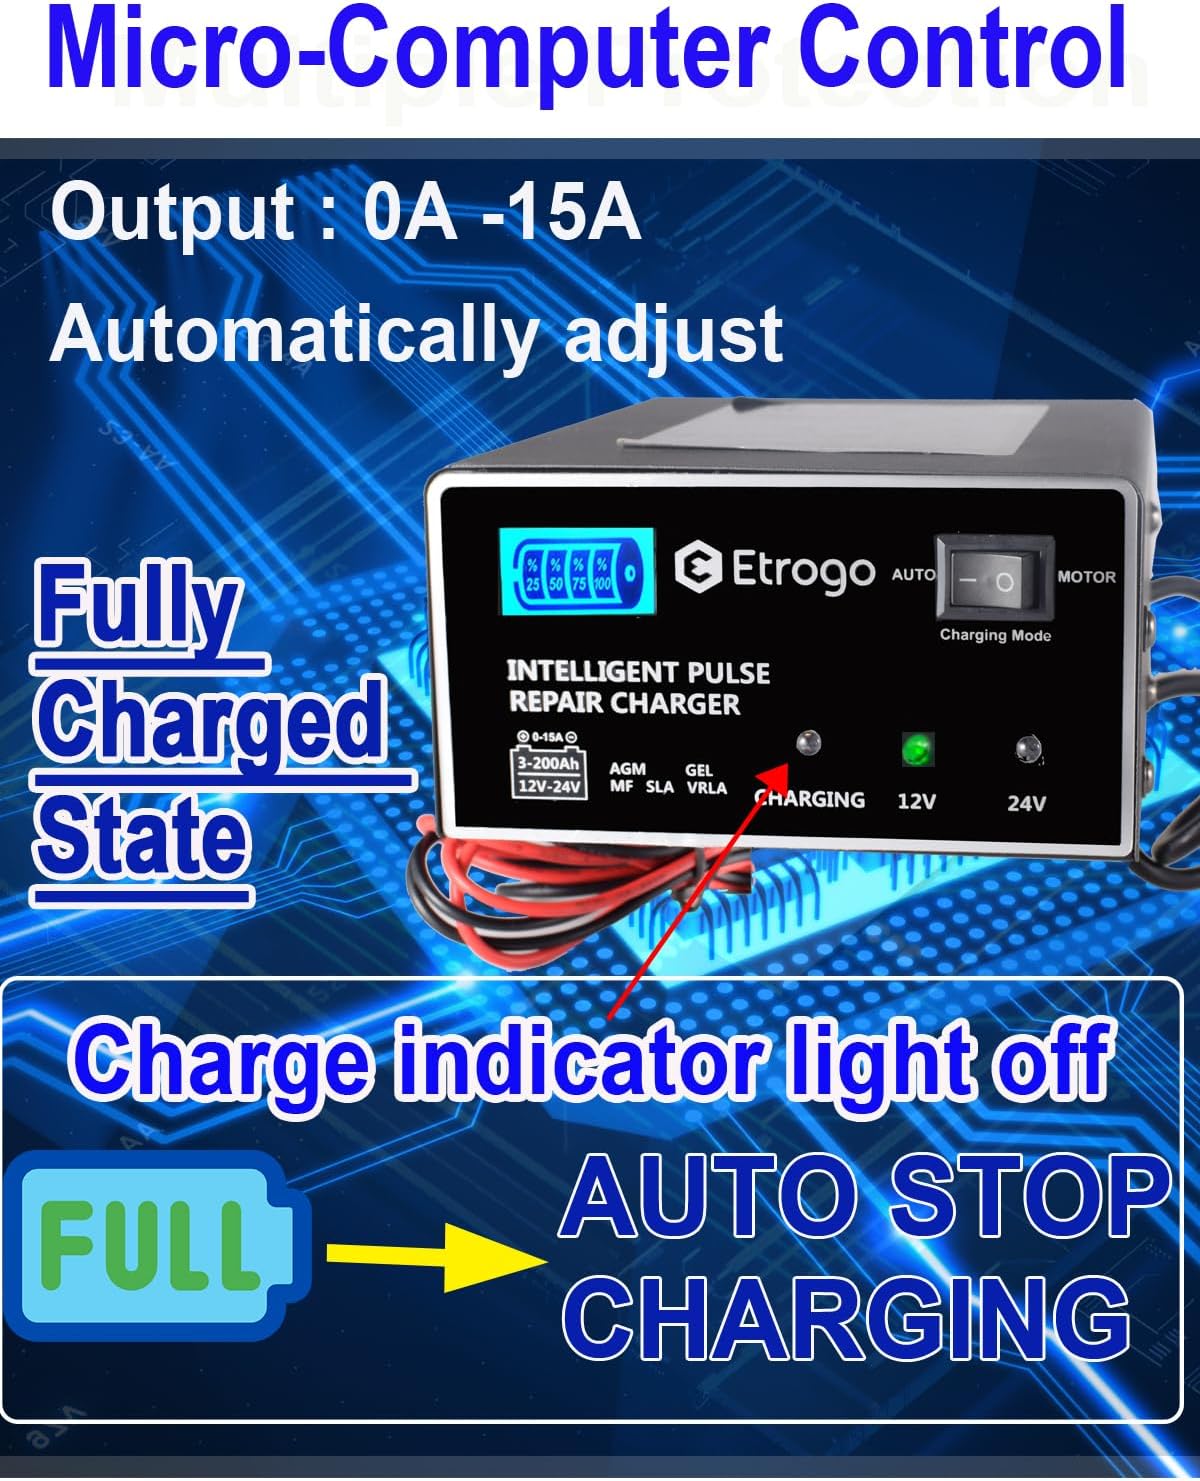
Image: The charger's display indicating a fully charged state, where the charging indicator light is off and the unit automatically stops charging.
- Disconnecting: Once charging is complete, first unplug the charger from the AC power outlet, then disconnect the black (-) clamp, followed by the red (+) clamp from the battery terminals.
Maintenance
Proper maintenance ensures the longevity and optimal performance of your charger:
- Cleaning: Keep the charger clean and free from dust and debris. Use a dry, soft cloth for cleaning. Do not use liquids or abrasive cleaners.
- Storage: Store the charger in a cool, dry, and well-ventilated place when not in use. Avoid extreme temperatures and direct sunlight.
- Cable Inspection: Regularly inspect the power cord and battery clamps for any signs of damage, fraying, or corrosion. Replace if necessary.
- Ventilation: Always ensure the charger's cooling vents are unobstructed during operation to prevent overheating.
Troubleshooting
If you encounter issues with your charger, refer to the following common troubleshooting steps:
- Charger Not Turning On:
- Check if the AC power cord is securely plugged into a live outlet.
- Ensure the battery clamps are correctly and securely connected to the battery terminals.
- Verify that the battery voltage is within the charger's operating range (12V or 24V).
- Charging Indicator Not Lighting Up:
- Confirm the battery is not already fully charged. The indicator turns off when full.
- Check for proper connection of battery clamps.
- Ensure the battery is a compatible lead-acid type and not a lithium battery.
- Charger Overheating:
- Ensure the charger is in a well-ventilated area.
- Check that the cooling fan is operating and vents are not blocked.
- If overheating persists, disconnect immediately and contact support.
- Error Displayed:
- Refer to the display for specific error codes or messages.
- Common errors might relate to reverse polarity (recheck clamp connections), short circuit (inspect cables), or over-voltage/low-voltage (check battery condition).
Specifications
| Parameter | Value |
|---|---|
| Input Voltage | AC 110V-250V |
| Frequency | 50-60Hz |
| Output Voltage | 12V / 24V (Automatic) |
| Working Current | 0-15A (Automatically Adjustable) |
| Suitable Battery Type | 12V / 24V 3Ah-200Ah Lead Acid Batteries (AGM, GEL, MF, SLA, etc.) |
| Not suitable for | Lithium batteries |
| 12V Voltage ID Range | 7V-14.5V |
| 24V Voltage ID Range | 17V-29V |
| Working Temperature | -30℃ to +50℃ |
| Product Dimensions | 7D x 13W x 17H cm |
| Item Weight | 0.95 Kilograms |
| Model Number | 168 |
| UPC | 760273098820 |

Image: A collage of different vehicles and equipment, including cars, trucks, motorcycles, and construction vehicles, demonstrating the universal suitability of the charger for 12V and 24V lead-acid batteries.
Warranty
This Etrogo Car Lead Battery Charger comes with a 1-year warranty from the date of purchase. This warranty covers manufacturing defects and malfunctions under normal use. Please retain your proof of purchase for warranty claims. The warranty does not cover damage caused by misuse, accidents, unauthorized modifications, or failure to follow the instructions in this manual.
Support
For further assistance, technical support, or warranty inquiries, please contact your retailer or the manufacturer directly. When contacting support, please have your product model number (168) and proof of purchase readily available.
For more information, you may visit the Etrogo brand page.