1. Introduction
This manual provides detailed instructions for the installation, setup, and operation of your Junsun Android 10.0 Car Stereo Head Unit. This unit is specifically designed for Honda Civic models from 2006 to 2011, offering advanced features such as GPS navigation, Bluetooth connectivity, Wi-Fi, DSP, and support for Android Auto and Apple CarPlay. Please read this manual thoroughly before installation and use to ensure proper function and safety.

Image 1.1: Junsun Car Stereo Head Unit installed in a Honda Civic dashboard.
2. Package Contents
Verify that all items listed below are included in your package. If any items are missing or damaged, please contact customer support.

Image 2.1: Included components of the Junsun Car Stereo Head Unit.
- Main Head Unit (10.1-inch display)
- Dashboard Bezel (for Honda Civic 2006-2011)
- Power Cable Harness
- RCA Cable Set
- USB Cables (x2)
- External Microphone
- GPS Module Antenna
- Screwdriver
- Crowbar (Pry Tool)
3. Installation
Professional installation is recommended. Ensure the vehicle's battery is disconnected before beginning installation to prevent electrical damage.
3.1 Wiring Diagram
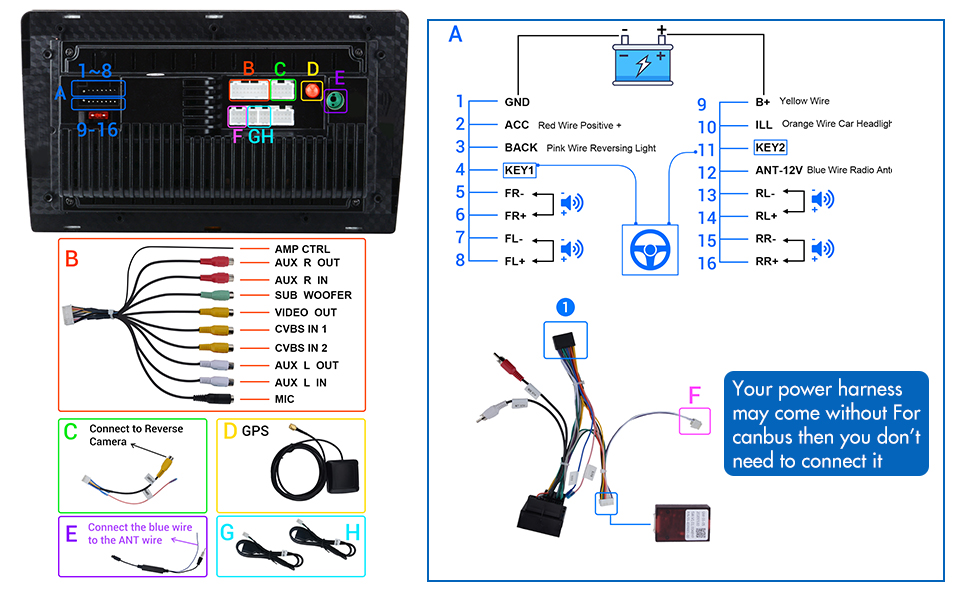
Image 3.1: Main wiring connections for the head unit.
Refer to the diagram above for connecting the various cables. The main power harness (A) connects to the vehicle's wiring. Ensure correct polarity for B+ (Yellow Wire), ACC (Red Wire), and GND (Black Wire). Speaker wires (FR+, FR-, FL+, FL-, RL+, RL-, RR+, RR-) should be connected to the corresponding vehicle speaker wires.
- Power Harness (A): Connects to the vehicle's main power and speaker wiring.
- RCA Cables (B): For AMP CTRL, AUX R/L OUT, SUB WOOFER, VIDEO OUT, CVBS IN 1/2, AUX R/L IN, and MIC.
- Reverse Camera Input (C): Connect the reverse camera video signal and trigger wire.
- GPS Antenna (D): Connect the GPS module for navigation functionality.
- Antenna Wire (E): Connect the blue wire to the vehicle's antenna wire for radio reception.
- Canbus (F): If your power harness comes without Canbus, you do not need to connect it.
- USB Ports (G, H): Connect the provided USB cables for external devices.
3.2 Physical Installation
- Carefully remove the original car stereo and dashboard trim using the provided crowbar.
- Connect all necessary wiring harnesses and antennas as per the wiring diagram.
- Mount the new Junsun head unit into the dashboard opening.
- Install the new dashboard bezel to secure the unit and ensure a flush fit.
- Reconnect the vehicle's battery.
4. Initial Setup
After installation, power on the unit and perform the initial setup steps.
- First Boot: The system will take approximately 40 seconds to boot up.
- Wi-Fi Connection: Navigate to Settings > Network & Internet > Wi-Fi. Connect to an available Wi-Fi network (e.g., your phone's hotspot) to enable online features and app downloads.
- GPS Setup: Ensure the GPS antenna is properly connected and placed in a location with a clear view of the sky. The unit supports both online and offline navigation applications. Download preferred map data if using offline navigation.
- Date and Time: Set the correct date and time, or enable automatic synchronization via network.
- Steering Wheel Control (SWC): Access the SWC settings in the system menu to program your vehicle's steering wheel buttons for controlling the head unit functions.
5. Operating Instructions
This section details the primary functions and how to operate them.
5.1 GPS Navigation

Image 5.1: GPS Navigation interface.
The head unit features a built-in GPS module. You can use pre-installed offline navigation apps or download online navigation apps from the Google Play Store (requires Wi-Fi connection). Ensure the GPS antenna is correctly installed for optimal signal reception.
5.2 Bluetooth Connectivity

Image 5.2: Bluetooth 4.0 interface.
Pair your smartphone via Bluetooth 4.0 for hands-free calling and audio streaming. Access the Bluetooth application from the main menu. Search for available devices on your phone and select the head unit's Bluetooth name (e.g., "DEV:BT7268") to pair. The built-in microphone allows for clear call quality.
5.3 Multimedia Functions
5.3.1 Android Auto / Apple CarPlay

Image 5.3: Wireless Apple CarPlay and Wired Android Auto.
The unit supports both Wireless Apple CarPlay and Wired Android Auto. Connect your compatible smartphone via USB for Android Auto or wirelessly for Apple CarPlay to access phone features, navigation, and music directly on the head unit's screen.
5.3.2 Mirror Link

Image 5.4: Mirror Link function.
Use the Mirror Link function to display your smartphone's screen directly onto the head unit. This allows you to control your phone's applications from the car stereo's touch screen.
5.3.3 Split Screen

Image 5.5: Split Screen multitasking.
The split-screen feature allows you to run two applications simultaneously, such as navigation on one side and a music player on the other, enhancing multitasking capabilities.
5.3.4 AM/FM RDS Radio

Image 5.6: AM/FM Radio interface.
Tune into your favorite AM and FM radio stations. The unit supports RDS (Radio Data System) for displaying station information where available.
5.3.5 Built-in DSP (Digital Signal Processor)

Image 5.7: Built-in DSP equalizer settings.
Adjust audio output with the built-in DSP. This feature allows for precise equalization and sound customization to optimize your listening experience.
5.4 Rear Camera Support

Image 5.8: Rear Camera display.
The unit supports a rear view camera input. When the vehicle is shifted into reverse, the display will automatically switch to the camera feed, assisting with parking and maneuvering.
5.5 OBD Support

Image 5.9: OBDII diagnostic scanner.
The head unit supports OBDII (On-Board Diagnostics) functionality when connected to a compatible OBDII scanner (sold separately). This allows you to monitor vehicle data and diagnose potential issues directly from the stereo display.
6. Specifications
| Operating System | Android 10.0 |
| RAM | 2GB |
| ROM | 32GB |
| CPU | Octa-Core |
| Display Size | 10.1 Inches |
| Connectivity | Wi-Fi, Bluetooth 4.0, Cellular (via hotspot) |
| Navigation | Built-in GPS Module (supports online/offline maps) |
| Audio Output Mode | Stereo, Built-in DSP |
| Human Interface Input | Microphone, Touchscreen |
| Special Features | Android Auto, Apple CarPlay, Mirror Link, Split Screen, AM/FM RDS Radio, Rear Camera Support, OBD Support, Steering Wheel Control |
| Product Dimensions | 17.32 x 11.42 x 9.84 inches |
| Item Weight | 5.74 pounds |
7. Troubleshooting
This section addresses common issues you might encounter.
- Unit does not power on:
Check all power connections (B+, ACC, GND) for secure contact. Ensure the vehicle's battery is properly connected and charged. - Slow boot-up or app performance:
The unit typically takes about 40 seconds to boot. Performance can vary with complex applications. Close unnecessary background apps to improve responsiveness. - GPS signal is weak or lost:
Ensure the GPS antenna is securely connected and placed in a location with an unobstructed view of the sky (e.g., on the dashboard). Avoid placing it under metal objects. - Bluetooth not connecting:
Ensure Bluetooth is enabled on both the head unit and your smartphone. Delete previous pairings and attempt to re-pair. Check that the head unit's Bluetooth is discoverable. - Display is too bright at night:
Adjust the brightness settings in the system menu. Some Android systems allow pulling down the notification menu to access quick brightness controls. - No sound:
Check speaker wiring connections. Ensure the volume is not muted or set to zero. Verify DSP settings are not configured to output no sound. - Steering Wheel Controls not working:
Ensure the SWC wires are correctly connected. Access the SWC learning function in the system settings and program each button according to the instructions.
8. Maintenance
Proper care and maintenance will extend the life of your car stereo.
- Cleaning the Screen: Use a soft, lint-free cloth to gently wipe the touch screen. For stubborn smudges, slightly dampen the cloth with water or a screen-safe cleaner. Avoid harsh chemicals or abrasive materials.
- Software Updates: Periodically check for system software updates via Wi-Fi to ensure optimal performance and access to new features.
- Environmental Conditions: Avoid exposing the unit to extreme temperatures, direct sunlight for prolonged periods, or excessive moisture.
- Cable Connections: Periodically check all cable connections to ensure they remain secure, especially after driving on rough terrain.
9. Warranty and Support
Your Junsun Car Stereo Head Unit comes with a standard manufacturer's warranty. For specific warranty details, please refer to the documentation included with your purchase or contact Junsun customer support directly. For technical assistance, troubleshooting, or service inquiries, please visit the official Junsun website or contact their customer service department.


