Introduction
This manual provides detailed instructions for the assembly, operation, and maintenance of your KEDIERS ATX Mid Tower PC Case. This case features a tempered glass side panel, an open frame design, and seven pre-installed Addressable RGB (ARGB) fans to enhance your computing experience. Please read this manual thoroughly before beginning installation to ensure proper setup and safe operation.

A front-side view of the KEDIERS ATX Mid Tower PC Case, showcasing the tempered glass side panel and the three front-mounted ARGB fans.
Setup and Component Installation
Follow these steps to install your computer components into the KEDIERS ATX Mid Tower PC Case.
1. Unpacking and Preparation
- Carefully remove the PC case from its packaging.
- Place the case on a stable, flat surface.
- Remove the tempered glass side panel by unscrewing the thumb screws. Set it aside on a soft, non-abrasive surface to prevent scratches.
2. Motherboard Installation
- The KEDIERS ATX Mid Tower PC Case supports ATX, Micro ATX, and Mini ITX motherboards.
- Install the I/O shield (if applicable) into the rear opening of the case.
- Align your motherboard with the standoffs inside the case. Ensure all standoffs match the motherboard's mounting holes.
- Secure the motherboard with the provided screws.

An illustration of the internal layout of the KEDIERS PC case, indicating maximum clearances for a CPU cooler (160mm), PSU (200mm), GPU (300mm), and compatibility with ATX, Micro ATX, and Mini ITX motherboards.
3. Power Supply Unit (PSU) Installation
- Mount the PSU in the designated compartment at the bottom rear of the case.
- Secure the PSU with screws from the rear of the case.
4. Storage Drive Installation
- Install 3.5-inch hard drives (HDDs) or 2.5-inch solid-state drives (SSDs) into the available drive bays.
- Secure drives with the appropriate screws.
5. Graphics Card (GPU) and Expansion Card Installation
- Remove the necessary PCI slot covers from the rear of the case.
- Insert your graphics card or other expansion cards into the motherboard's PCI-E slots.
- Secure the cards with screws. The case provides 7 expansion slots.
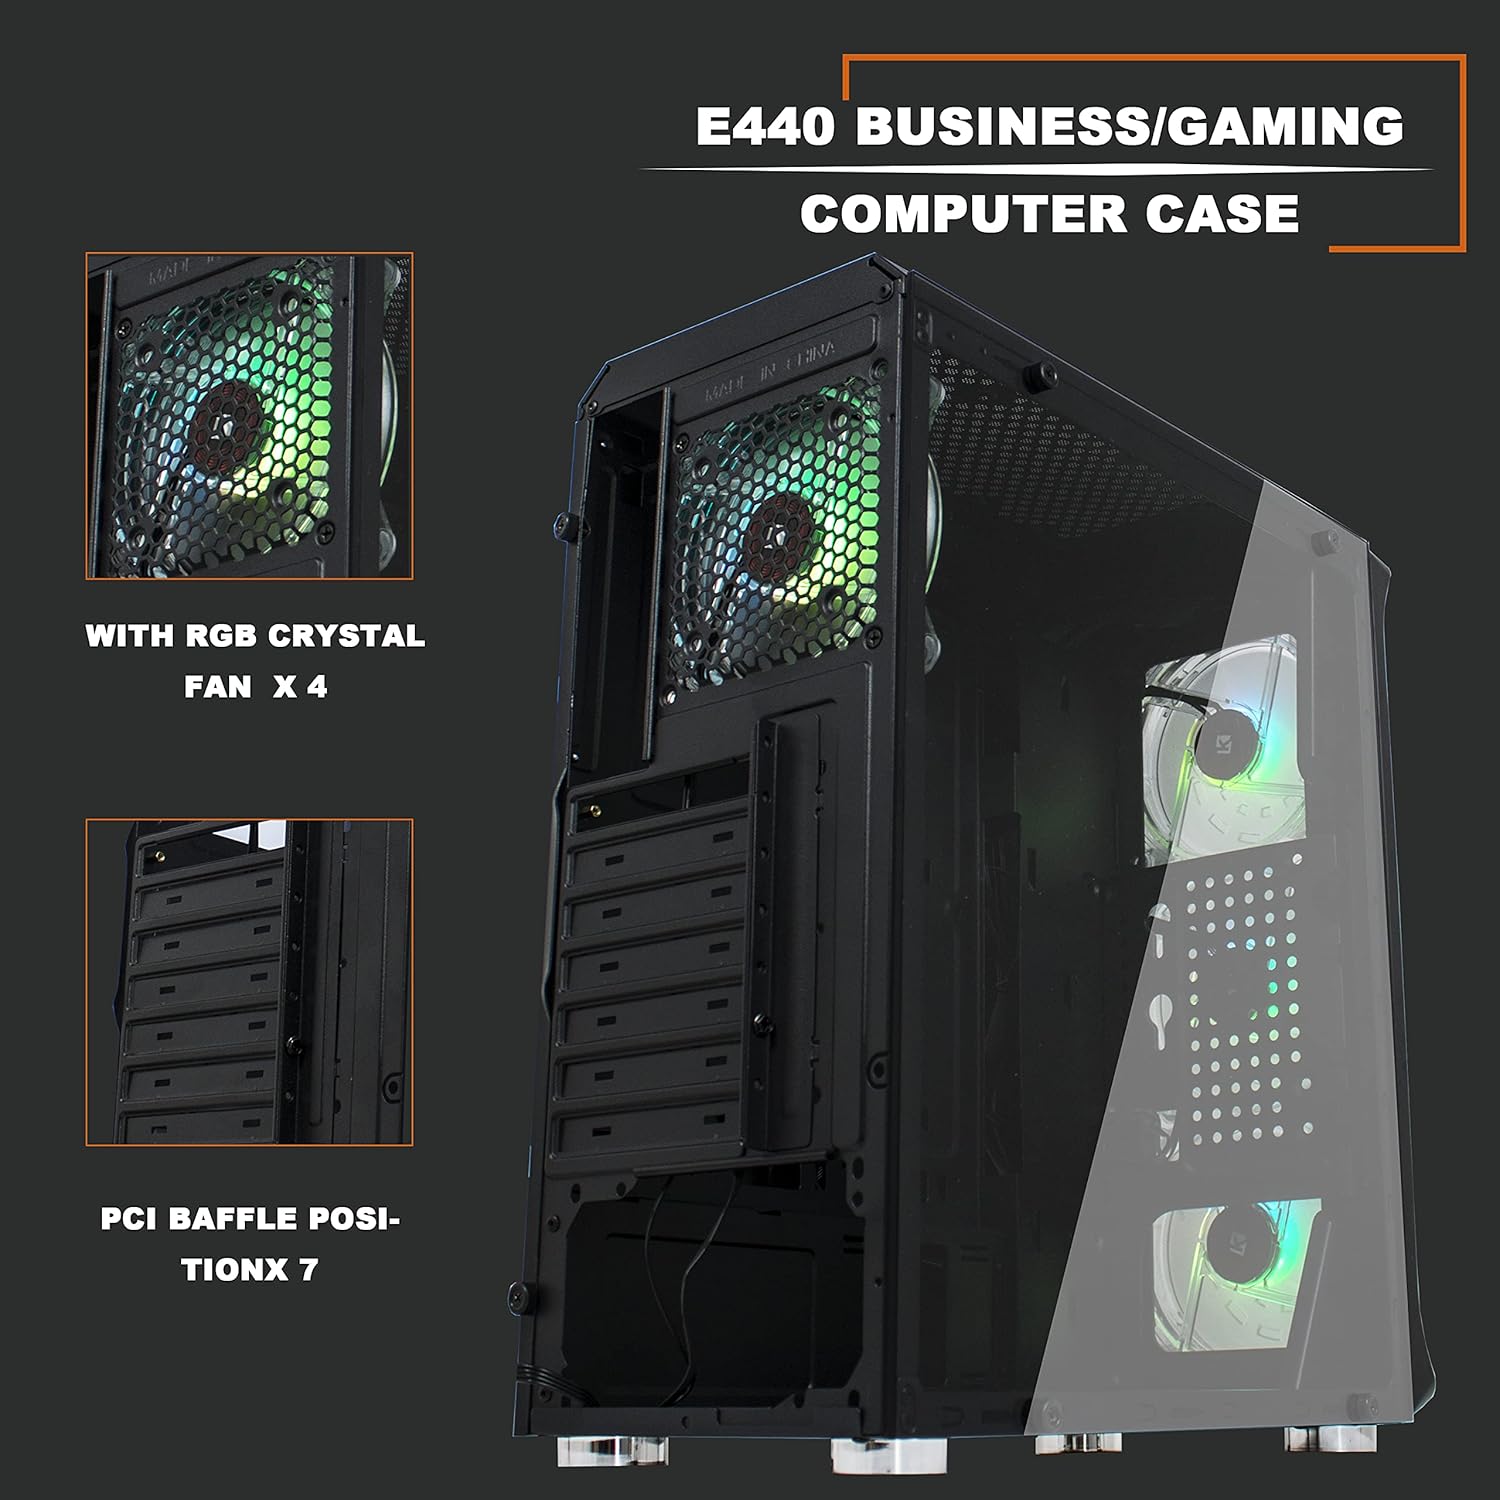
An internal view of the KEDIERS PC case, highlighting the seven PCI expansion slots and the pre-installed rear ARGB fan.
6. Connecting Front Panel I/O
- Connect the front panel cables (USB 3.0, USB 2.0, HD Audio, Power Switch, Reset Switch, Power LED, HDD LED) to the corresponding headers on your motherboard. Refer to your motherboard manual for exact header locations.
- Connect the ARGB fan controller to the power supply via SATA power and to the motherboard's 5V 3-pin D-RGB header for software control, if desired.

A close-up of the top-front control panel, featuring the power switch, RGB switch, USB 2.0 port, USB 3.0 port, and audio jack.
Operating Instructions
1. Powering On Your System
- Ensure all internal components are securely installed and all cables are connected.
- Connect your monitor, keyboard, mouse, and power cable to the rear of your PC.
- Flip the power switch on your PSU to the 'ON' position.
- Press the power button on the top-front panel of the case to start your computer.
2. ARGB Fan Control
The KEDIERS PC Case includes seven pre-installed ARGB fans. These can be controlled via the included remote or synchronized with your motherboard's ARGB software.
- Remote Control: Use the provided remote to cycle through various lighting modes, adjust brightness, change colors, and control fan speed. Refer to the remote control diagram for specific button functions.
- Motherboard Synchronization: If your motherboard has a 5V 3-pin D-RGB header, connect the ARGB controller cable to it. This allows you to control the fan lighting effects through your motherboard's RGB software (e.g., ASUS Aura Sync, MSI Mystic Light Sync, Gigabyte RGB Fusion). Note that 12V 4-pin RGB headers are not compatible with this system.
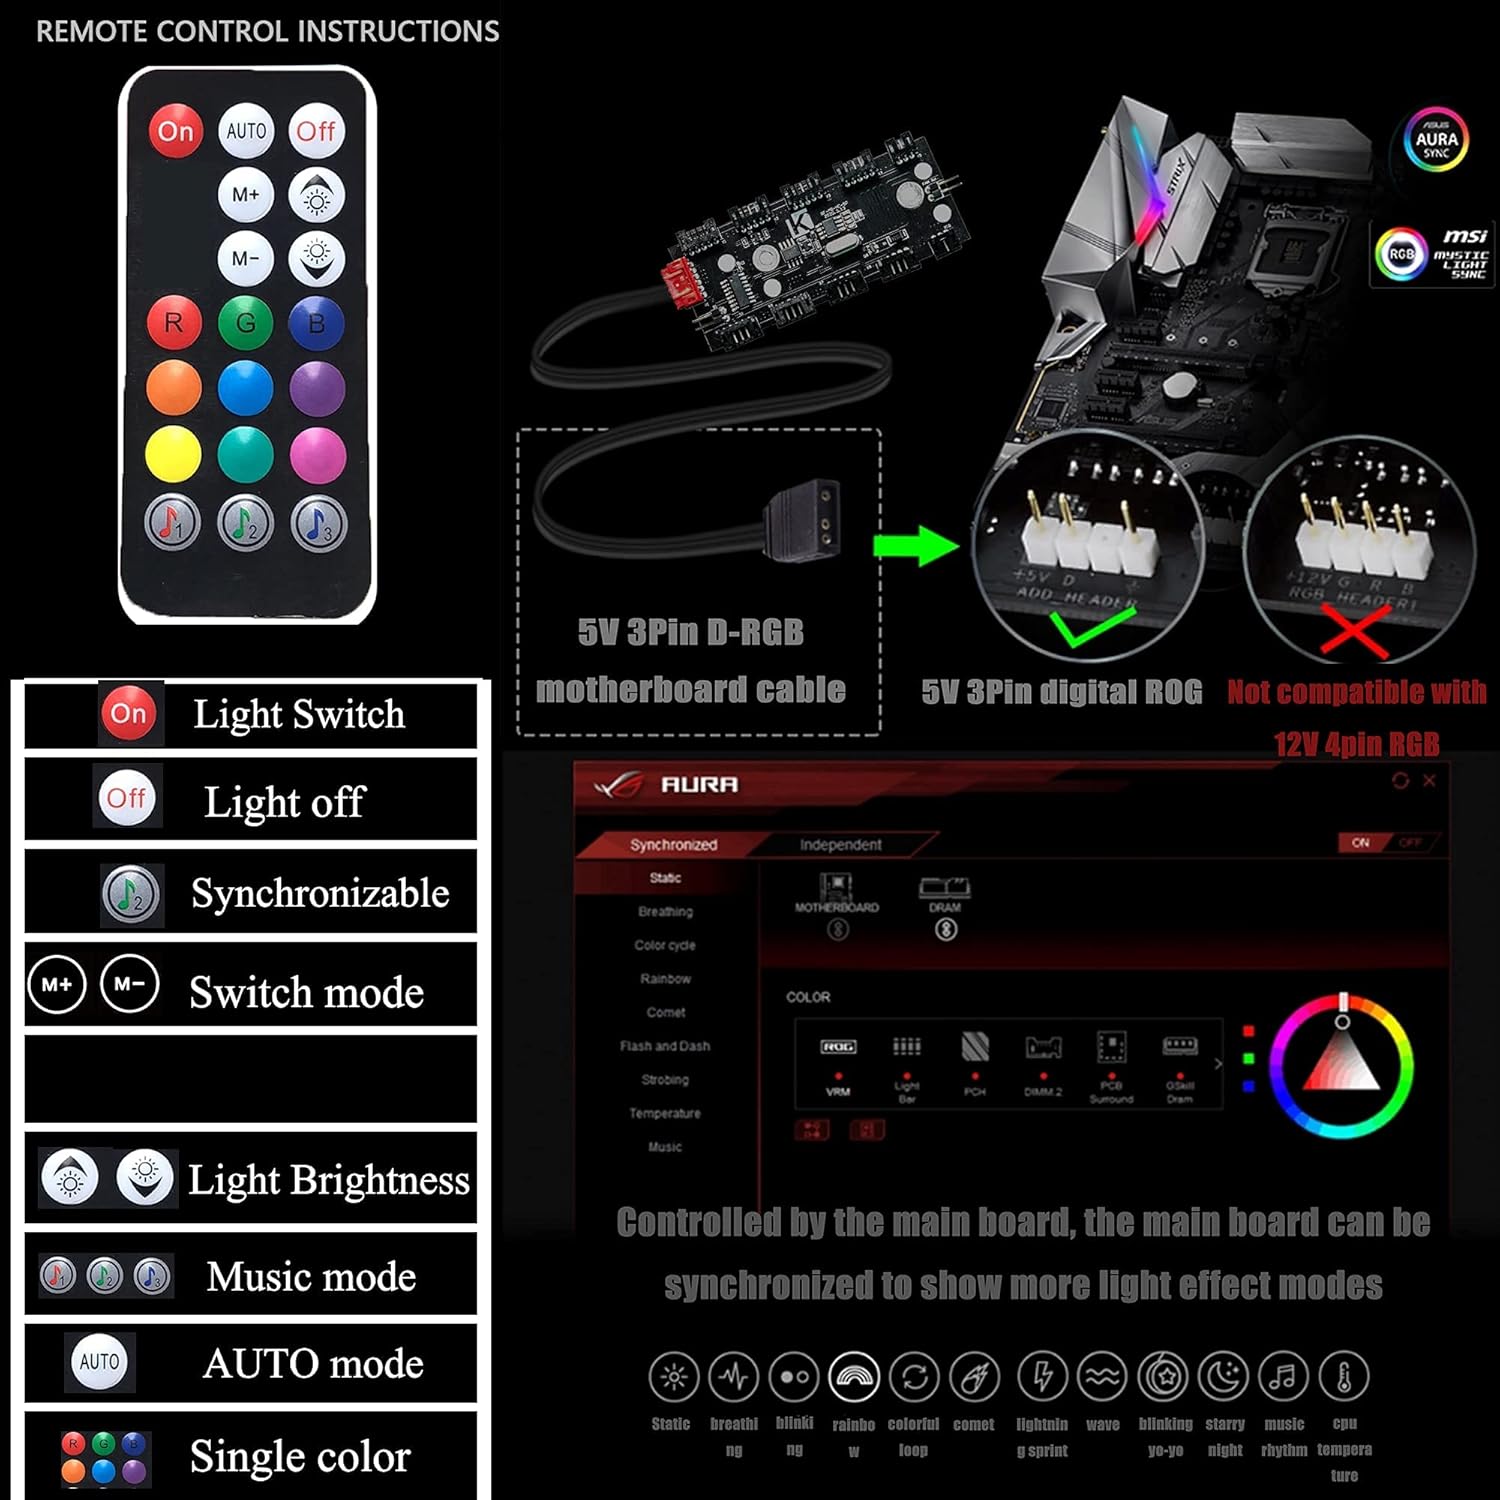
An image detailing the functions of the ARGB fan remote control and illustrating the 5V 3-pin D-RGB motherboard cable connection for synchronization, noting incompatibility with 12V 4-pin RGB headers.
Maintenance
Regular maintenance helps ensure optimal performance and longevity of your PC components.
1. Cleaning Dust Filters
- The case features a detachable dust filter on the top panel. Regularly remove and clean this filter to prevent dust buildup and maintain optimal airflow.
- Gently brush or rinse the filter with water. Ensure it is completely dry before reattaching.

The top panel of the KEDIERS PC case, showing the ventilation grille and the removable magnetic dust filter designed for easy cleaning and improved airflow.
2. Exterior and Interior Cleaning
- Use a soft, damp cloth to wipe down the exterior surfaces of the case, including the tempered glass panel. Avoid abrasive cleaners.
- For interior cleaning, use compressed air to remove dust from fans, heatsinks, and other components. Ensure the system is powered off and unplugged before cleaning the interior.
Troubleshooting
If you encounter issues with your KEDIERS PC Case, refer to the following common troubleshooting steps:
- System Not Powering On:
- Check if the PSU is switched on and properly connected to the wall outlet.
- Verify that the power switch cable from the front panel is correctly connected to the motherboard header.
- Ensure all power cables to the motherboard and components are securely seated.
- ARGB Fans Not Lighting Up/Spinning:
- Confirm the ARGB controller is receiving power from the PSU (SATA power connector).
- If using motherboard synchronization, ensure the 5V 3-pin D-RGB cable is correctly connected to the motherboard.
- Check if the fans are properly connected to the ARGB controller.
- Test the remote control by ensuring its battery is functional.
- Front Panel USB/Audio Not Working:
- Verify that the USB 3.0, USB 2.0, and HD Audio cables from the front panel are correctly connected to their respective motherboard headers.
- Ensure your motherboard drivers are up to date.
Specifications
| Feature | Specification |
|---|---|
| Case Type | Mid Tower |
| Dimensions (L x W x H) | 15.35 x 7.48 x 16.93 inches (390 x 190 x 430 mm) |
| Item Weight | 10.98 pounds (4.98 kg) |
| Material | Tempered Glass, Steel, Plastic |
| Motherboard Compatibility | ATX, Micro ATX, Mini ITX |
| Expansion Slots | 7 |
| Pre-installed Fans | 7 x 120mm ARGB Fans |
| Front I/O Ports | 2 x USB 3.0, 1 x USB 2.0, HD Audio (Mic/Headphone), Power Button, RGB Control Button |
| Max CPU Cooler Height | 160mm |
| Max GPU Length | 300mm |
| Max PSU Length | 200mm |
| Cooling Method | Air |
| Hard Disk Form Factor | 3.5 Inches (HDD) / 2.5 Inches (SSD) |
Warranty and Support
For warranty information or technical support, please contact KEDIERS customer service through their official website or the retailer where the product was purchased. Keep your proof of purchase for warranty claims.