1. Introduction
This manual provides detailed instructions for the assembly, operation, and maintenance of your VIVOSUN 4x4 Grow Tent Kit. This complete system is designed to create an optimal indoor growing environment, featuring a grow tent, full-spectrum LED grow light, automatic ventilation system, and the GrowHub A22 controller for smart environmental management. Please read this manual thoroughly before setup and operation to ensure safe and efficient use of the product.

Image 1: VIVOSUN 4x4 Grow Tent Kit in operation, showing plants under LED light and ventilation system.
2. Safety Information
- Always disconnect power before performing any maintenance or assembly.
- Ensure all electrical connections are secure and comply with local electrical codes.
- Do not operate the grow light or fan with damaged cords or plugs.
- Keep water and liquids away from electrical components.
- Ensure proper ventilation to prevent heat buildup inside the tent.
- Do not overload electrical outlets.
- Keep children and pets away from the grow tent and its components.
3. Package Contents
Verify that all components listed below are present in your package:
- 48" × 48" × 80" Standard Grow Tent
- LumaLight 400W LED Grow Light
- 6" R6 Duct Fan
- GrowHub A22 Controller
- 6" Carbon Filter
- 6" 8ft Ducting
- 6" Clamp × 2
- 6" Prefilter
- 5 Gal Grow Bag × 5
- 4 × 4ft Trellis Net
- Pruning Shears
- Rope Hangers
- Hanging Straps

Image 2: Diagram illustrating all components included in the VIVOSUN 4x4 Grow Tent Kit.
4. Setup Instructions
4.1. Grow Tent Assembly
- Unpack all tent frame poles and connectors.
- Assemble the base frame by connecting the appropriate poles and corner pieces.
- Attach the vertical poles to the base frame.
- Place the tent fabric over the assembled frame, ensuring the zippers are aligned correctly.
- Zip up the tent fabric partially to secure it.
- Install the roof poles and top frame, then fully zip the tent fabric.
- Ensure all zippers are closed to prevent light leakage.
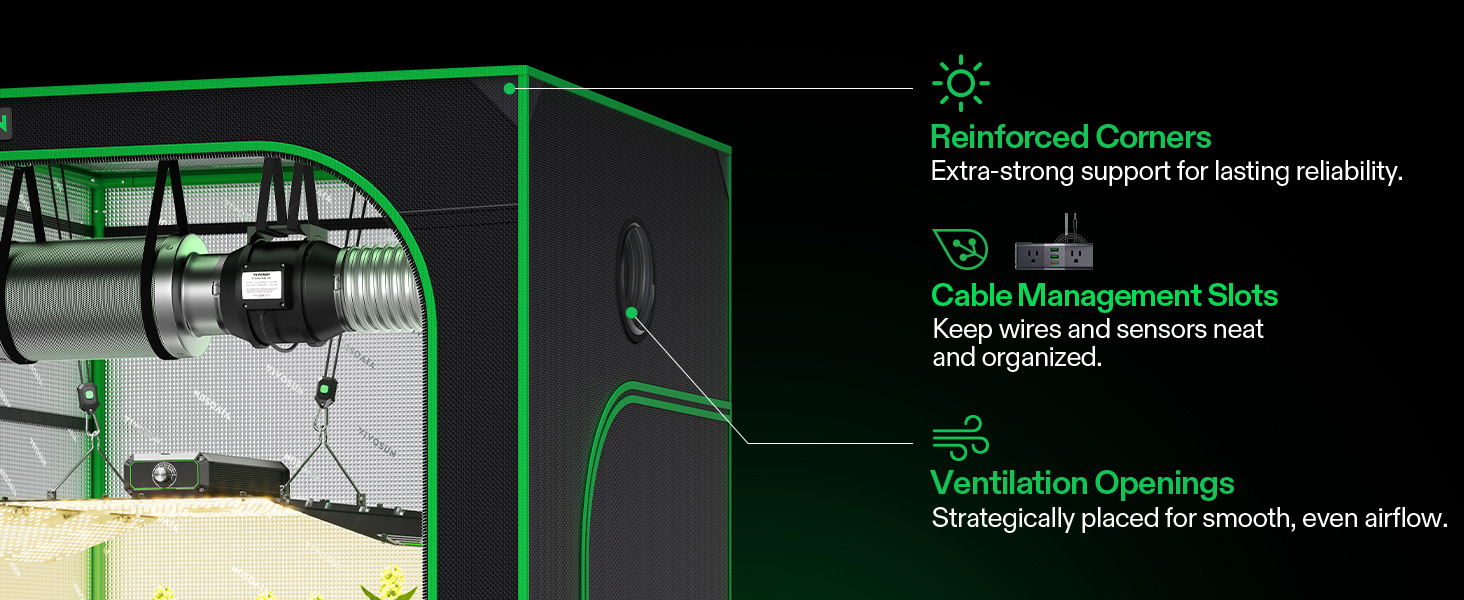
Image 3: Close-up of the VIVOSUN Grow Tent showing reinforced corners, cable management slots, and ventilation openings.
4.2. LED Grow Light Installation
- Attach the rope hangers to the LumaLight 400W LED Grow Light.
- Hang the grow light from the tent's support bars using the rope hangers, adjusting the height as needed.
- Connect the power cord to the LED light and route it through a cable management port.

Image 4: The LumaLight 400W LED Grow Light providing full spectrum light to plants.
4.3. Ventilation System Setup
- Attach the 6" carbon filter to one end of the 6" R6 Duct Fan.
- Secure the 6" prefilter around the carbon filter.
- Connect the 8ft ducting to the other end of the duct fan using a 6" clamp.
- Hang the assembled fan and filter unit inside the tent from the support bars using hanging straps.
- Route the ducting out of a ventilation port and secure it with the second 6" clamp.
- Connect the duct fan's power cord and route it through a cable management port.

Image 5: The VIVOSUN 6" R6 Duct Fan and carbon filter for efficient air circulation.
4.4. GrowHub A22 Controller Setup
- Mount the GrowHub A22 Controller outside the tent or in an easily accessible location.
- Plug the LED grow light and duct fan into the GrowHub A22 outlets.
- Connect the temperature and humidity sensor to the GrowHub A22 and place the sensor inside the tent at plant canopy level.
- Plug the GrowHub A22 into a power outlet.
- Download the VIVOSUN app on your smartphone and follow the in-app instructions to connect the GrowHub A22 to your WiFi network.
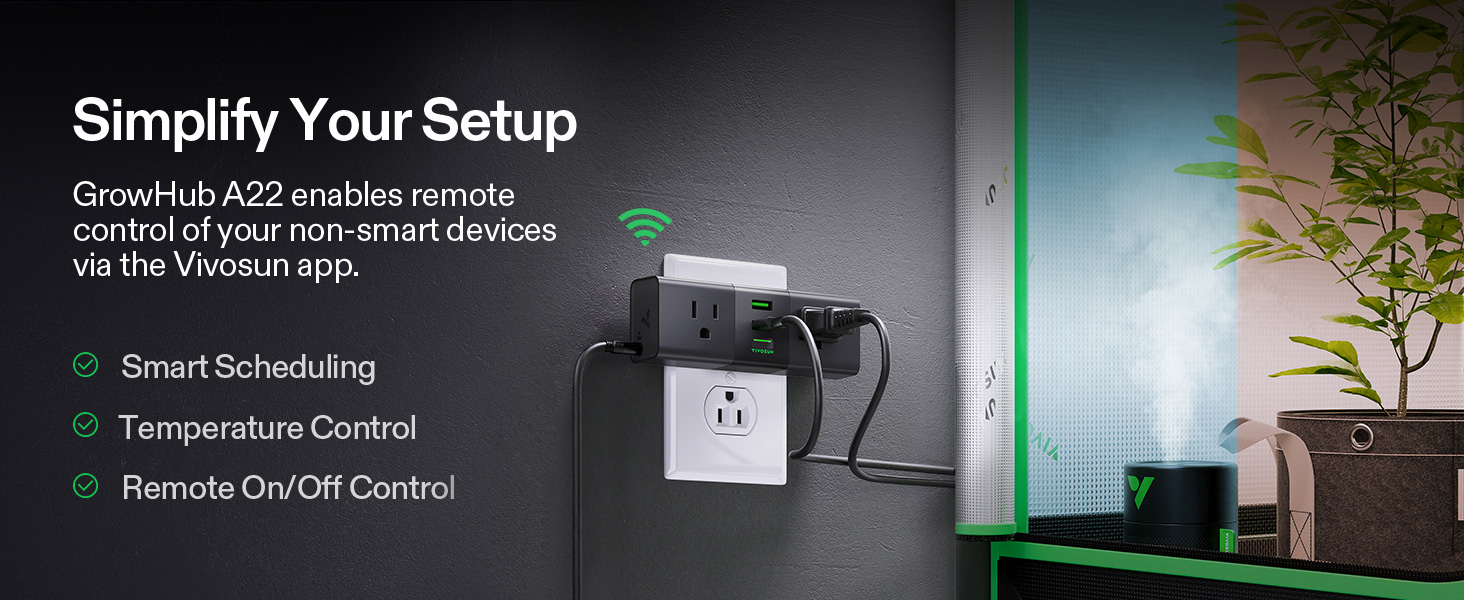
Image 6: The GrowHub A22 Controller simplifying control of grow devices.
4.5. Accessory Placement
- Place the 5-gallon grow bags on the removable Mylar floor tray inside the tent.
- Install the 4x4ft trellis net above your plants to support growth.
- Keep pruning shears readily available for plant maintenance.
5. Operating Instructions
5.1. GrowHub A22 and App Control
- Use the VIVOSUN app to monitor temperature and humidity readings from the sensor.
- Set up smart schedules for your grow light and ventilation fan based on your plant's growth stage.
- Configure temperature and humidity triggers to automatically turn devices on or off.
- Manually control connected devices (light, fan) via the app from anywhere.
5.2. LED Grow Light Operation
- The LumaLight 400W provides a full spectrum of light (3000K, 5000K, 660nm, 730nm) suitable for all growth stages.
- Adjust the light intensity and duration via the GrowHub A22 or directly on the light if it has manual controls.
- Maintain appropriate distance between the light and plant canopy to prevent light burn and ensure optimal light penetration.
5.3. Ventilation Fan Operation
- The 6" R6 Duct Fan operates at 2450 RPM, moving up to 390 CFM of air.
- Use the GrowHub A22 to set fan speed and schedule its operation to maintain desired temperature and humidity levels.
- The carbon filter helps to remove odors from the exhaust air.
Video 1: Official VIVOSUN video demonstrating the setup and features of the GIY Entry Grow Tent Kit, including fan and light installation.
6. Maintenance
6.1. Grow Tent Cleaning
- Regularly wipe down the interior Mylar lining with a damp cloth to maintain reflectivity.
- Clean the exterior fabric with a mild detergent and water as needed.
- Ensure the removable Mylar floor tray is cleaned frequently to prevent spills and maintain hygiene.
6.2. LED Grow Light Maintenance
- Periodically clean the LED light surface to ensure maximum light output. Use a soft, dry cloth.
- Check all electrical connections for tightness and wear.
6.3. Carbon Filter Replacement
- The carbon filter's prefilter should be cleaned regularly.
- Replace the carbon filter every 6-12 months, depending on usage and environmental conditions, to maintain odor control effectiveness.
7. Troubleshooting
| Problem | Possible Cause | Solution |
|---|---|---|
| Light leakage from tent | Zippers not fully closed; small gaps in fabric. | Ensure all zippers are completely closed. Check for any small holes or tears and repair with light-proof tape. |
| High temperature inside tent | Insufficient ventilation; light too close to plants; high ambient room temperature. | Increase fan speed. Adjust light height. Ensure room temperature is suitable. Add an oscillating fan for air circulation. |
| Low humidity inside tent | Dry ambient air; insufficient misting. | Use a humidifier. Increase frequency of misting plants. |
| GrowHub A22 not connecting to WiFi | Incorrect WiFi password; router too far; 2.4GHz vs 5GHz network issue. | Verify WiFi password. Move GrowHub closer to router. Ensure you are connecting to a 2.4GHz network. |
| Fan not operating | Power disconnected; fan speed set to zero; faulty wiring. | Check power connection. Adjust fan speed setting. Inspect wiring for damage. |
8. Specifications
| Feature | Specification |
|---|---|
| Grow Tent Dimensions | 48"L x 48"W x 80"H |
| Chamber Volume | 106 Cubic Feet |
| Frame Material | Metal |
| Inner Material | Mylar |
| Outer Material | 600D Oxford Fabric, PE |
| LED Grow Light Wattage | 400 Watts (LumaLight) |
| Duct Fan Airflow | 390 CFM |
| Duct Fan Speed | 2450 RPM |
| Noise Level | Less than 34 dB |
| Controller | GrowHub A22 (WiFi-enabled) |
9. Warranty and Support
VIVOSUN products are manufactured to high-quality standards. This product comes with a standard manufacturer's warranty. For specific warranty details, please refer to the warranty card included in your package or visit the official VIVOSUN website. For technical support, troubleshooting assistance, or to inquire about replacement parts, please contact VIVOSUN customer service through their official website or the contact information provided in your product documentation.


