Introduction
This manual provides detailed instructions for the installation, operation, and maintenance of the Briidea Pump Start Relay Sprinkler System, Model HPR-01. Please read this manual thoroughly before installation and use to ensure proper function and safety.
Safety Information
WARNING: HIGH VOLTAGE! DISCONNECT POWER SUPPLY BEFORE INSTALLING.
Always ensure the main power supply to the pump and the relay is disconnected before performing any installation, wiring, or maintenance. Failure to do so can result in serious injury or death. Installation should be performed by a qualified electrician or a knowledgeable individual familiar with electrical wiring and safety procedures. Observe all local electrical codes.
The unit is designed for outdoor use and is weather-resistant. However, ensure all connections are secure and the enclosure is properly sealed to prevent water ingress.
Product Overview
The Briidea Pump Start Relay (Model HPR-01) is designed to automatically activate a pump for watering in conjunction with a standard 24 VAC sprinkler system. It ensures the pump starts when the sprinkler controller signals for water, providing reliable operation for your irrigation system.
Key features include:
- Automatic pump activation for irrigation systems.
- Weather-resistant plastic case for durability and protection.
- Quick lever-nut wire connectors for simplified wiring.
- Compatible with 1HP 120V or 2HP 240V pumps.
- Works with all standard 24 VAC sprinkler systems.
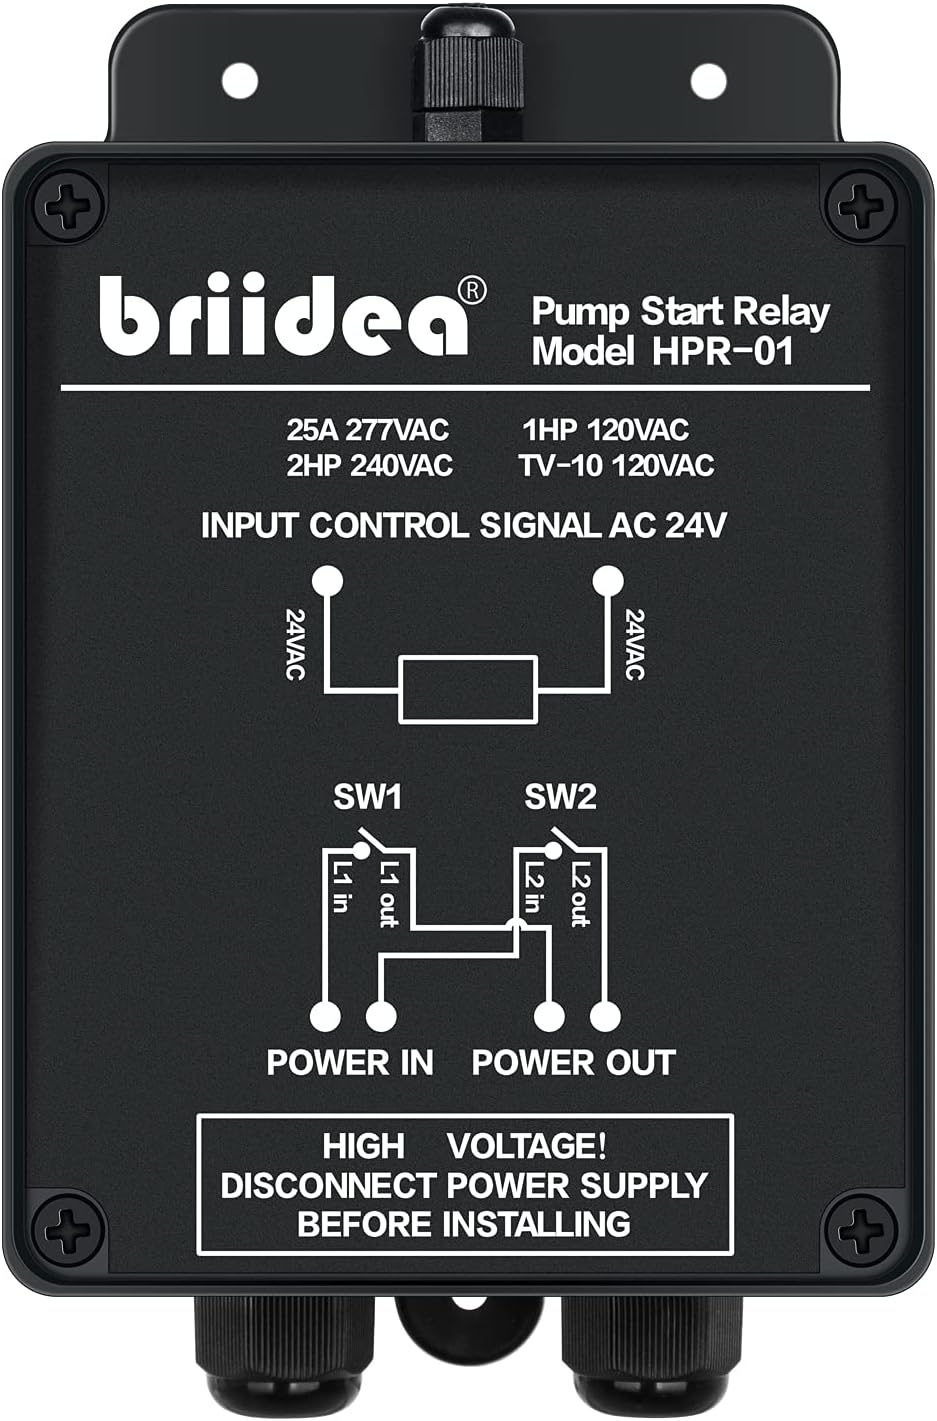
Image: Front view of the Briidea Pump Start Relay HPR-01, showing the model number, electrical ratings (25A 277VAC, 1HP 120VAC, 2HP 240VAC), and a simplified internal wiring diagram. A warning for high voltage and to disconnect power before installation is visible.
Specifications
| Specification | Value |
|---|---|
| Brand | briidea |
| Model | HPR-01 |
| Color | Black |
| Material | Plastic |
| Style | Above Ground |
| Power Source | Requires external power for pump, controlled by 24 VAC signal |
| Item Weight | 0.7 Kilograms |
| Control Voltage | 24 Volts AC |
| Pump Compatibility | 1HP 120V or 2HP 240V |
| Dimensions (H x W x D) | 5.6 in x 3.9 in x 3.3 in (approximate, based on image) |

Image: Diagram illustrating the dimensions of the Briidea Pump Start Relay HPR-01, showing a height of 5.6 inches, width of 3.9 inches, and depth of 3.3 inches.
Setup and Installation
Before you begin, ensure the main power supply to your pump and sprinkler system is completely disconnected.
Step 1: Attaching the Bracket
Mount the pump start relay securely to a wall or suitable surface using appropriate screws. The unit features mounting screw holes for easy attachment.
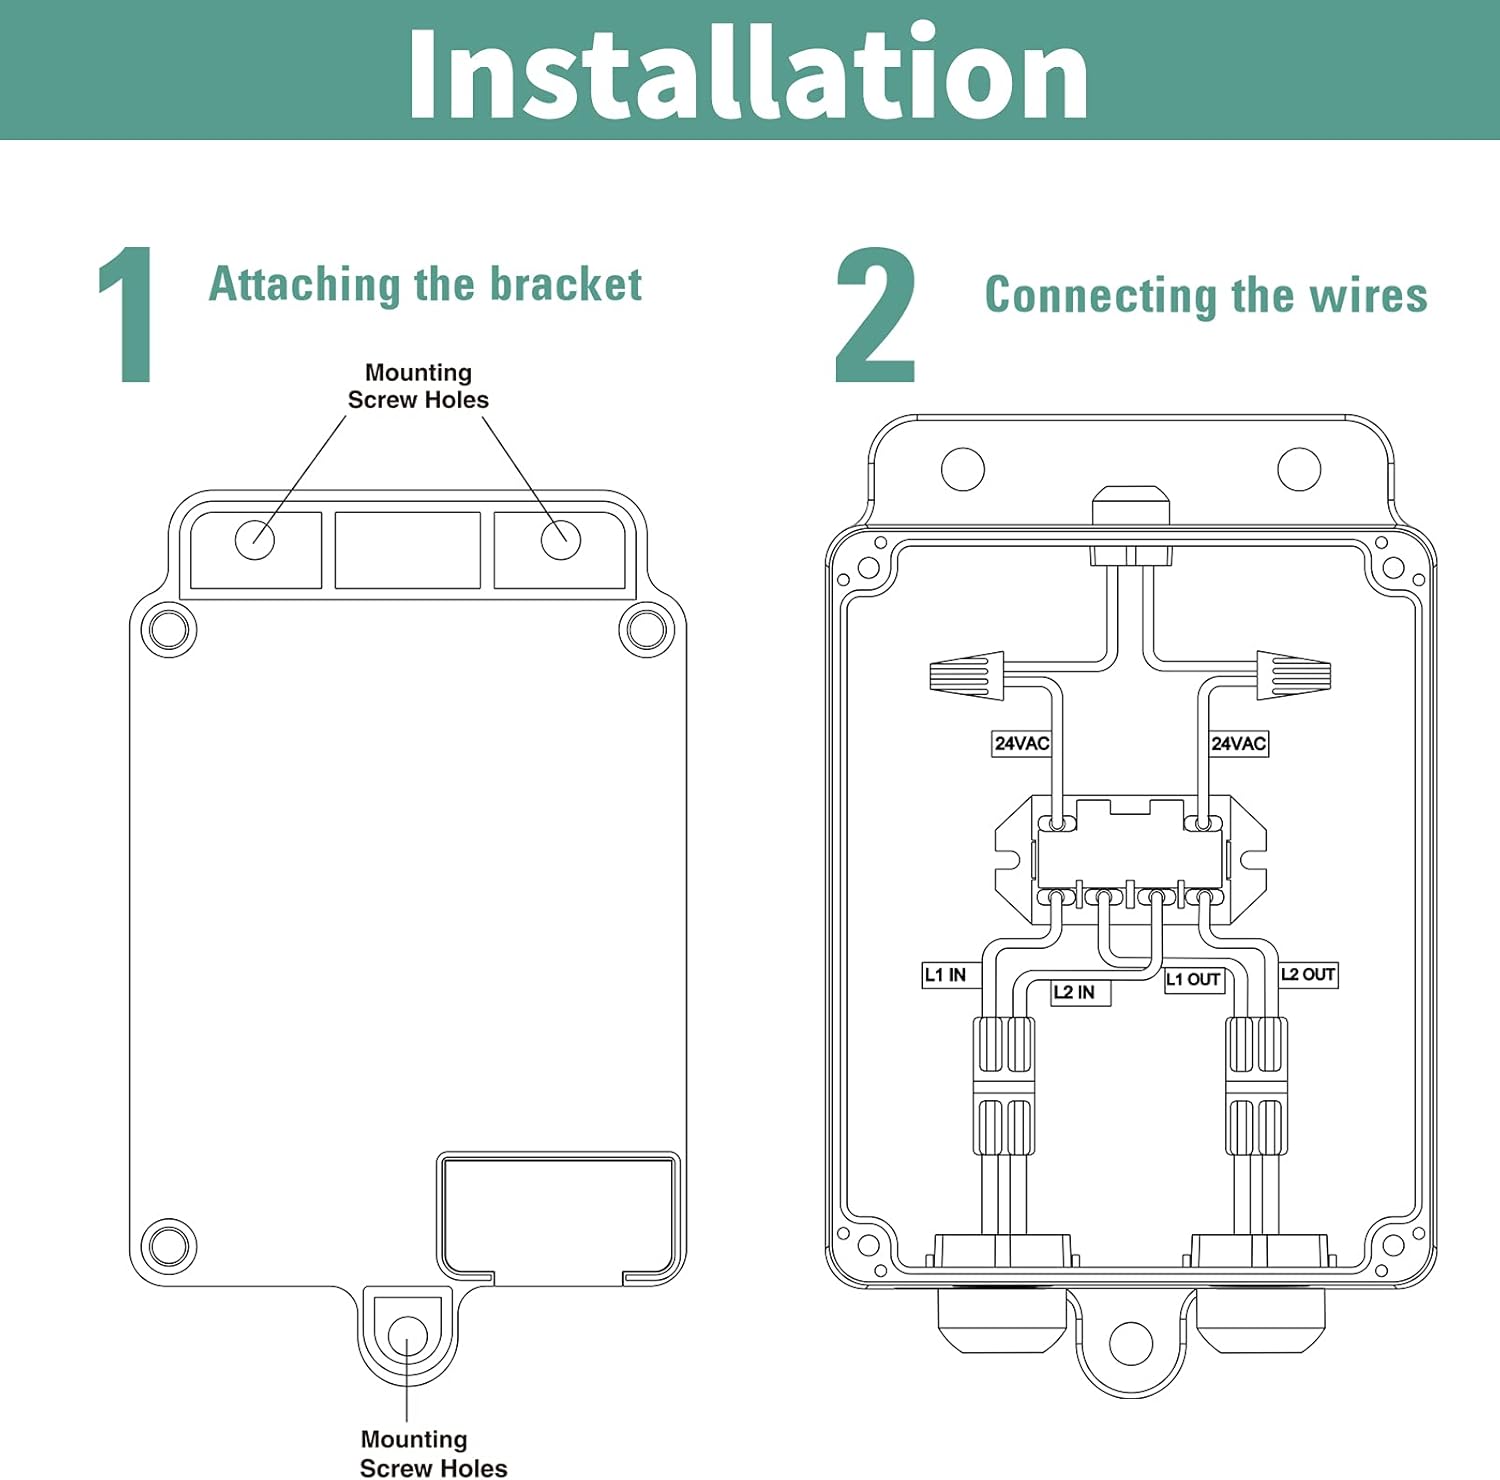
Image: Installation diagram showing the back of the relay unit with designated mounting screw holes for attaching the bracket to a surface.
Step 2: Connecting the Wires
The relay uses quick lever-nut wire connectors for simplified wiring. Refer to the internal wiring diagram and the sample layout for correct connections.
Wiring Diagram:

Image: Internal view of the Briidea Pump Start Relay showing the wiring connections. Blue wires are for 24VAC input control, and red/black wires are for L1 IN, L1 OUT, L2 IN, L2 OUT power connections using lever-nut connectors.
Connection Points:
- 24VAC Input: Connect the 24 VAC control wires from your sprinkler controller to the designated 24VAC terminals on the relay.
- Power In (L1 IN, L2 IN): Connect the incoming power supply wires to the L1 IN and L2 IN terminals.
- Power Out (L1 OUT, L2 OUT): Connect the power wires leading to your pump to the L1 OUT and L2 OUT terminals.
Sample Layout:

Image: A comprehensive diagram illustrating a sample installation layout. It shows the sprinkler controller connected to the pump start relay via 24VAC control wires, and the relay connected to the pump with power in and power out lines.
Ensure all wire connections are tight and secure. After wiring, close the enclosure lid tightly to maintain its weather-resistant seal.

Image: The Briidea Pump Start Relay HPR-01 installed on an exterior brick wall, demonstrating its weather-resistant design and typical placement alongside a sprinkler controller.
Operating Instructions
Once installed and wired correctly, the Briidea Pump Start Relay operates automatically in conjunction with your sprinkler controller.
- Ensure the main power supply to the pump and the sprinkler controller is restored.
- When your sprinkler controller initiates a watering cycle, it sends a 24 VAC signal to the pump start relay.
- Upon receiving this signal, the relay closes its internal contacts, allowing power to flow to the connected pump.
- The pump will then activate and supply water to your sprinkler system.
- When the sprinkler controller completes the watering cycle and stops sending the 24 VAC signal, the relay opens its contacts, cutting power to the pump and turning it off.
No manual intervention is required for the relay's operation once properly configured with your sprinkler system.
Maintenance
The Briidea Pump Start Relay is designed for minimal maintenance. Follow these guidelines to ensure long-term performance:
- Periodically inspect the unit for any signs of physical damage or wear.
- Ensure the enclosure lid remains tightly sealed to protect internal components from moisture and debris.
- Check wire connections for tightness, especially after initial installation or if the unit has been moved.
- Keep the area around the relay clear of obstructions to allow for proper ventilation and access.
Always disconnect power before performing any inspection or maintenance.
Troubleshooting
| Problem | Possible Cause | Solution |
|---|---|---|
| Pump does not turn on when sprinkler controller activates. |
|
|
| Pump runs continuously. |
|
|
| Unit shows signs of electrical issues (e.g., scorching, tripping breaker). |
|
|
For issues not covered here, or if troubleshooting steps do not resolve the problem, contact customer support.
Warranty Information
Specific warranty details for the Briidea Pump Start Relay HPR-01 are not provided in this manual. Please refer to the product packaging or the manufacturer's official website for the most current warranty information.
Customer Support
For technical assistance, questions, or support regarding your Briidea Pump Start Relay HPR-01, please visit the official Briidea website or contact their customer service department. Contact information is typically available on the product packaging or the manufacturer's website.