1. Product Overview
The BILIPALA Wireless Weather Station (Model 010ABS) is designed to provide accurate indoor and outdoor temperature and humidity readings, along with weather forecasts, a DCF radio-controlled clock, and a vibrant VA color display. It includes a main unit and three wireless outdoor sensors, allowing you to monitor conditions in up to four different locations.

Image: BILIPALA Wireless Weather Station main unit and three outdoor sensors, showcasing the complete product package.

Image: The weather station main unit and three outdoor sensors, illustrating the maximum transmission range of 100 meters in open areas.
2. Setup Instructions
2.1 Initial Power-Up
- Power the Main Unit: Insert 3 AAA batteries (not included) or connect the included AC adapter to the main weather station unit.
- Power the Outdoor Sensors: Insert 2 AAA batteries (not included) into each of the three outdoor sensors. Ensure each sensor displays a different channel number (1, 2, or 3).
- Initial Synchronization: Place the main unit and all sensors in the same location for 2 to 3 hours. This allows the devices to automatically connect and the DCF radio signal to synchronize the time.

Image: Rear view of the weather station main unit, illustrating the battery compartment for 3 AAA batteries and the port for the AC adapter, demonstrating the two power supply methods.
2.2 Sensor Placement
The outdoor sensors are designed to be weather-resistant (IPX4 waterproof rating), but they should not be submerged in water. For optimal performance and longevity, place sensors in a sheltered location, such as under an awning or eaves, to protect them from direct heavy rain and sunlight.

Image: Visual guide for outdoor sensor placement, indicating that sensors should be placed under an awning for protection, despite their IPX4 waterproof rating.
3. Operating Instructions
3.1 Display Overview
The VA color display provides clear visibility from various angles, showing indoor and outdoor temperature and humidity, weather forecasts, time, date, and comfort levels.
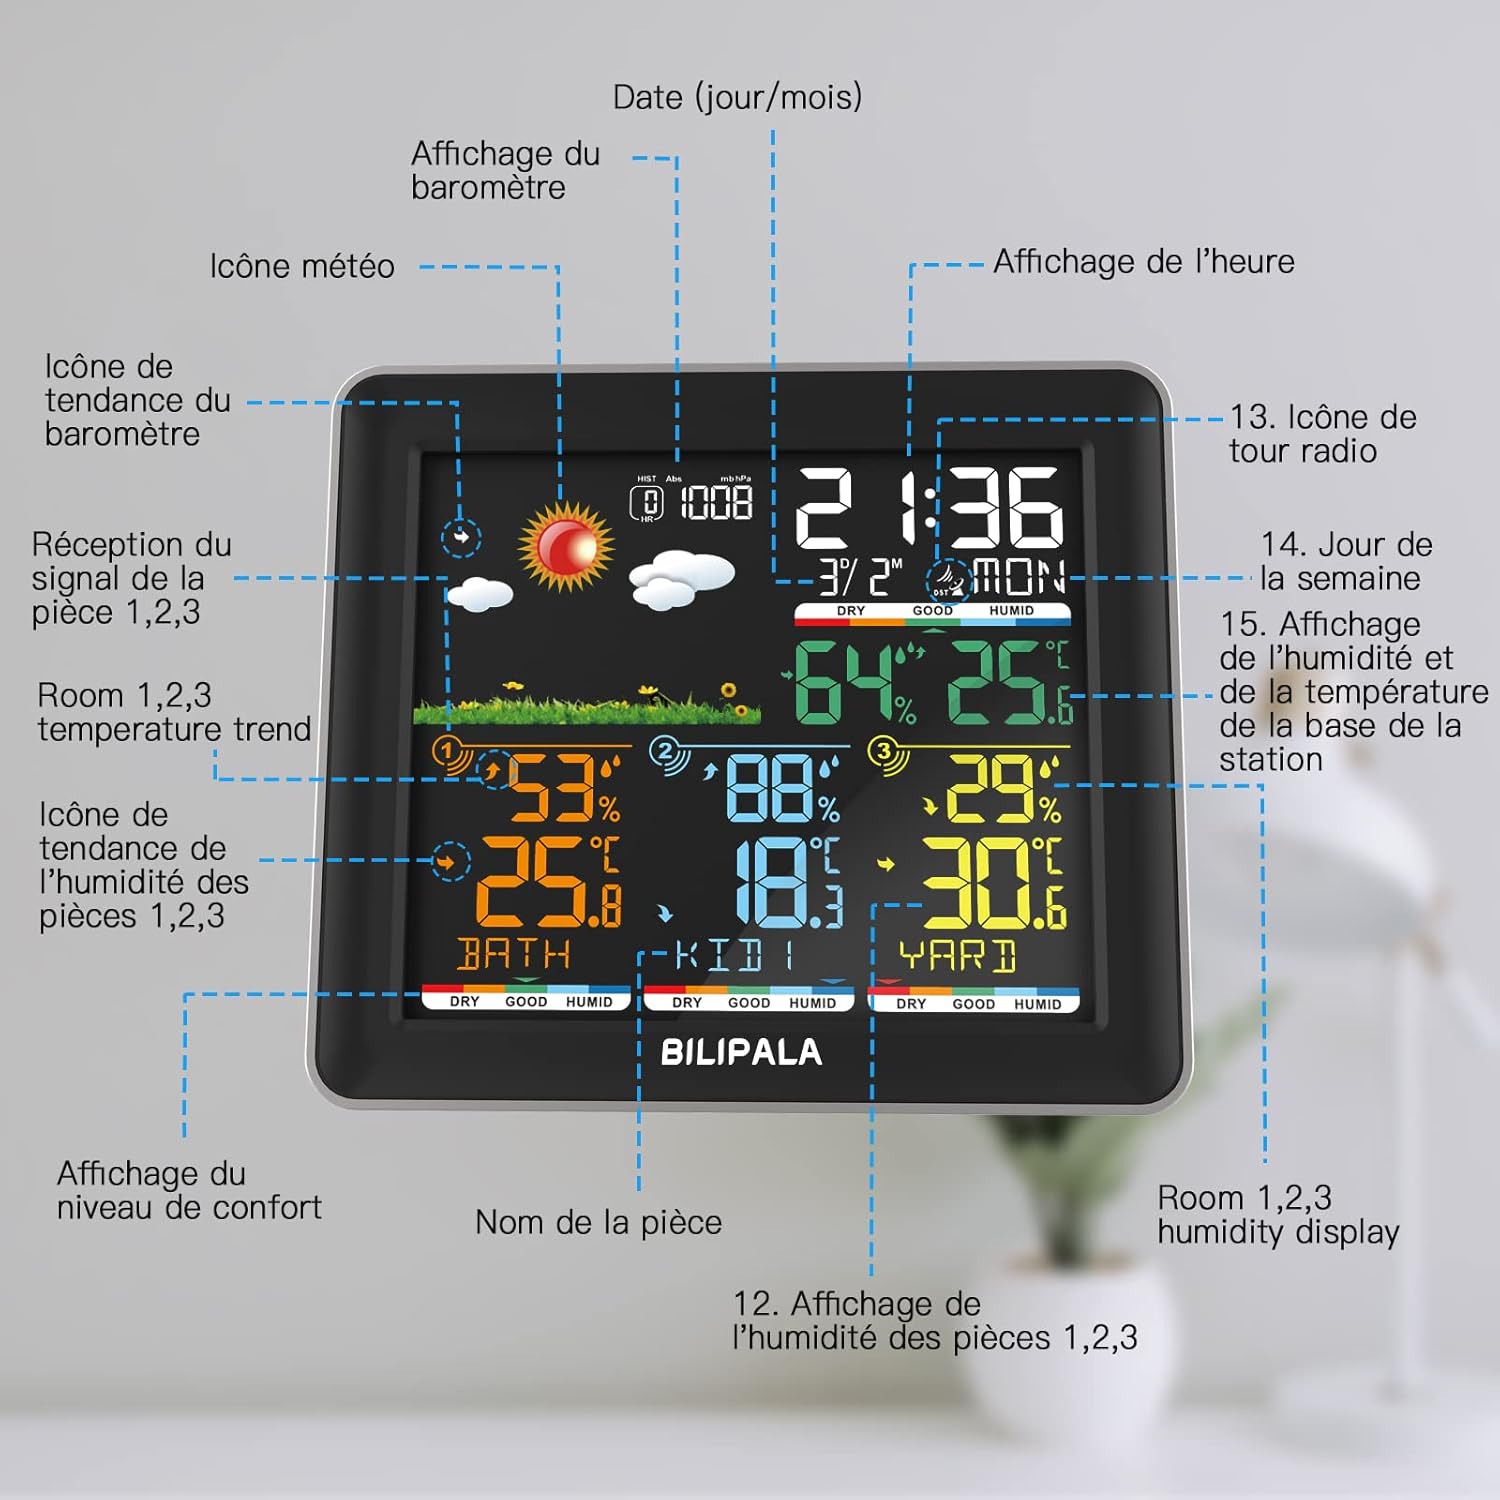
Image: A detailed diagram of the weather station's main display, with labels pointing to the weather icon, barometer display, time, date, indoor/outdoor temperature and humidity, comfort level, and room names for each sensor.
3.2 Customizing Room Names
Each outdoor sensor can be assigned a custom room name (up to 5 characters, including letters, numbers, and special characters) to easily identify the location of each reading.

Image: The weather station display showing customizable room names such as 'BATH', 'KID'S', and 'YARD' assigned to the three outdoor sensors (CH1, CH2, CH3).
3.3 Backlight Settings
The display features 3 levels of adjustable backlight. When powered by AC adapter, the backlight can be continuously on. When using batteries, the backlight activates briefly with button presses. To toggle continuous backlight (when using AC adapter), long-press the SNOOZE/LIGHT button for 3 seconds.

Image: The weather station display demonstrating three adjustable backlight levels: Off, 50% brightness, and 100% brightness, suitable for different lighting conditions.
3.4 Weather Forecast
The weather station provides forecasts for the next 8 hours based on atmospheric pressure changes. It displays 7 weather symbols: Sunny, Cloudy, Overcast, Drizzle, Heavy Rain, Stormy, and Snow.

Image: A visual chart illustrating the 7 weather forecast icons (Sunny, Cloudy, Overcast, Drizzle, Heavy Rain, Stormy, Snow) and their correlation with 12-hour barometer data.
3.5 Alarm and Snooze Function
The weather station includes an alarm with a snooze function. Refer to the full manual for specific setting instructions.

Image: The weather station placed on a bedside table, indicating its alarm and snooze functionality for daily use.
3.6 Temperature and Humidity Trends
The display shows current temperature and humidity, along with trend indicators (rising, falling, stable) and records of maximum and minimum values.

Image: A close-up view of the weather station display, highlighting the trend indicators for temperature and humidity, the MAX/MIN temperature and humidity records, and the comfort level rating.
4. Maintenance
4.1 Battery Replacement
Replace batteries in both the main unit and outdoor sensors when the low battery indicator appears on the display. Use fresh AAA batteries.
4.2 Cleaning
Wipe the main unit and sensors with a soft, dry cloth. Do not use abrasive cleaners or immerse in water.
5. Troubleshooting
5.1 Incorrect Weather Forecast
Weather forecasts are based on atmospheric pressure changes. The main station requires 2 to 4 days to detect actual air pressure during initial use. Altitude, temperature, and atmospheric density can also influence pressure readings. If forecasts seem inaccurate, allow more time for calibration or manually adjust the air pressure if your model supports it (refer to the full manual).
5.2 Outdoor Sensors Not Connecting
If a room (1/2/3) does not display corresponding temperature and humidity data:
- Ensure all devices are powered on and placed within 80 meters of each other (without significant barriers).
- For a quick method, leave all devices powered on and in proximity for 1 hour; they should automatically reconnect.
- Manual Reconnection: If only one sensor (e.g., Room 1) is not displaying data, remove its batteries. On the main unit, press and hold the corresponding ROOM button (e.g., "ROOM1") for 3 seconds until the signal reception icon for that room flashes. Then, press and hold the ROOM button again until the room number disappears, indicating the previous sensor data is cleared. Reinsert the batteries into the sensor. The sensor should attempt to reconnect. Repeat this process 2-3 times if necessary.
5.3 Main Station Time Mismatch
Once connected to the DCF77 signal, the main station displays the time from the DCF77 signal tower. If your time zone does not match Frankfurt, Germany (the DCF77 signal origin), you will need to manually adjust the time zone or time settings. Refer to the full instruction manual for detailed steps on setting the correct time.
5.4 "LL" Display on Main Station
The main station's temperature measurement range is between 0 ℃ and +50 ℃. If the indoor temperature falls below 0 ℃, the main station will display "LL" (Low Limit).
6. Specifications
| Feature | Detail |
|---|---|
| Brand | BILIPALA |
| Model Number | 010ABS |
| Product Dimensions (L x W x H) | 16.26 x 2.54 x 14.22 cm |
| Weight | 636 grams |
| Power Source (Main Unit) | AC Adapter (included) or 3 x AAA Batteries (not included) |
| Power Source (Outdoor Sensors) | 2 x AAA Batteries per sensor (not included) |
| Display Type | VA Color LCD |
| Outdoor Sensor Transmission Range | Up to 100 meters (in open areas) |
| Outdoor Sensor Waterproof Rating | IPX4 |
| Main Unit Temperature Range | 0 ℃ to +50 ℃ |
| Languages Supported (Display & Manual) | English, German, French, Spanish, Italian |
| UPC | 661273058190 |