
Pixcast WR23
Pixcast WiFi Range Extender User Manual
Model: WR23
Introduction
The Pixcast WiFi Range Extender is designed to expand your existing WiFi coverage, creating stronger and more far-reaching connections in areas that are difficult to reach. This device allows you to enjoy fast wireless coverage throughout your entire home or office, eliminating dead zones and improving signal strength for all your connected devices.
Product Overview
The Pixcast WiFi Range Extender (Model WR23) is a compact, wall-plug design device that boosts your wireless signal. It features a WPS button for easy setup and an Ethernet port for wired connections.

Figure 1: Front view of the Pixcast WiFi Range Extender, showing the WPS button and indicator lights for power, WiFi, LAN, and signal strength.
Key Features:
- Ultra High Speed Signal: Achieves up to 300Mbps (2.4GHz) for stable online video streaming and chatting.
- Complete WiFi Coverage: Provides 360° signal penetration to extend WiFi to all areas of your home, including bedrooms, floors, and gardens.
- Universal Compatibility: Compatible with 99% of routers on the market and all standard routers.
- Safe Heat Dissipation: Designed with cooling holes on both sides to maintain optimal operating temperature.
- Easy Setup with WPS Button: Simplifies the setup process, allowing for quick extension of wireless coverage.
- Ethernet Port: Includes a 10/100Mbps LAN/WAN RJ45 Ethernet Port for wired device connections.

Figure 2: Illustration of the WiFi extender boosting signal to various devices such as smartphones, gaming consoles, laptops, and smart televisions, demonstrating its multi-device support.

Figure 3: A floor plan diagram illustrating how the WiFi extender (Wireless Repeater) extends the coverage of an existing Wireless Router, reaching areas like bedrooms, living rooms, and kitchens that might otherwise have weak signals.
Specifications
| Feature | Detail |
|---|---|
| Wireless Standard | IEEE802.11 b/g/n |
| Physical Ports | 1 x 10/100Mbps LAN/WAN RJ45 Ethernet Port |
| Power Input | 100~240V, 50 / 60HZ |
| Encryption | WPA-PSK / WPA2-PSK, WPA / WPA2 |
| Data Transfer Rate | 300 Megabits Per Second (2.4GHz) |
| Frequency Band Class | Dual-Band (operates on 2.4GHz) |
| Compatible Devices | Router |
| Dimensions | 8.79 x 8.71 x 8.2 cm |
| Item Weight | 109 g |
Setup Instructions
There are two primary methods to set up your Pixcast WiFi Range Extender: using a web browser or using the WPS button.
Method 1: Web Browser Setup
- Plug In: Plug the WiFi extender into a power socket. Wait approximately 5 seconds for the device to power on.
- Connect to Extender's WiFi: On your wireless device (e.g., phone, laptop, tablet), open your WiFi settings. Find and select the network named "PIX-LINK-2.4G" from the available WiFi list and connect to it.
- Open Browser: Open a web browser (e.g., Chrome, Firefox, Safari) and enter the IP address "192.168.7.234" into the address bar. Press Enter.
- Login: When prompted, enter the password "admin" (all lowercase letters) to log in to the setup page.
- Scan for Networks: The extender will automatically scan for available WiFi networks. Select the WiFi network you wish to extend from the list.
- Enter Router Password: Enter the password of your existing wireless router. You will also have the option to name your extended network (SSID).
- Complete Setup: The repeater will complete the setting process within approximately 30 seconds. Once the setup is finished, reconnect your devices to the newly extended network using the password you set (or your original router's password if you didn't change it).
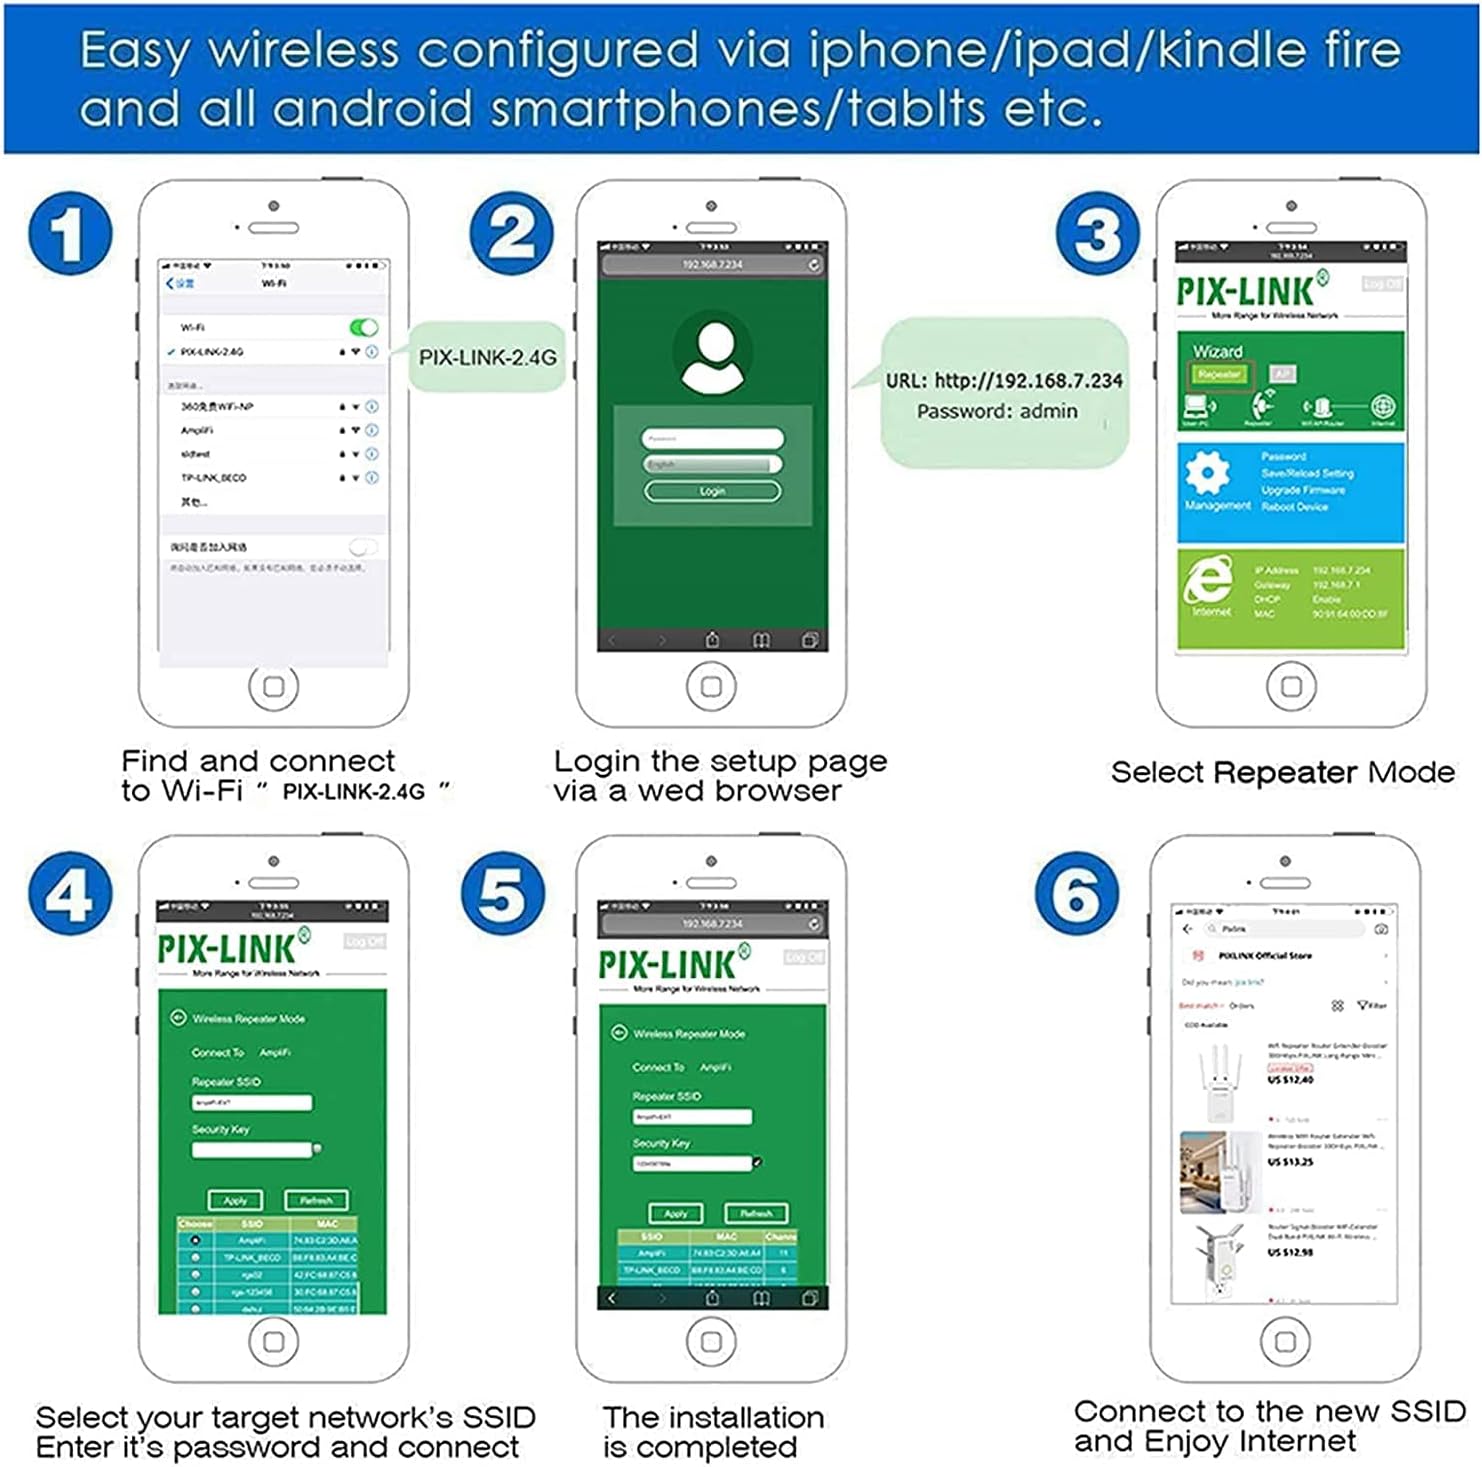
Figure 4: Visual step-by-step guide for configuring the WiFi extender via a web browser on a smartphone, showing connection to "PIX-LINK-2.4G", accessing the setup page, selecting repeater mode, choosing the target network, and confirming installation.
Method 2: WPS Button Setup (If your router supports WPS)
- Plug In: Plug the WiFi extender into a power socket near your main router.
- Press WPS on Extender: Press the WPS button on the Pixcast WiFi Range Extender. The WPS indicator light on the extender should start blinking.
- Press WPS on Router: Within two minutes, press the WPS button on your main wireless router.
- Wait for Connection: The extender will automatically connect to your router. Once connected, the WPS indicator light on the extender will become solid, indicating a successful connection.
- Relocate Extender: You can now unplug the extender and move it to a desired location within the range of your main router's signal, but closer to the area where you need extended coverage.
Operating Instructions
Once the Pixcast WiFi Range Extender is successfully set up, it will broadcast an extended WiFi network. Your devices can connect to this extended network just like any other WiFi network.
- Connecting Devices: On your smartphone, laptop, or other WiFi-enabled device, search for available WiFi networks. Select the SSID (network name) of your extended network (e.g., "YourNetworkName_EXT" or the custom name you set during setup) and enter the password.
- Indicator Lights: Pay attention to the indicator lights on the extender.
- Power Light: Solid green indicates the device is powered on.
- WiFi Light: Solid green indicates a stable WiFi connection.
- LAN Light: Solid green indicates a device is connected via the Ethernet port.
- Signal Light: Indicates the strength of the signal received from your main router. More lights typically mean a stronger signal.
- Repeater Mode Status: The WPS button light also indicates the repeater's status:
- On: Relay Successful (extender is working correctly).
- Blinking: Relay Failure (extender is not successfully connected to the main router).

Figure 5: A detailed view of the Pixcast WiFi extender's WPS button and its associated indicator light, explaining that a solid light means "Relay Successful" and a blinking light means "Relay Failure" for the repeater mode.
Maintenance
The Pixcast WiFi Range Extender requires minimal maintenance. Follow these general guidelines to ensure optimal performance:
- Keep Clean: Gently wipe the device with a soft, dry cloth to remove dust. Do not use liquid cleaners or aerosols.
- Ventilation: Ensure the cooling holes on the sides of the extender are not blocked to allow for proper heat dissipation.
- Firmware Updates: Periodically check the Pixcast official website for any available firmware updates to ensure the best performance and security.
- Power Cycle: If you experience connectivity issues, try unplugging the extender from the power outlet for 10-15 seconds and then plugging it back in. This can often resolve minor glitches.
Troubleshooting
If you encounter issues with your Pixcast WiFi Range Extender, refer to the following common problems and solutions:
| Problem | Possible Cause / Solution |
|---|---|
| Extender not powering on. | Ensure the extender is firmly plugged into a working power outlet. Try a different outlet. |
| Cannot connect to "PIX-LINK-2.4G" during setup. | Ensure the extender is powered on and you are within close proximity. Try restarting the extender. |
| Cannot access the setup page (192.168.7.234). | Verify you are connected to the extender's WiFi ("PIX-LINK-2.4G"). Clear your browser's cache or try a different browser. Ensure you typed the IP address correctly. |
| Extended network has no internet access. |
|
| WPS setup fails (WPS light blinking). |
|
| Slow speeds on the extended network. |
|
Warranty and Support
Pixcast is committed to providing high-quality products and excellent customer service.
- Warranty: Your Pixcast WiFi Range Extender comes with a 12-month free warranty from the date of purchase.
- Technical Support: Lifetime technical support is provided for this product.
- Contact Us: If you have any questions, suggestions, or require technical assistance, please do not hesitate to contact Pixcast customer support. Refer to the contact information provided with your product packaging or visit the official Pixcast website for support details.
Ask a question about this manual
Ask about setup, troubleshooting, compatibility, parts, safety, or missing instructions. Manuals+ will review the question and use this page’s manual context to help answer it.