
1. Introduction
This manual provides essential information for the installation, operation, and maintenance of your new goodfind68 Carburetor. Please read these instructions carefully before proceeding with installation or use to ensure proper function and longevity of the product.
This carburetor is designed to be compatible with the following ATV models:
- Kawasaki KFX400 (2003, 2004, 2005, 2006)
- Suzuki LTZ 400 (2003, 2004, 2005, 2006, 2007)
- Arctic Cat DVX400 (2004, 2005, 2006, 2007)
Ensure your vehicle's model and year match the compatibility list before installation.
2. Product Overview and Components
The goodfind68 Carburetor is a replacement component designed to restore optimal fuel-air mixture delivery to your ATV engine. It comes with necessary accessories for installation.
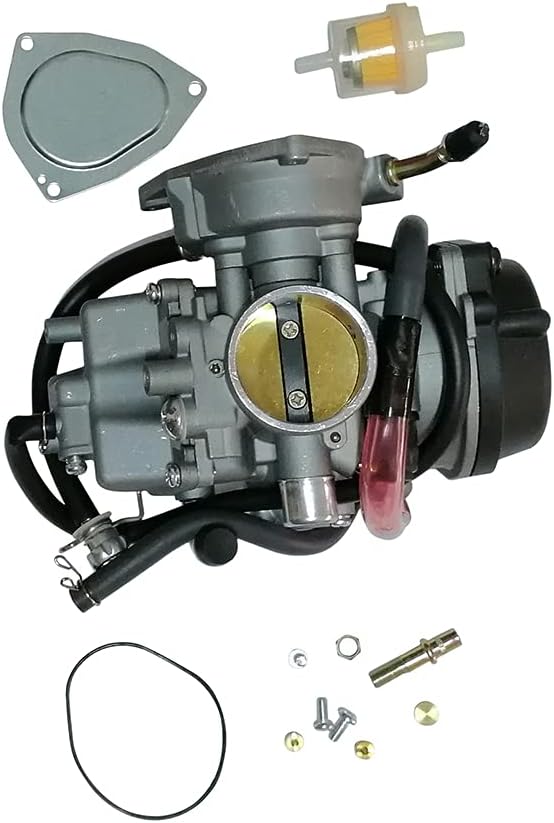
Figure 2.1: Main view of the goodfind68 Carburetor, showing the main body, fuel filter, gasket, and various small parts for installation.

Figure 2.2: Side view of the carburetor, highlighting the throttle linkage area and fuel inlet.

Figure 2.3: Front view of the carburetor, showing the air intake side and internal components.
Included Components:
- Carburetor Assembly
- Gasket
- Fuel Filter
- Assorted small parts (screws, nuts, O-rings, jets)
3. Setup and Installation
Carburetor installation requires mechanical aptitude and specific tools. If you are not confident in your abilities, it is highly recommended to seek professional assistance from a qualified mechanic.
3.1. Safety Precautions
- Ensure the ATV engine is cool before starting work.
- Disconnect the battery to prevent accidental starting.
- Work in a well-ventilated area.
- Have a fire extinguisher nearby, as gasoline is highly flammable.
- Wear appropriate personal protective equipment (gloves, eye protection).
3.2. Installation Steps (General Guide)
- Drain Fuel: Turn off the fuel petcock and drain the fuel from the old carburetor's float bowl.
- Remove Airbox and Fuel Lines: Disconnect the airbox boot and fuel lines from the old carburetor. Be prepared for residual fuel spillage.
- Disconnect Cables: Carefully disconnect the throttle cable and choke cable (if applicable) from the old carburetor. Note their routing for reinstallation.
- Remove Old Carburetor: Unbolt and remove the old carburetor from the engine intake manifold.
- Inspect Intake Manifold: Clean the intake manifold and ensure there are no obstructions or damage.
- Install New Gasket: Place the new gasket between the new carburetor and the intake manifold.
- Mount New Carburetor: Secure the new goodfind68 Carburetor to the intake manifold. Do not overtighten.
- Connect Cables: Reconnect the throttle cable and choke cable. Ensure smooth operation without binding. Note: Some models may require adjustments or different choke mechanisms. Verify compatibility of your stock choke with this carburetor.
- Connect Fuel Lines: Reconnect the fuel lines, ensuring a secure fit. Install the new fuel filter in the fuel line, observing the flow direction.
- Connect Airbox: Reconnect the airbox boot to the carburetor.
- Refill Fuel: Turn on the fuel petcock and allow the carburetor float bowl to fill. Check for leaks.
- Initial Start-up: Attempt to start the engine. It may take a few cranks to prime the fuel system.
Important Note on Compatibility: Some users have reported that the throttle cable and stock choke may not be directly compatible with this carburetor on certain models (e.g., 2005 KFX400). Additionally, some models (e.g., 2005 and 2006 KFX, LTZ, DVX) may require a carburetor with a TPS (Throttle Position Sensor) spot, which this carburetor may not have. Please verify your specific vehicle's requirements before installation. Modifications or alternative parts may be necessary in such cases.
4. Operating Instructions
Once installed, the carburetor is designed to automatically regulate the fuel-air mixture. Proper operation relies on correct installation and regular maintenance.
4.1. Engine Starting
- For cold starts, engage the choke fully.
- Once the engine starts, gradually disengage the choke as the engine warms up.
- For warm starts, the choke may not be necessary.
4.2. Idle Adjustment
The idle speed screw (typically a large, knurled screw on the side of the carburetor) can be adjusted to set the engine's idle RPM. Turn clockwise to increase idle, counter-clockwise to decrease. Adjust only when the engine is at operating temperature.
4.3. Air/Fuel Mixture Adjustment (Pilot Screw)
The air/fuel mixture screw (pilot screw) controls the mixture at idle and low RPMs. Adjusting this screw can fine-tune engine performance. Turning it clockwise leans the mixture (less fuel), and counter-clockwise richens it (more fuel). Small adjustments (1/4 turn increments) are recommended. Consult your ATV's service manual for specific adjustment procedures and recommended settings.
5. Maintenance
Regular maintenance of your carburetor and fuel system is crucial for optimal performance and longevity.
- Fuel Quality: Always use fresh, clean fuel. Stale or contaminated fuel can clog carburetor jets and passages. Consider using a fuel stabilizer if the ATV will be stored for extended periods.
- Fuel Filter Replacement: The included fuel filter should be inspected periodically and replaced if it appears dirty or clogged. This prevents debris from reaching the carburetor.
- Air Filter Maintenance: A clean air filter is vital for proper carburetor function. Clean or replace your ATV's air filter according to the manufacturer's recommendations.
- Carburetor Cleaning: If performance issues arise (e.g., rough idle, poor acceleration), the carburetor may need cleaning. This typically involves disassembling the float bowl and jets, and cleaning them with carburetor cleaner and compressed air. This is an advanced procedure and should only be attempted by experienced individuals.
- Linkage Inspection: Periodically check all throttle and choke linkages for smooth operation and ensure they are free of dirt or corrosion.
6. Troubleshooting
This section addresses common issues that may arise with carburetor operation. Always ensure basic checks (fuel level, spark, air filter) are performed before troubleshooting the carburetor.
| Problem | Possible Cause | Solution |
|---|---|---|
| Engine won't start or starts hard | No fuel, clogged jets, incorrect choke use, fuel filter clogged, improper installation. | Check fuel supply, inspect fuel filter, ensure choke is used correctly, clean jets, re-verify installation steps. |
| Rough idle or stalling | Idle speed too low, air/fuel mixture incorrect, vacuum leak, dirty pilot jet. | Adjust idle speed, adjust air/fuel mixture screw, check for loose hoses/cracked boots, clean pilot jet. |
| Poor acceleration or loss of power | Main jet clogged, air filter dirty, fuel flow restriction, float level incorrect. | Clean main jet, clean/replace air filter, check fuel lines/filter, inspect float level. |
| Fuel leaks | Loose fuel lines, damaged float bowl gasket, stuck float needle. | Tighten clamps, replace gasket, clean float needle and seat. |
| Throttle cable or choke incompatibility | Design variation between carburetor and specific ATV model. | Verify part numbers and specifications for your ATV. May require sourcing a compatible throttle cable, choke assembly, or adapter. Professional consultation recommended. |
| No TPS (Throttle Position Sensor) port | Carburetor design does not include a TPS port, but ATV model requires one. | This carburetor may not be suitable for models requiring a TPS. Verify your ATV's specific requirements before purchase and installation. |
7. Specifications
| Brand: | goodfind68 |
| Model Number: | JMSAKFX40 (Also known as X-400) |
| Compatible Vehicle Service Type: | All Terrain Vehicle (ATV) |
| Product Dimensions (Approx.): | 10"D x 12"W x 18"H |
| Item Weight (Approx.): | 1.94 pounds |
| UPC: | 792276451692 |
8. Warranty and Support
For any questions regarding product warranty, technical support, or replacement parts, please contact the seller directly through the platform where the purchase was made. Provide your order number and a detailed description of the issue for prompt assistance.
It is recommended to retain your proof of purchase for warranty claims.