1. Introduction
This manual provides detailed instructions for the installation, operation, and maintenance of your TIMPANO TPT-500 2 Ohm Compact Car Audio Amplifier. Please read this manual thoroughly before attempting installation or operation to ensure proper use and to prevent damage to the unit or your vehicle's audio system. Keep this manual for future reference.

Figure 1: TIMPANO TPT-500 2 Ohm Compact Car Audio Amplifier, top view.
2. Safety Information
- Always disconnect the vehicle's battery negative terminal before starting any electrical work.
- Ensure all wiring is properly insulated to prevent short circuits.
- Use appropriate gauge wiring for power and ground connections to handle the amplifier's current draw.
- Install the amplifier in a location that allows for adequate ventilation to prevent overheating.
- Avoid mounting the amplifier in areas exposed to moisture or excessive vibration.
- Consult a professional car audio installer if you are unsure about any installation steps.
- Do not operate the amplifier at excessively high volumes for prolonged periods, as this may cause hearing damage or damage to your speakers.
- This product contains chemicals known to the State of California to cause cancer and birth defects or other reproductive harm (Proposition 65 warning).
3. Package Contents
Verify that all items are present in the package:
- TIMPANO TPT-500 2 Ohm Compact Car Audio Amplifier
- Wiring Harness (for high-level input, if applicable)
- Mounting Hardware (screws)
- User Manual (this document)
4. Features
The TIMPANO TPT-500 2 Ohm amplifier is designed for compact installations while delivering significant power. Key features include:
- Compact Size: Dimensions of approximately 3.15 x 2.36 x 0.5 inches, ideal for space-constrained installations.
- High Output Power: 500 Watts (RMS) at 2 Ohms.
- Single Channel (Mono): Optimized for driving subwoofers.
- Class D Topology: High efficiency for reduced heat and power consumption.
- Full Range Capability: Can be used for full-range speakers if desired, though primarily designed for subwoofers.
- RCA Input: Standard low-level signal input.
- High-Level Input: Allows connection to factory head units without RCA outputs.
- Adjustable Crossovers: High-Pass Filter (HPF) and Low-Pass Filter (LPF) with variable controls for precise sound tuning.
- Level Control: Input sensitivity adjustment.
- Auto Turn-On: Automatically detects signal from high-level input to turn on the amplifier.

Figure 2: Visual representation of key features including 1 channel, 500 Watts, RCA input, and HPF/LPF variable controls.
5. Setup and Installation
Proper installation is crucial for optimal performance and safety. Follow these general guidelines:
- Mounting: Choose a secure, dry location with good airflow. Use the provided mounting hardware to firmly attach the amplifier.
- Power Connection:
- Connect a suitable gauge power cable (e.g., 8 AWG or 10 AWG) from the vehicle's positive battery terminal to the amplifier's +12V terminal.
- Install an in-line fuse (25A recommended, as indicated on the unit) within 18 inches of the battery.
- Ground Connection:
- Connect a short, heavy gauge ground cable from the amplifier's GND terminal to a clean, unpainted metal point on the vehicle's chassis. Ensure a solid electrical connection.
- Remote Turn-On (REM):
- If using RCA inputs, connect a remote turn-on wire from your head unit's remote output to the amplifier's REM terminal.
- If using high-level input, the amplifier may use its "AUTO TURN-ON" feature, eliminating the need for a separate remote wire.
- Signal Input:
- RCA Input: Connect RCA cables from your head unit's pre-amp output to the amplifier's RCA input jacks (L and R).
- High-Level Input: If your head unit lacks RCA outputs, use the provided wiring harness to connect to your speaker wires. Refer to the diagram on the amplifier or in the manual for correct polarity.
- Speaker Output:
- Connect your speaker(s) to the amplifier's SPEAKER terminals, observing correct polarity (+ to + and - to -).
- Ensure the total impedance of the connected speakers is 2 Ohms for optimal power delivery.

Figure 3: Close-up view of the power (REM, +, -) and speaker (+, -) terminals, including the 25A fuse.

Figure 4: Rear view of the amplifier showing RCA inputs, high-level input connector, and the included wiring harness.
6. Operating Controls
The TIMPANO TPT-500 features several controls to fine-tune your audio system:
- LPF (Low-Pass Filter): Adjusts the upper frequency limit for the amplifier's output. Typically used for subwoofers to only play low frequencies. Range: 60Hz - 22kHz.
- HPF (High-Pass Filter): Adjusts the lower frequency limit for the amplifier's output. Typically used for full-range speakers to block low frequencies. Range: 10Hz - 700Hz.
- LEVEL: Controls the input sensitivity of the amplifier. Adjust this to match the output voltage of your head unit. Start with the level control at minimum and slowly increase until desired volume is achieved without distortion.
- AUTO TURN-ON: When using the high-level input, this feature automatically turns the amplifier on when it detects an audio signal and off when the signal is absent.

Figure 5: Rear panel showing LPF, HPF, and LEVEL adjustment knobs, along with RCA and high-level inputs.
7. Maintenance
Your TIMPANO TPT-500 amplifier requires minimal maintenance:
- Cleaning: Use a soft, dry cloth to wipe the amplifier's exterior. Do not use harsh chemicals or abrasive cleaners.
- Connection Checks: Periodically inspect all power, ground, signal, and speaker connections to ensure they are secure and free from corrosion.
- Ventilation: Ensure that the amplifier's cooling fins are not obstructed to maintain proper heat dissipation.
8. Troubleshooting
If you experience issues with your amplifier, refer to the following common problems and solutions:
| Problem | Possible Cause | Solution |
|---|---|---|
| No Power / Amplifier Not Turning On | Blown fuse, loose power/ground/remote connection, faulty remote wire. | Check the in-line fuse and the amplifier's internal fuse (if accessible). Verify all power, ground, and remote connections are secure. Ensure the remote wire is receiving +12V from the head unit. If using high-level input, ensure the "AUTO TURN-ON" feature is enabled and receiving signal. |
| No Sound Output | Loose RCA/speaker connections, incorrect input selection, amplifier in protect mode, faulty speakers. | Check all RCA and speaker wire connections. Ensure the head unit is sending an audio signal. Check if the amplifier's protection indicator is lit. Test speakers with another known good amplifier if possible. |
| Distorted Sound | Gain (LEVEL) set too high, poor ground connection, speaker impedance mismatch, damaged speakers. | Reduce the LEVEL control. Verify the ground connection is solid. Ensure speaker impedance matches the amplifier's rating (2 Ohms). Inspect speakers for damage. |
| Amplifier Overheating | Insufficient ventilation, impedance too low, prolonged high volume use. | Ensure the amplifier has adequate airflow. Check speaker impedance. Reduce volume or allow the amplifier to cool down. |
| Popping Sound on Turn-On/Off | Ground loop, remote turn-on delay issue, head unit turn-on/off sequence. | Ensure a clean, single-point ground for all audio components. Check the remote turn-on wire for proper connection and ensure it turns on/off simultaneously with the head unit. Some head units may have a slight delay that can cause this. |
9. Specifications
| Feature | Specification |
|---|---|
| Model | TPT-500 2 Ohm |
| Output Power | 500 Watts (RMS) at 2 Ohms |
| Number of Channels | 1 (Mono) |
| Amplifier Class | Class D |
| Minimum Supply Voltage | 12 Volts (DC) |
| Maximum Supply Voltage | 15 Volts (DC) |
| Item Dimensions (L x W x H) | 3.15 x 2.36 x 0.5 inches |
| Item Weight | 1.17 pounds |
| Material | Plastic |
| Specification Met | FCC |
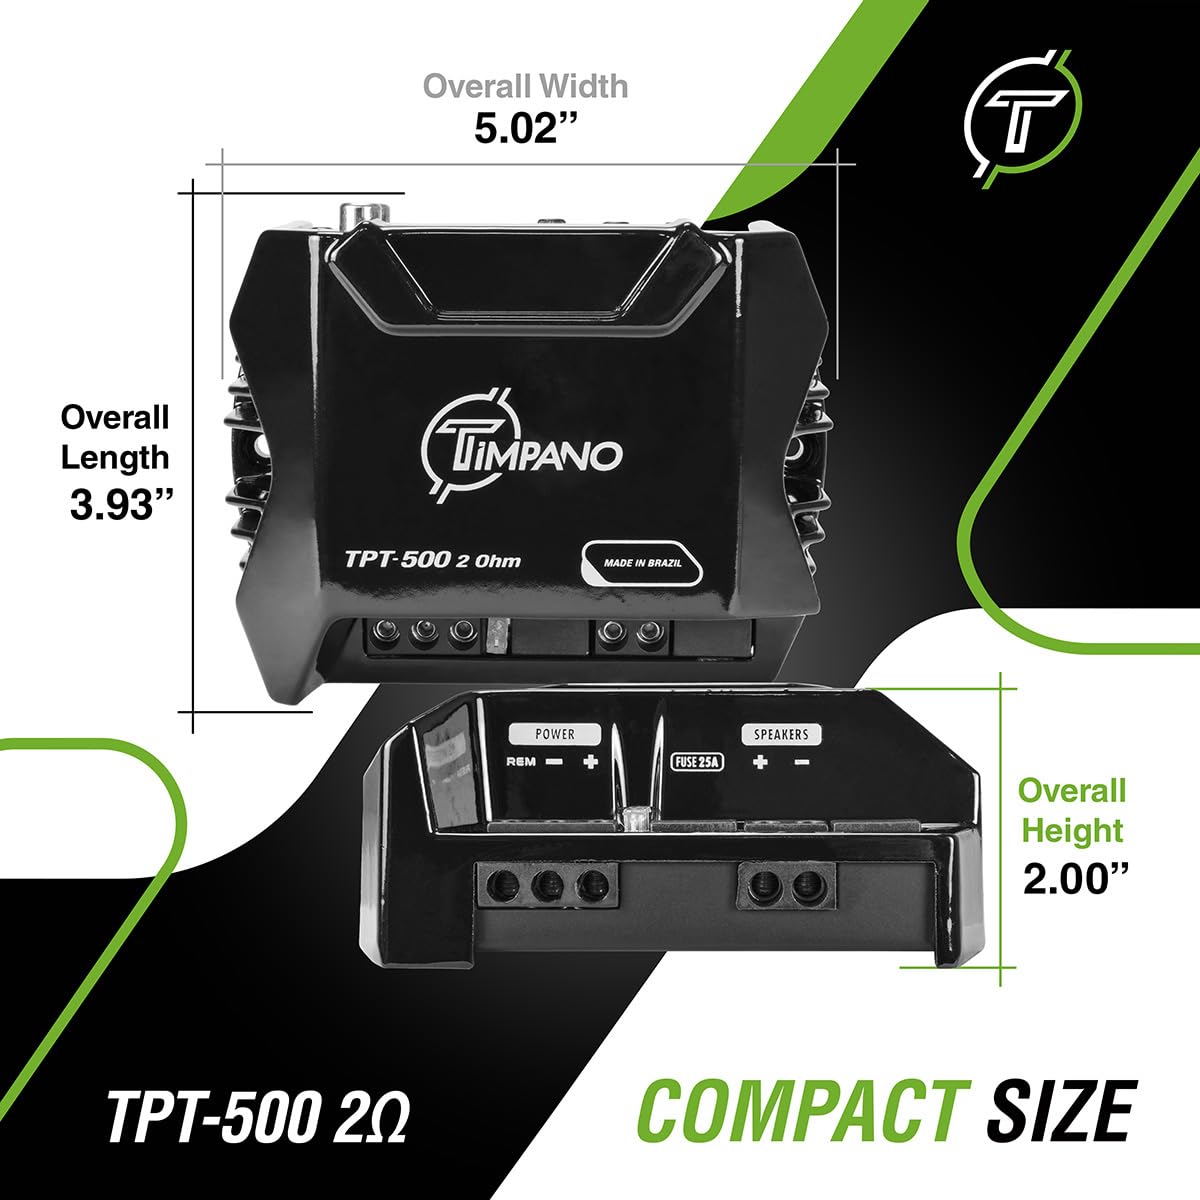
Figure 6: Diagram illustrating the compact dimensions of the TPT-500 amplifier.
10. Warranty and Support
For specific warranty information, please refer to the warranty card included with your product or contact the retailer where you purchased the TIMPANO TPT-500 amplifier. You can also visit the official Timpano website for support resources, FAQs, and contact information.
Manufacturer: Timpano
Contact Support: Please visit the Timpano Store on Amazon or their official website for the most up-to-date support options.


