1. Introduction
This manual provides detailed instructions for installing your eXtremeRate Nebula Galaxy replacement front top shell and touchpad cover for the PlayStation 5 DualSense controller. Please read all instructions carefully before beginning the installation process to ensure proper fit and function.
2. Compatibility Check
Important: This product is ONLY compatible with PS5 controller models BDM-010, BDM-020, BDM-030, BDM-040, and BDM-050. It is NOT compatible with other models. Verifying your controller's model is crucial before proceeding with installation.
Method 1: Check the R2 Trigger Spring and Side Shape
You can identify your controller's BDM model by examining the R2 trigger mechanism. Carefully pry off the R1/L1 buttons to reveal the internal structure. Observe the shape of the side and the spring mechanism of the R2 trigger.

Image: Visual guide for distinguishing PS5 controller BDM models by R2 trigger components.
Method 2: Check the Mainboard Model (Requires Disassembly)
For a definitive check, you can disassemble your controller and inspect the mainboard. The BDM model number is typically printed on the mainboard.
Video Guide: How to Check Your PS5 Controller BDM Model
Video: A step-by-step guide from eXtremeRate on how to identify your PS5 controller's BDM model using a PC connection or by physical inspection of the trigger mechanism.
3. Package Contents
Please ensure all the following items are included in your package:
- 1x Front Faceplate Shell (Nebula Galaxy)
- 1x Touchpad Shell (Nebula Galaxy)
- 1x Touchpad Holder Set
- 1x Opening Tool
- 1x Screwdriver
- Spare Screws
Note: The PS5 controller and any other internal parts are not included.
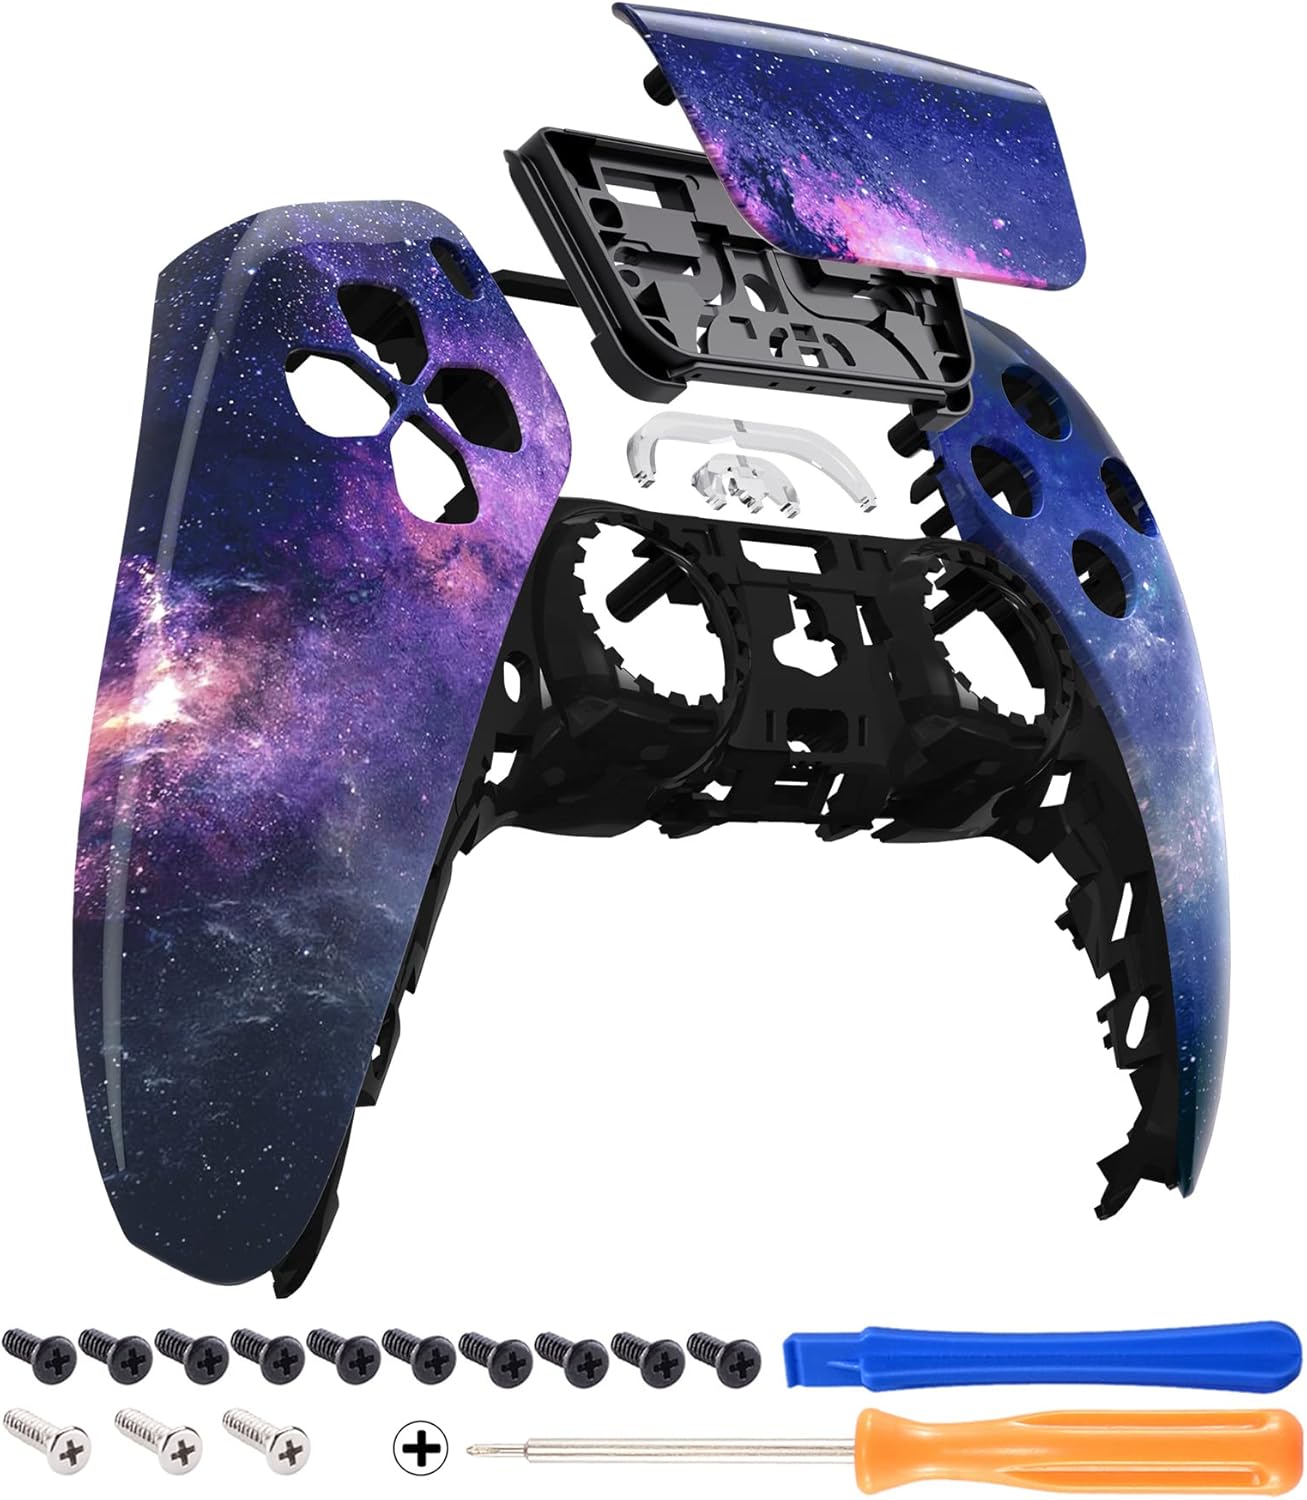
Image: Exploded view of the eXtremeRate Nebula Galaxy replacement shell components and the tools provided for installation.
4. Installation Guide
Disclaimer: Proceed with caution. Disassembling your controller may void its warranty. eXtremeRate is not responsible for any damage caused during installation.
Preparation:
- Ensure your workspace is clean, well-lit, and organized.
- Gather all included tools: screwdriver, opening tool, and spare screws.
- Ensure your PS5 controller is powered off and disconnected from any power source or console.
Step-by-Step Installation:
- Remove Original Faceplate: Using the provided opening tool, carefully pry off the original front faceplate of your PS5 controller. Start from the edges and work your way around.
- Remove Original Touchpad: Once the faceplate is removed, gently disconnect the ribbon cable connecting the touchpad to the mainboard. Then, remove the original touchpad and its holder.
- Install New Touchpad: Connect the ribbon cable to your new Nebula Galaxy touchpad. Carefully place the new touchpad and its holder into the designated slot on the controller. Ensure the ribbon cable is securely connected and not pinched.
- Install New Front Shell: Align the eXtremeRate Nebula Galaxy front shell with the controller's body. Carefully snap it into place, ensuring all clips engage correctly.
- Secure with Screws: Use the provided screwdriver and spare screws to secure any internal components or the new shell if necessary, following the original screw placement.
- Reassemble and Test: Once the new shell and touchpad are securely in place, reassemble any other parts of the controller. Power on your controller and test all buttons, joysticks, and touchpad functionality to ensure everything works as expected.
For a visual guide, you may search for 'eXtremeRate front shell compatible with ps5 BDM 010 020 030' on YouTube for detailed installation videos.
5. Specifications
| Feature | Detail |
|---|---|
| Product Type | Replacement Front Top Shell & Touchpad Cover |
| Brand | eXtremeRate |
| Compatible Platform | PlayStation 5 DualSense Controller |
| Compatible Models | BDM-010, BDM-020, BDM-030, BDM-040, BDM-050 |
| Material | Plastic |
| Finish Type | Matte |
| Design | Nebula Galaxy Pattern |
6. Troubleshooting
- Controller Not Functioning After Installation: Double-check all ribbon cable connections, especially for the touchpad. Ensure no cables are pinched or improperly seated. Verify that all screws are tightened appropriately, but not overtightened.
- Buttons Not Responding: Ensure all buttons and their respective membranes (if applicable) are correctly aligned and seated.
- Shell Does Not Fit: Reconfirm your controller's BDM model using the methods described in Section 2. This shell is only compatible with the specified BDM models.
- Visual Imperfections: Ensure all protective films have been removed from the new shell components.
7. Warranty and Support
eXtremeRate products are designed for quality and performance. For warranty information or technical support, please refer to the official eXtremeRate website or contact their customer service directly. Keep your proof of purchase for any warranty claims.
For additional resources and product information, visit the eXtremeRate Store on Amazon.