EDISHINE HGSL06A
EDISHINE HGSL06A Low Voltage LED Pathway Lights Instruction Manual
Model: HGSL06A
1. Product Overview
The EDISHINE HGSL06A Low Voltage LED Pathway Lights are designed to provide efficient and durable outdoor lighting for paths, yards, gardens, and patios. These lights feature a robust aluminum construction, warm white LED illumination, and a weather-resistant design for long-lasting performance.
- Bright Illumination: 3W 150LM LED lights emit a bright, warm white (3000K) light, ideal for creating a pleasant outdoor ambiance.
- Wide Coverage: Classic "hat-shaped" shade design provides continuous illumination with a 6-foot diameter, directing light downward to expand the illuminated area.
- Durable Construction: Made of die-casting aluminum with glass lenses, ensuring longevity and resistance to outdoor elements.
- Long Lifespan: LED light beads offer up to 50,000 hours of lifespan, contributing to energy savings.
- Weather-resistant: IP65 waterproof rating, rust-proof, and corrosion-resistant, operating effectively in temperatures from -40°F to 140°F.
- Easy Installation: Features quick-install wire connectors for simple connection to low voltage wires and a transformer (not included).

Image: EDISHINE Low Voltage LED Pathway Lights providing warm illumination along a garden path at night.
2. Safety Information
- Always disconnect power at the source before installation, maintenance, or troubleshooting.
- Ensure all electrical connections are secure and protected from moisture.
- Use only with a 12V AC/DC low voltage landscape lighting transformer (not included).
- Do not exceed the maximum wattage rating of your transformer.
- Avoid looking directly into the LED light source when illuminated.
- Keep children and pets away from the installation area.
- If you are unsure about any part of the installation, consult a qualified electrician.
3. Package Contents
Verify that all components are present and undamaged before proceeding with installation.
- EDISHINE HGSL06A Pathway Lights (Quantity as purchased, e.g., 4-pack)
- Die-cast Aluminum Spikes
- Quick-install Wire Connectors
- User Manual
Note: A low voltage transformer and low voltage wires are required for operation and are not included in this package.
4. Specifications
| Feature | Specification |
|---|---|
| Brand | EDISHINE |
| Model Name | HGSL06A |
| Power Source | Corded Electric |
| Voltage | 12 Volts AC/DC |
| Wattage | 3 Watts per light |
| Brightness | 150 Lumens per light |
| Color Temperature | 3000 Kelvin (Warm White) |
| Light Source Type | LED |
| Material | Die-cast Aluminum, Glass Lens |
| Finish Type | Painted (Black) |
| Indoor/Outdoor Usage | Outdoor |
| Water Resistance Level | IP65 Waterproof |
| Product Dimensions | Approximately 16.5 inches tall (total height with spike) |
| Lifespan | Up to 50,000 hours |
| Certification | ETL Listed |
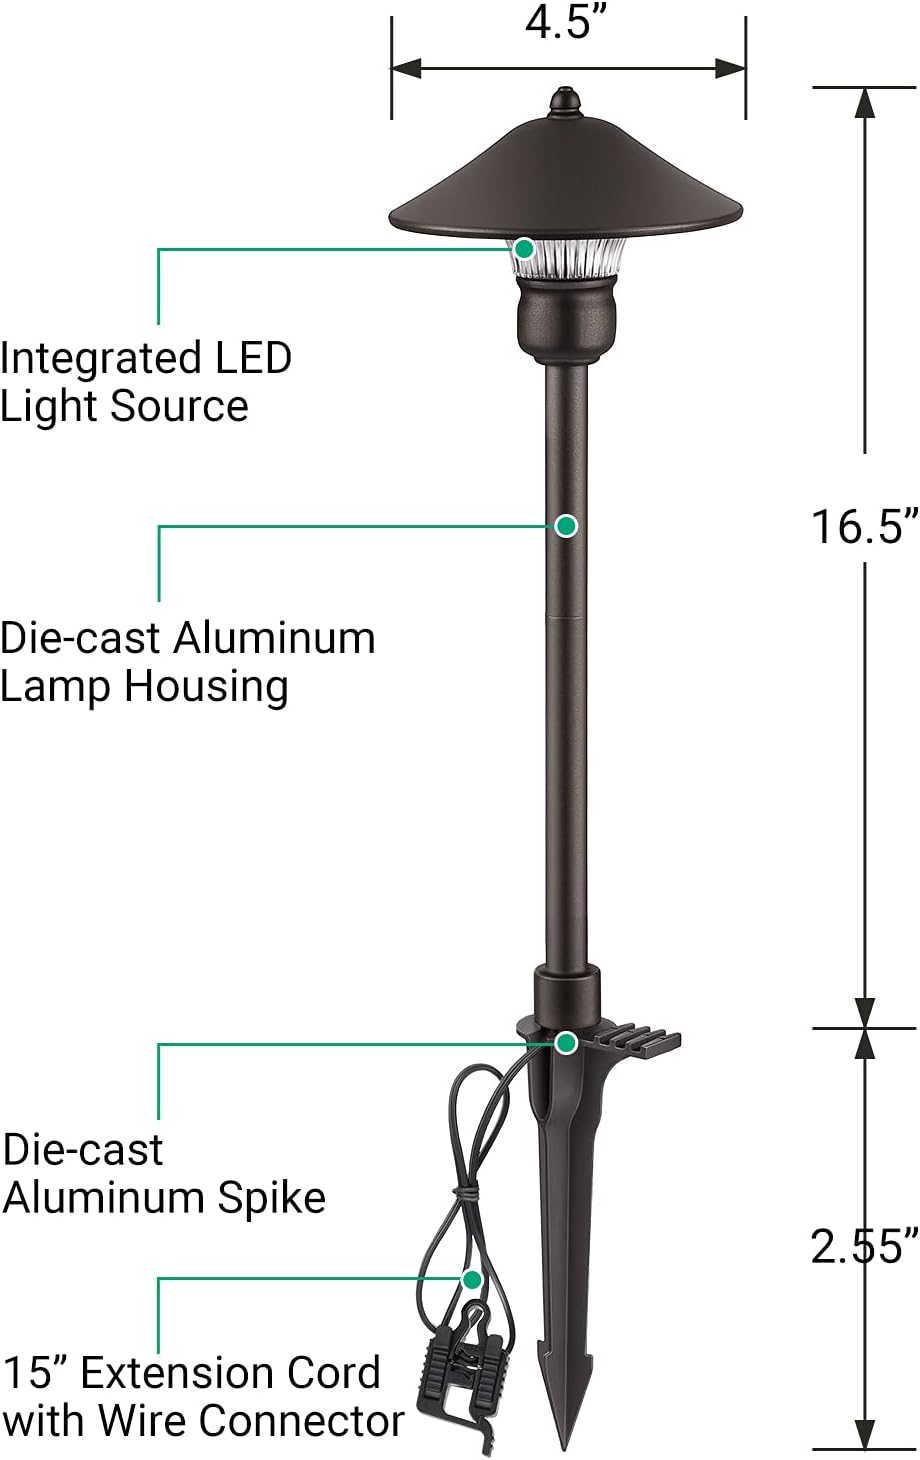
Image: Detailed view of the EDISHINE pathway light, highlighting its integrated LED light source, die-cast aluminum lamp housing, die-cast aluminum spike, and 15-inch extension cord with wire connector.
5. Setup & Installation
Follow these steps to properly install your EDISHINE Low Voltage LED Pathway Lights. Ensure power is disconnected before starting.
- Plan Layout: Determine the desired locations for each pathway light. Consider the illumination coverage (approximately 6-foot diameter per light) and the path of your low voltage main wire.
- Prepare Wiring: Lay out your low voltage main wire (not included) along the planned path. Ensure you have enough slack to avoid tension and allow for future adjustments.
- Connect to Transformer: Connect the main low voltage wire to your 12V AC/DC landscape lighting transformer (not included). Refer to your transformer's manual for specific wiring instructions.
- Assemble Lights: Attach the die-cast aluminum spike to the bottom of each pathway light.
- Position Lights: Gently push the assembled lights into the ground at your desired locations. Use your foot to apply pressure on the spike base for secure placement.
- Wire Connections: Use the provided quick-install wire connectors to connect each pathway light's extension cord to the main low voltage wire.
- Open the quick-install connector.
- Place the main low voltage wire into the designated channel.
- Place the light's extension wire into its channel.
- Close the connector firmly until it clicks, ensuring the metal prongs pierce the wire insulation to make contact.
- Test Lights: Once all lights are connected, turn on the power to your transformer to test the system. Adjust light positions as needed.
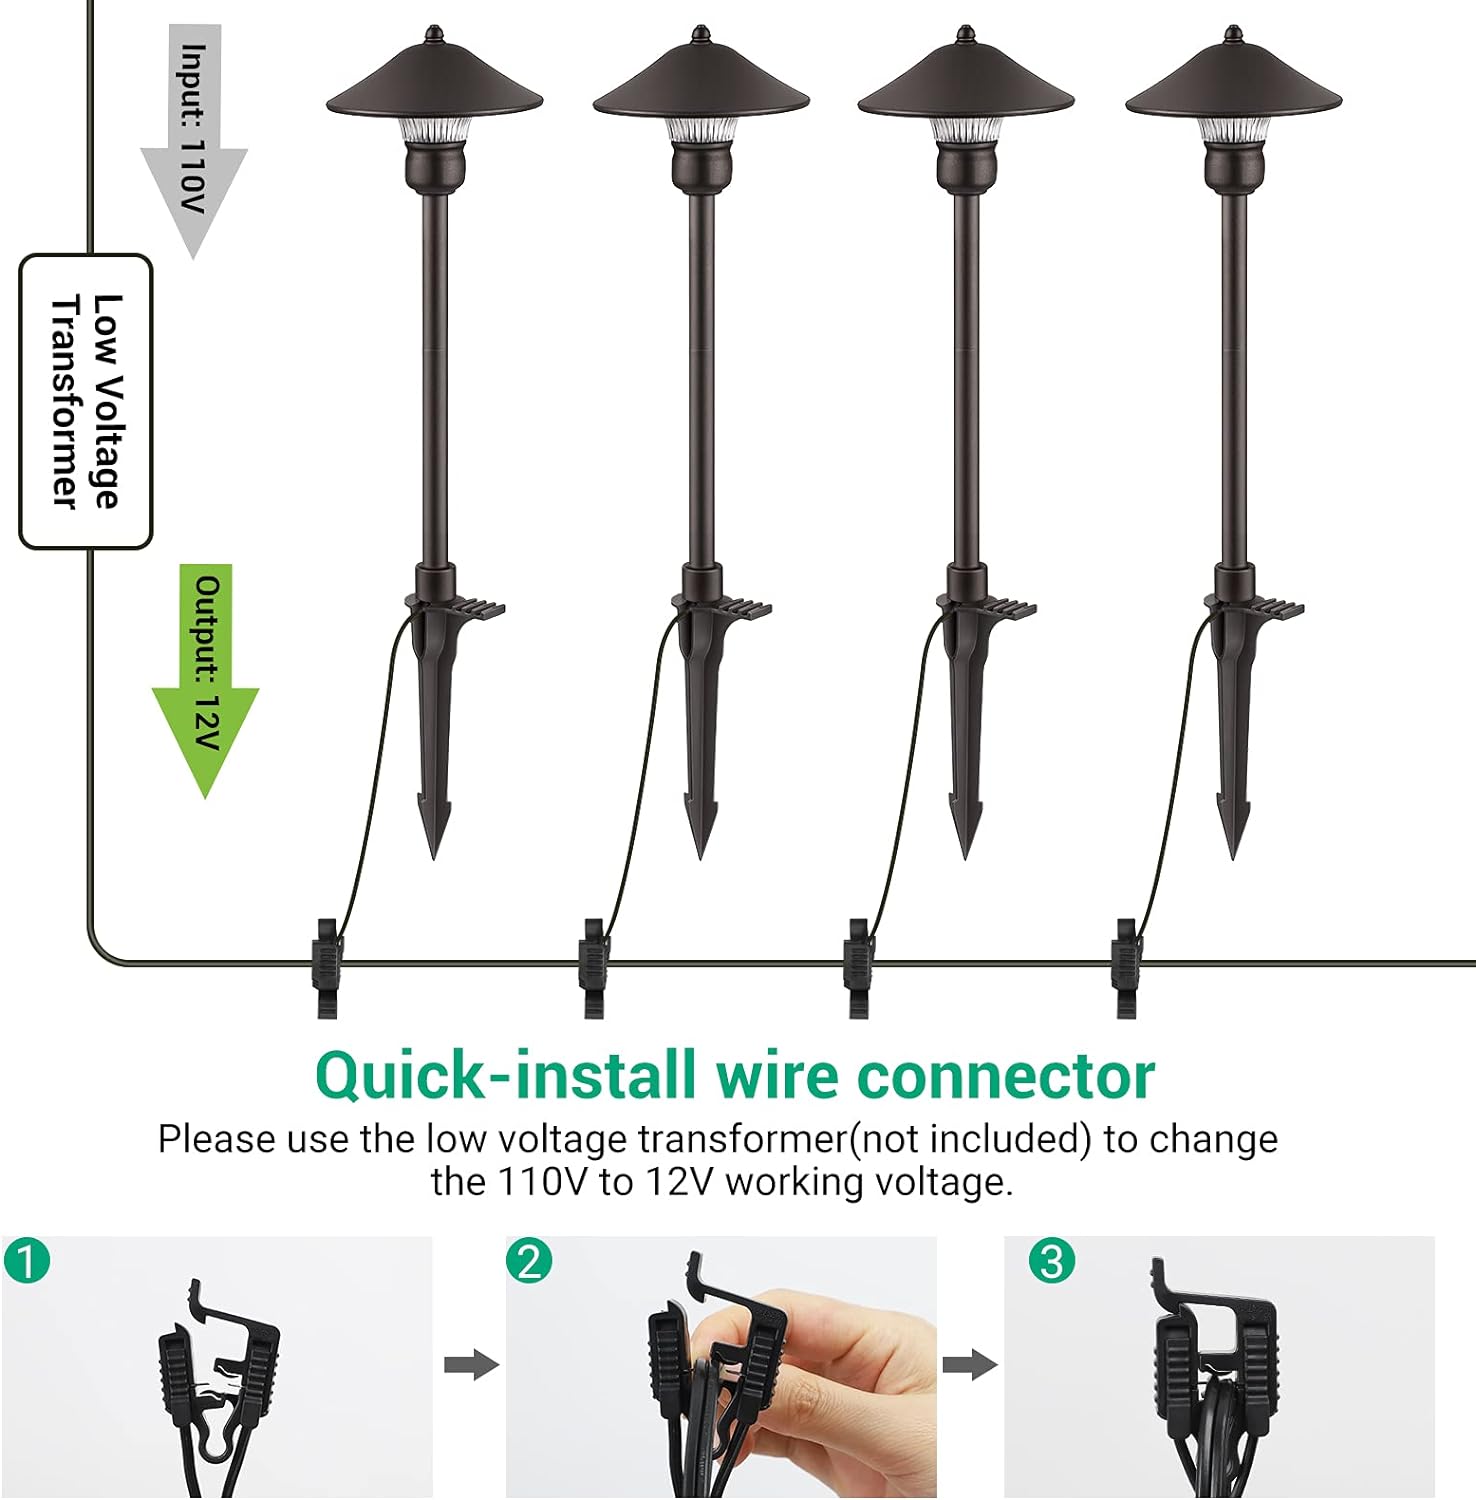
Image: Step-by-step guide on using the quick-install wire connector to connect the pathway light to the main low voltage wire.
Video: This video demonstrates the installation process for low voltage outdoor landscape pathway lights, including connecting wires and placing the lights.
6. Operation
The EDISHINE Low Voltage LED Pathway Lights operate directly from your low voltage landscape lighting transformer. Operation is controlled by the transformer's settings.
- Power On/Off: The lights will turn on and off according to the schedule or manual settings of your connected low voltage transformer.
- Light Output: The lights provide a consistent 150 lumens of warm white (3000K) light when powered. There are no adjustable brightness settings on the individual lights.
7. Maintenance
Regular maintenance helps ensure the longevity and optimal performance of your pathway lights.
- Cleaning: Periodically wipe the light fixtures with a soft, damp cloth to remove dirt, dust, and debris. Avoid using harsh chemicals or abrasive cleaners.
- Inspect Wiring: Annually inspect the low voltage wires and connectors for any signs of damage, fraying, or corrosion. Repair or replace damaged components as necessary.
- Clear Debris: Ensure that leaves, mulch, or other garden debris do not cover the light fixtures, which could impede light output or cause overheating.
- Check Stability: Periodically check that the lights are securely planted in the ground and have not become loose.

Image: The pathway light is designed with an IP65 waterproof rating, ensuring durability against rain and outdoor elements.
8. Troubleshooting
If your EDISHINE pathway lights are not functioning correctly, refer to the following common issues and solutions:
| Problem | Possible Cause | Solution |
|---|---|---|
| Lights not turning on | No power to transformer; Loose wire connections; Faulty transformer; Damaged light. | Check power outlet and transformer settings. Ensure all wire connectors are securely closed. Test transformer output. Inspect lights for visible damage. |
| Lights flickering or dim | Insufficient power from transformer; Loose or corroded connections; Too many lights on one circuit. | Verify transformer wattage capacity. Clean and tighten all wire connections. Reduce the number of lights on the circuit or upgrade transformer. |
| Only some lights are working | Faulty connection to specific lights; Damaged individual light. | Inspect connections for the non-working lights. Swap a non-working light with a working one to isolate the issue. |
9. Warranty & Support
EDISHINE HGSL06A Low Voltage LED Pathway Lights come with a 1-year warranty from the date of purchase.
For technical support, warranty claims, or any questions regarding your product, please contact EDISHINE customer service through the retailer where the product was purchased or visit the official EDISHINE website for contact information.