ACECAR T2
ACECAR T2 Heads Up Display User Manual
Model: T2 | Brand: ACECAR
1. Introduction
Thank you for choosing the ACECAR T2 Heads Up Display (HUD). This device is designed to enhance your driving experience in Tesla Model 3 and Model Y vehicles by projecting essential vehicle data directly into your line of sight, ensuring safer and more convenient driving. This manual provides detailed instructions for installation, operation, maintenance, and troubleshooting.

Figure 1: The ACECAR T2 Heads Up Display showing various vehicle data.
2. Safety Information
Please read all safety warnings and instructions before using this product to avoid injury or damage. Keep this manual for future reference.
- Do not attempt to disassemble or modify the device.
- Ensure the device is securely mounted and does not obstruct your view or interfere with vehicle controls.
- Avoid exposing the device to extreme temperatures, direct sunlight for prolonged periods, or moisture.
- Clean the display with a soft, dry cloth. Do not use abrasive cleaners or solvents.
3. Package Contents
Verify that all items are included in your package:
- ACECAR T2 HUD Unit
- Data Cable (for connection to vehicle's OBD port)
- Crowbar Tool (for panel removal)
- Cleaning Cloth
- User Manual
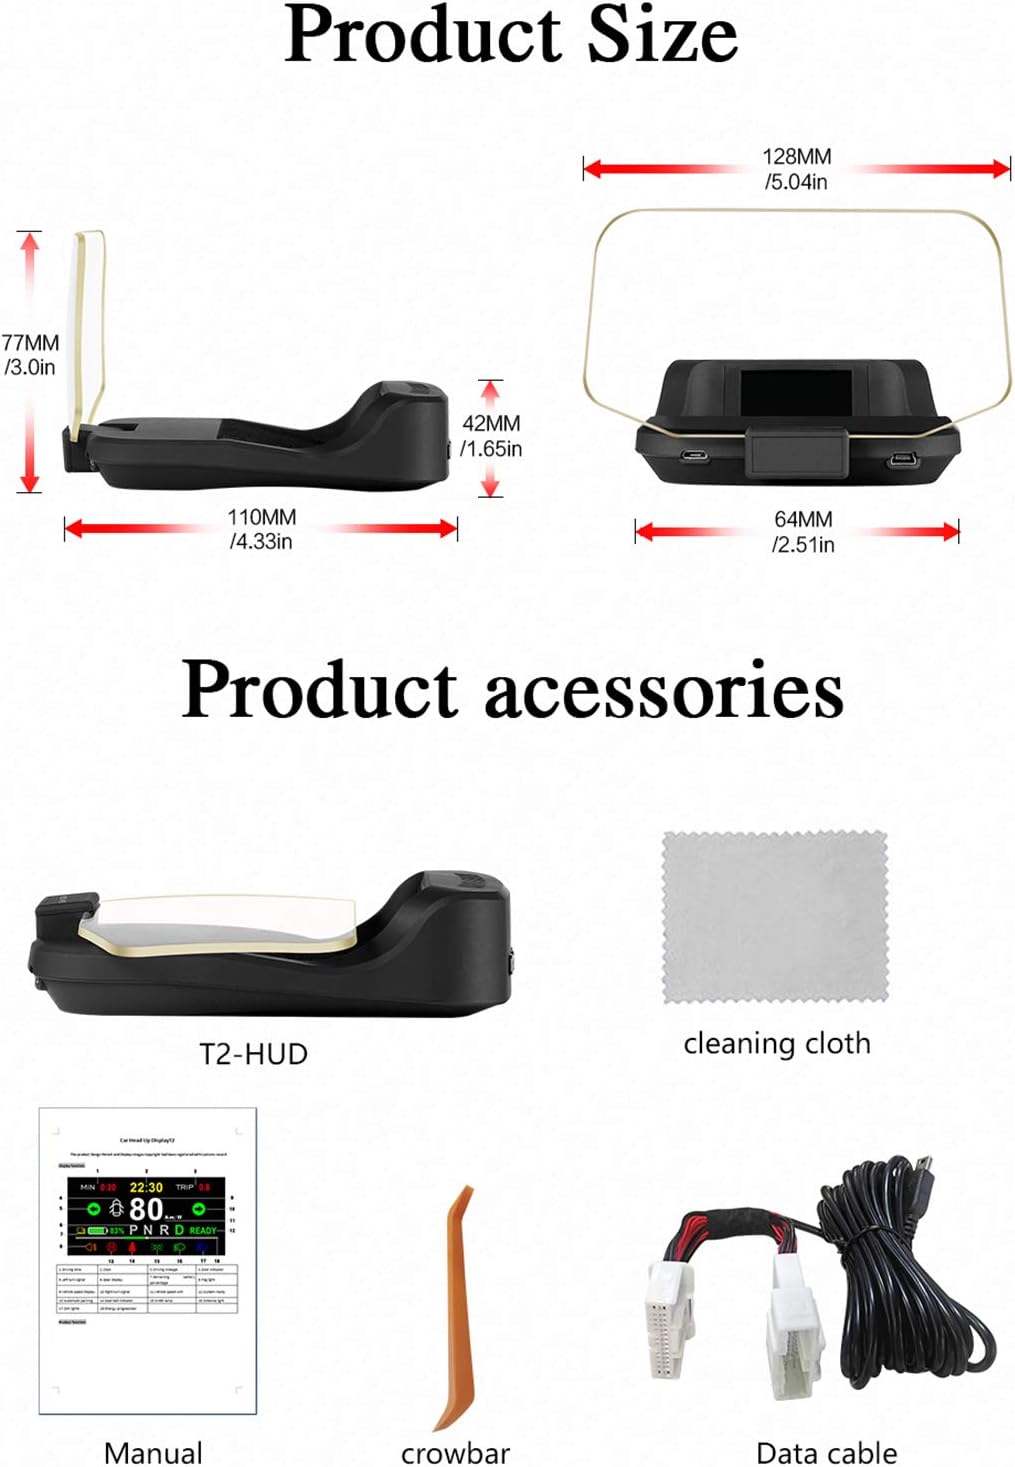
Figure 2: Included accessories with the ACECAR T2 HUD.
4. Product Overview
The ACECAR T2 HUD features a 4.2-inch TFT LCD display that projects information clearly without the need for reflective stickers. It is designed for seamless integration with Tesla Model 3 and Model Y vehicles.
4.1. Display Features
- Speed: Displays current vehicle speed.
- Remaining Battery Percentage: Shows the car's battery level.
- Gear Display: Indicates the current gear (P, N, R, D).
- Clock: Real-time clock display.
- Seat Belt Indicator: Reminds occupants to fasten seat belts.
- Turn Signal: Displays left and right turn signal activation.
- Lighting Indicators: Clearance light, high beam, low beam, fog light.
- Brake Warning Light: Alerts for brake-related issues.
- Door Reminder: Indicates open doors.
- Driving Time & Mileage: Tracks trip duration and distance.

Figure 3: Comprehensive data displayed on the HUD.
4.2. Control Buttons
The HUD unit features independent stereo keys for easy operation:
- Power On/Off: Activates or deactivates the unit.
- Increase/Decrease: Adjusts displayed data values or navigates menus.
- Main Menu: Accesses settings and customization options.

Figure 4: Control buttons for adjusting HUD settings.
5. Setup and Installation
The ACECAR T2 HUD offers a hassle-free plug-and-play installation. Follow these steps for proper setup:
5.1. Installation Video Guide
Video 1: Detailed installation guide for the ACECAR T2 HUD in a Tesla Model 3/Y.
5.2. Step-by-Step Installation
- Locate the OBD Port: The OBD port is typically located under the rear air conditioning outlet in Tesla Model 3 and Model Y. Use the provided crowbar tool to gently pry open the panel covering the port.
- Disconnect Original Cable: Carefully disconnect the original cable from the OBD port.
- Connect Data Cable: Connect the provided data cable to the vehicle's OBD port. Ensure a secure connection.
- Connect HUD Unit: Connect the other end of the data cable to the ACECAR T2 HUD unit.
- Route Cable: Route the data cable discreetly along the vehicle's interior, tucking it under floor mats and trim panels, towards the dashboard.
- Position HUD: Place the HUD unit on the dashboard in a position that provides a clear view of the projected display without obstructing your driving view.
- Secure Panels: Re-secure any panels that were removed during the installation process.

Figure 5: Non-destructive installation process for the T2 HUD.
6. Operating Instructions
Once installed, the ACECAR T2 HUD will automatically power on and off with your vehicle. The display provides real-time data from your car's dashboard.
6.1. Understanding the Display
The TFT LCD display presents various data points simultaneously. The layout is intuitive, allowing for quick glances to gather necessary information.

Figure 6: The HUD in operation, displaying data on the windshield.
6.2. Alarm Functions
The HUD includes multiple alarm functions to enhance safety:
- Overspeed Alarm: Alerts when exceeding a set speed limit.
- Low Voltage Alarm: Warns of low vehicle battery voltage.
- Low Power Alarm: Indicates critically low battery percentage.
- Door Alarm: Notifies if a door is not properly closed.
- Seat Belt Alarm: Reminds to fasten seat belts.
- Brake Warning Light Alarm: Activates for brake system warnings.

Figure 7: Examples of functional displays and warnings.
6.3. Customization
You can adjust the displayed data and the color of the displayed data using the control buttons on the unit. Refer to the detailed instructions in the included printed manual for specific menu navigation and customization options.

Figure 8: The HUD offers 8 interface colors for personalization.
6.4. Google Custom Version (Navigation)
This HUD supports a Google Custom version that integrates navigation features, providing road conditions, smart data analysis, preferred travel routes, map updates, and road track display. This feature enhances the practicality and convenience of the device.

Figure 9: The Google Custom version of the HUD with navigation capabilities.
7. Maintenance
To ensure the longevity and optimal performance of your ACECAR T2 HUD, follow these maintenance guidelines:
- Cleaning: Use the provided cleaning cloth or a soft, lint-free cloth to wipe the display screen and the unit's body. Do not use harsh chemicals, abrasive materials, or spray cleaners directly onto the device.
- Storage: If storing the device for an extended period, disconnect it from the vehicle and store it in a cool, dry place away from direct sunlight.
- Avoid Impact: Protect the unit from drops or strong impacts, which can damage internal components or the display.
8. Troubleshooting
If you encounter issues with your ACECAR T2 HUD, refer to the following common problems and solutions:
| Problem | Possible Cause | Solution |
|---|---|---|
| No display/No power | Loose cable connection, vehicle not powered on. | Ensure the data cable is securely connected to both the HUD and the vehicle's OBD port. Turn on the vehicle. |
| Incorrect speed display | Unit calibration issue. | Refer to the detailed calibration instructions in the included manual to adjust speed settings. |
| Ghosting or blurry image | Improper placement, dirty screen. | Adjust the HUD's position. Clean the display screen with the provided cloth. The unit features optical imaging to minimize ghosting. |
| Alarms not functioning | Alarm settings disabled or incorrect thresholds. | Access the HUD's menu to verify and adjust alarm settings and thresholds. |
If the problem persists after trying these solutions, please contact ACECAR customer support for assistance.
9. Specifications
| Feature | Detail |
|---|---|
| Brand | ACECAR |
| Model | T2 |
| Material | Acrylonitrile Butadiene Styrene (ABS) |
| Item Dimensions (L x W x H) | 5 x 4 x 3 inches |
| Item Weight | 15 Ounces |
| UPC | 762041139315 |
| Display Type | TFT LCD |
| Compatibility | Tesla Model 3 and Model Y (post-June 2021 update) |
10. Warranty and Support
ACECAR is committed to providing high-quality products. This product is CE FCC RoHS Certified, ensuring superior quality and safety standards.
If you have any questions about this product, require technical assistance, or need to inquire about warranty information, please feel free to contact ACECAR customer service. We are dedicated to providing prompt support and helping you resolve any issues you may encounter.
For the most up-to-date contact information, please refer to the official ACECAR website or the contact details provided on your product packaging.