
SENRISE HS81, HS81R, HS81T
SENRISE Rear Handle Assembly User Manual
Replacement Part for Stihl HS81, HS81R, HS81T Hedge Trimmers
Introduction
This manual provides essential information for the installation, operation, and maintenance of your new SENRISE Rear Handle Assembly. This high-quality aftermarket replacement part is designed to restore the functionality and ergonomic comfort of your compatible Stihl hedge trimmer. Please read this manual thoroughly before attempting any installation or operation to ensure safe and correct usage.
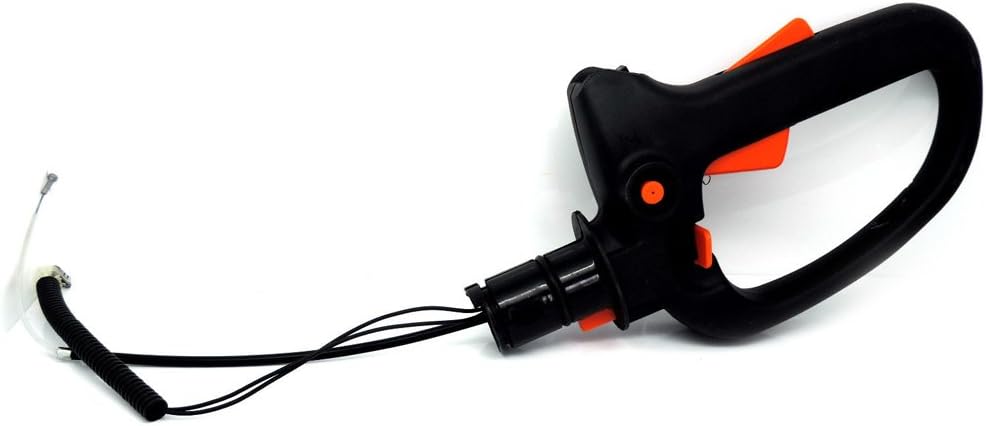
Image: The SENRISE Rear Handle Assembly, showing the main handle, throttle cable, and ignition wires.
Compatibility
This SENRISE Rear Handle Assembly is specifically designed as a direct replacement for the following Stihl hedge trimmer models:
- Stihl HS81
- Stihl HS81R
- Stihl HS81T
Ensure your hedge trimmer model matches one of those listed above to guarantee proper fit and function.

Image: The rear handle assembly, with text indicating compatibility with HS86R, HS81, HS81R, and HS81T models.
Package Contents
Upon opening your package, please verify that all components are present and undamaged:
- 1 x SENRISE Rear Handle Assembly (complete with throttle cable and ignition wires)
Safety Information
Always prioritize safety when working with power tools and replacement parts. Failure to follow these safety guidelines may result in serious injury or damage to equipment.
- Disconnect Power: Before beginning any installation or maintenance, always ensure the hedge trimmer's engine is off and the spark plug cap is disconnected to prevent accidental starting.
- Wear Protective Gear: Always wear appropriate personal protective equipment (PPE), including safety glasses, gloves, and sturdy footwear.
- Work in a Well-Lit Area: Perform installation in a clean, well-lit workspace to ensure clear visibility of all components.
- Use Correct Tools: Use only the appropriate tools for disassembly and assembly.
- Keep Children and Pets Away: Ensure no unauthorized persons are in the work area.
- Inspect Components: Before installation, inspect the new handle assembly for any signs of damage. Do not install damaged parts.
Setup and Installation
Follow these steps carefully to replace the rear handle assembly on your Stihl hedge trimmer. If you are unsure about any step, consult a qualified service technician.
- Prepare the Trimmer:
- Ensure the hedge trimmer engine is completely cool.
- Disconnect the spark plug cap from the spark plug to prevent accidental ignition.
- Place the trimmer on a stable, flat surface.
- Remove the Old Handle Assembly:
- Locate the screws or fasteners securing the existing rear handle assembly to the trimmer body. Carefully remove them.
- Gently detach the old handle, paying attention to how the throttle cable and ignition wires are routed and connected.
- Disconnect the throttle cable and ignition wires from their respective points on the trimmer. Note their exact connection points for reassembly.
- Install the New Handle Assembly:
- Carefully route the new throttle cable and ignition wires from the SENRISE handle assembly to their corresponding connection points on the trimmer.
- Connect the throttle cable securely.
- Connect the ignition wires to their correct terminals. Ensure connections are firm and insulated.
- Position the new handle assembly onto the trimmer body, aligning it with the mounting holes.
- Secure the New Handle:
- Insert and tighten the screws or fasteners that secure the new handle assembly to the trimmer body. Do not overtighten, as this can strip threads or crack plastic.
- Ensure the handle is firmly attached and does not wobble.
- Final Checks:
- Visually inspect all connections to ensure they are correct and secure.
- Verify that the throttle lever moves freely and returns to its idle position.
- Ensure the ignition switch operates smoothly.
- Reconnect the spark plug cap.

Image: A detailed view of the handle's ergonomic design, highlighting the throttle trigger and ignition switch.

Image: An angled view of the handle assembly, showing the cable routing from the base of the handle.
Operating Instructions
Once the new rear handle assembly is installed, the operation of your hedge trimmer remains largely the same. This handle provides the primary control interface for the trimmer.
- Throttle Control: The orange lever on the handle controls the engine speed. Squeeze the lever to increase engine RPM and release to return to idle.
- Ignition Switch: The switch located on the handle controls the engine's ignition. Move the switch to the "ON" position to allow the engine to start, and to the "OFF" position to stop the engine.
- Ergonomic Design: The handle is designed for comfortable and secure gripping during operation, featuring a soft grip and a see-through hand guard for safety.
Maintenance
Proper maintenance will extend the life of your rear handle assembly and ensure reliable operation.
- Cleaning: Periodically wipe down the handle with a clean, damp cloth to remove dirt, grease, and debris. Avoid using harsh chemicals that could damage the plastic.
- Inspection: Regularly inspect the handle for any signs of wear, cracks, or damage. Check the throttle cable and ignition wires for fraying or exposed insulation.
- Fastener Check: Ensure all mounting screws remain tight. Retighten if necessary, but do not overtighten.
- Cable Movement: Verify that the throttle cable moves freely without binding.
Troubleshooting
If you encounter issues after installing the new handle assembly, consider the following common problems and solutions:
| Problem | Possible Cause | Solution |
|---|---|---|
| Engine does not start after handle replacement. | Ignition switch wires not connected correctly or securely. | Check ignition wire connections. Ensure they are firmly attached to the correct terminals. |
| Throttle lever is stiff or does not return smoothly. | Throttle cable kinked, improperly routed, or binding. | Inspect the throttle cable for kinks or obstructions. Reroute if necessary. Ensure no debris is impeding movement. |
| Handle feels loose or wobbly. | Mounting screws are not tightened sufficiently. | Carefully tighten all mounting screws. Do not overtighten. |
If problems persist after attempting these solutions, it is recommended to consult a qualified service technician.
Specifications
| Feature | Detail |
|---|---|
| Product Type | Rear Handle Assembly |
| Compatibility | Stihl HS81, HS81R, HS81T Hedge Trimmers |
| Material | Plastic + Metal |
| Color | Black (with orange accents) |
| Included Components | Throttle cable, Ignition wires |
Warranty and Support
For information regarding warranty coverage or technical support for your SENRISE Rear Handle Assembly, please refer to the purchase documentation or contact the seller directly. Keep your proof of purchase for any warranty claims.
Ask a question about this manual
Ask about setup, troubleshooting, compatibility, parts, safety, or missing instructions. Manuals+ will review the question and use this page’s manual context to help answer it.