1. Introduction
This manual provides comprehensive instructions for the installation, operation, and maintenance of the DNYSYSJ 12V 4-Port Universal Auxiliary Under Dash Heater. This energy-saving heater is designed to provide additional warmth to the passenger compartment of various vehicles, including cars, trucks, minivans, excavators, and harvesters. It operates by utilizing the hot coolant from the engine's cooling system, circulating air through a heater core, and expelling warm air into the vehicle's interior.
The heater is an efficient solution for maintaining a comfortable cabin temperature without significant fuel consumption, offering more heat output compared to battery-powered alternatives with low electricity usage.
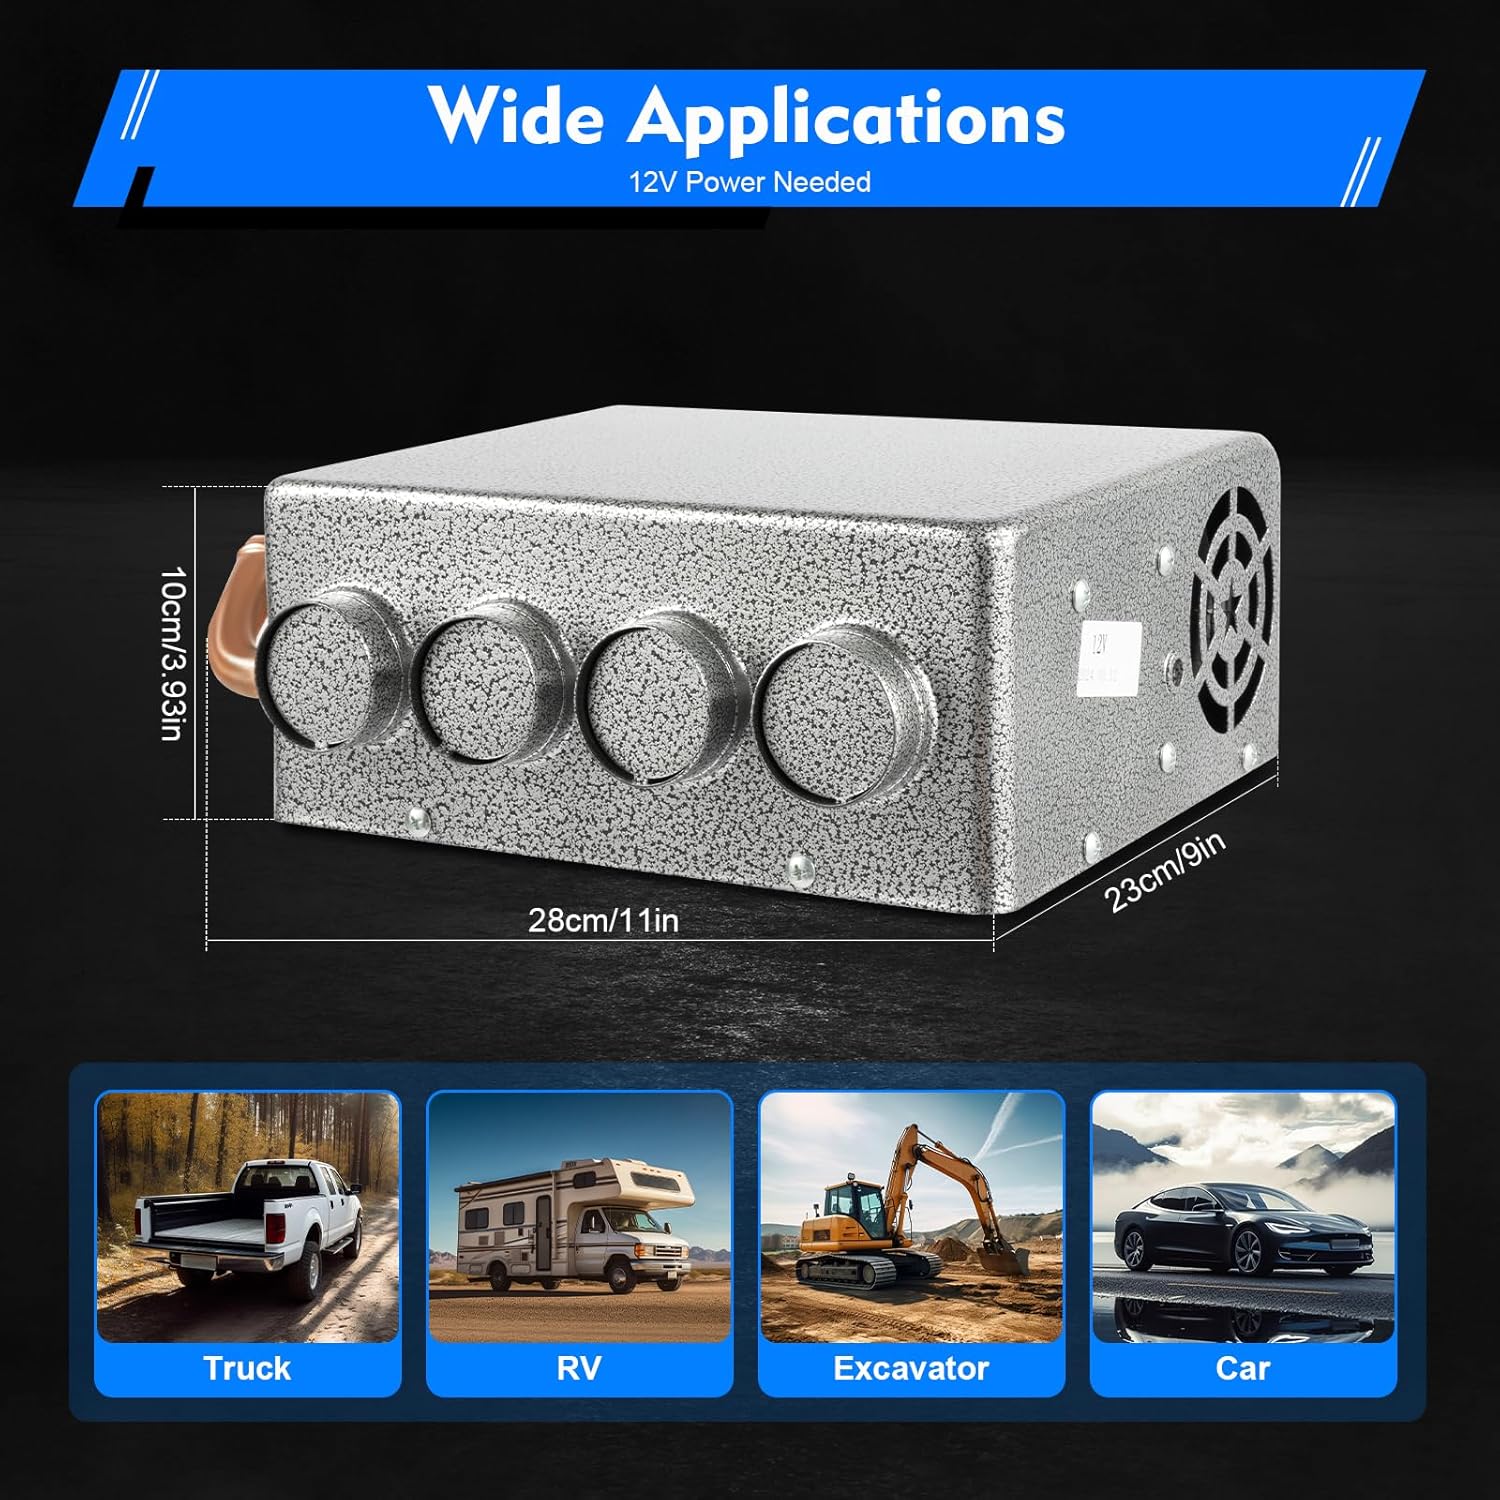
Figure 1: Wide range of vehicle applications for the DNYSYSJ Under Dash Heater.
2. Safety Information
Please read and understand all safety warnings and instructions before installing or operating this product. Failure to follow these instructions may result in property damage, personal injury, or death.
- Always disconnect the vehicle's battery before performing any electrical work.
- Ensure the engine is cool before working on the cooling system to avoid burns from hot coolant.
- Wear appropriate personal protective equipment, including safety glasses and gloves.
- Ensure all electrical connections are secure and properly insulated to prevent short circuits.
- Verify that all hose connections are tight and leak-free to prevent coolant loss.
- Do not obstruct the air inlets or outlets of the heater.
- If you are unsure about any part of the installation process, consult a qualified automotive technician.
3. Product Overview and Components
The DNYSYSJ Under Dash Heater system includes the main heater unit and several accessories necessary for installation. Familiarize yourself with all components before beginning the installation process.

Figure 2: Main heater unit and included accessories.
Included Components:
- 1 x Heater Unit
- 4 x Black Air Tubes
- 2 x Tee Connectors (for coolant hoses)
- 2 x Mounting Brackets
- 1 x Speed Control Switch
- 2 x Straight Fittings
- 7 x Hose Clamps (0.6-1 inch / 16-25mm)

Figure 3: Detailed view of package contents.
The heater unit features a powerful blower motor and four air outlets for strong warm airflow. It incorporates a high-efficiency copper pipe heating core for rapid air warming. The design includes round corners to prevent scratches and a large air inlet to promote overall efficiency.

Figure 4: Design details of the heater unit, showing round corners and air inlet.
4. Specifications
| Feature | Specification |
|---|---|
| Voltage | 12V |
| Power Supply Current | 8A |
| Material | Copper, Iron |
| Color | Grey |
| Dimensions (Heater Unit) | 23 x 21 x 10 cm (9.3" x 8.5" x 3.9") |
| Fitting Required | 5/8'' (16mm) inner diameter water hose |
| Number of Air Ports | 4 |
| Weight | 7.1 pounds (approx. 3.2 kg) |
5. Setup and Installation
Proper installation is crucial for the safe and efficient operation of your under dash heater. This process involves connecting the heater to your vehicle's engine cooling system and electrical system.
Installation Steps:
- Choose Mounting Location: Select a suitable location under the dashboard that allows for secure mounting, clear airflow, and easy access for hose and electrical connections. Ensure the heater does not interfere with pedals, steering, or other vehicle controls.
- Mount the Heater Unit: Use the provided mounting brackets to securely fasten the heater unit in your chosen location.
- Cooling System Connection:
- Identify the direction of coolant flow through your vehicle's cooling system.
- Carefully cut into an appropriate heater hose line (typically 5/8'' or 16mm inner diameter) and insert the provided Tee connectors.
- Connect the hot coolant hoses from the vehicle's cooling system to the inlet and outlet ports of the heater unit using the straight fittings and hose clamps. Ensure all connections are tight to prevent leaks.
- Electrical System Connection:
- Wire the heater and the speed control switch into your vehicle’s 12V electrical system.
- Connect the red wire of the switch to the positive (+) pole of the power supply and the heater's positive input.
- Connect the blue wire of the switch to the negative (-) pole of the heater's input.
- Connect the black wire to the negative (-) pole of the power supply (vehicle ground).
- Ensure all electrical connections are properly crimped, soldered, and insulated.
- Attach Air Tubes: Connect the four black air tubes to the heater's air outlets and direct them to the desired areas for heating (e.g., footwells, defrost vents).
- Test System: After installation, refill the cooling system if necessary and check for any coolant leaks. Start the vehicle and test the heater's operation and fan speed control.
Note:
- The heater must be connected to your engine's cooling system to function.
- The blower motor requires wiring into your vehicle's electrical system to circulate warm air.

Figure 5: Example of heater unit installed under a vehicle dash.
6. Operating Instructions
Once properly installed, operating the DNYSYSJ Under Dash Heater is straightforward.
- Start Vehicle: Ensure your vehicle's engine is running and has reached operating temperature to allow hot coolant to circulate.
- Activate Heater: Turn on the heater using the installed speed control switch.
- Adjust Fan Speed: The included speed control switch allows for infinite adjustment of the air volume. Rotate the knob to increase or decrease the fan speed to your desired level of warmth and airflow.

Figure 6: Speed control switch for adjusting airflow.
The heater is designed for multi-use applications, including general air heating, feet warming, defrosting windows, and defogging the windshield for improved visibility.

Figure 7: Versatile applications of the under dash heater.
7. Maintenance
Regular maintenance helps ensure the longevity and optimal performance of your heater. While this unit requires minimal maintenance, periodic checks are recommended.
- Inspect Hoses and Clamps: Periodically check all coolant hoses and clamps for signs of wear, cracks, or leaks. Tighten clamps if necessary.
- Check Electrical Connections: Ensure all electrical wiring and connections remain secure and free from corrosion.
- Clean Air Inlets/Outlets: Keep the heater's air inlets and outlets free from dust, debris, or obstructions to maintain efficient airflow. Use a soft brush or compressed air if needed.
- Coolant Level: Regularly check your vehicle's coolant level and ensure it is at the appropriate mark. Low coolant levels can affect heater performance.
8. Troubleshooting
If you encounter issues with your DNYSYSJ Under Dash Heater, refer to the following common troubleshooting steps:
- No Heat Output:
- Ensure the engine is at operating temperature and circulating hot coolant.
- Check coolant levels in your vehicle.
- Inspect coolant hoses for kinks or blockages.
- Verify that the heater's fan is operating.
- Fan Not Working:
- Check all electrical connections to the heater and the speed control switch.
- Ensure the vehicle's battery is charged and providing 12V power.
- Check for any blown fuses in the circuit connected to the heater.
- Coolant Leaks:
- Immediately shut off the engine and allow it to cool.
- Inspect all hose connections and clamps for tightness. Tighten or replace as needed.
- Check the heater core for any signs of damage.
If problems persist after attempting these steps, it is recommended to consult a professional automotive technician.
9. Warranty and Support
Specific warranty details for the DNYSYSJ 12V 4-Port Universal Auxiliary Under Dash Heater are not provided in this manual. For information regarding warranty coverage, returns, or technical support, please refer to the product packaging, the seller's website, or contact DNYSYSJ customer service directly.
When contacting support, please have your product model information and purchase details readily available.