Arokimi 111
Arokimi 200W Electric Branding Iron Instruction Manual
Model: 111
Introduction
Thank you for choosing the Arokimi 200W Electric Branding Iron. This tool is designed to create permanent custom logos and designs on various materials such as wood, leather, plastic, and paper. This manual provides essential information for safe and effective use, setup, operation, maintenance, and troubleshooting.
Safety Information
Please read and understand all safety instructions before operating the branding iron. Failure to follow these instructions may result in electric shock, fire, or serious injury.
- High Temperature: The branding iron reaches very high temperatures. Always handle with extreme caution. Do not touch the metal parts of the iron when it is hot or plugged in.
- Protective Gear: Wear heat-resistant gloves and safety glasses to protect your hands and eyes from heat and potential sparks.
- Ventilation: Use the branding iron in a well-ventilated area to avoid inhaling fumes, especially when working with plastics or treated wood.
- Flammable Materials: Keep the branding iron away from flammable liquids, gases, and materials.
- Children and Pets: Keep the device out of reach of children and pets.
- Unplug When Not in Use: Always unplug the branding iron from the power outlet when not in use, during cleaning, or when changing accessories.
- Power Cord: Inspect the power cord for damage before each use. Do not use if the cord is frayed or damaged.
- Stable Surface: Place the branding iron on a stable, heat-resistant surface or use the included stand during heating and cooling.
Setup
- Attach Custom Logo Mold: Ensure your custom brass logo mold is securely attached to the branding iron's heating element.
- Connect Power: Plug the branding iron into a standard electrical outlet.
- Preheat: Place the branding iron on its stand on a heat-resistant surface. Allow the iron to preheat for approximately 10-15 minutes to reach the optimal branding temperature.


Operating Instructions
Once the branding iron is preheated, you can begin the branding process. Always test on a scrap piece of material first to determine the ideal pressure and duration.
Standard Branding (Wood, Leather, Plastic, Paper)
- Prepare Surface: Ensure the material surface is clean and dry.
- Position Iron: Carefully position the hot branding iron with the custom logo mold over the desired area on your material.
- Apply Pressure: Press the branding iron firmly and evenly onto the material for approximately 1-5 seconds. The exact duration depends on the material type and desired depth of the brand. For wood, 1-2 seconds is often sufficient.
- Remove Iron: Lift the branding iron straight up from the material.
- Inspect: Check the branded impression. Adjust pressure or duration for subsequent brands as needed.
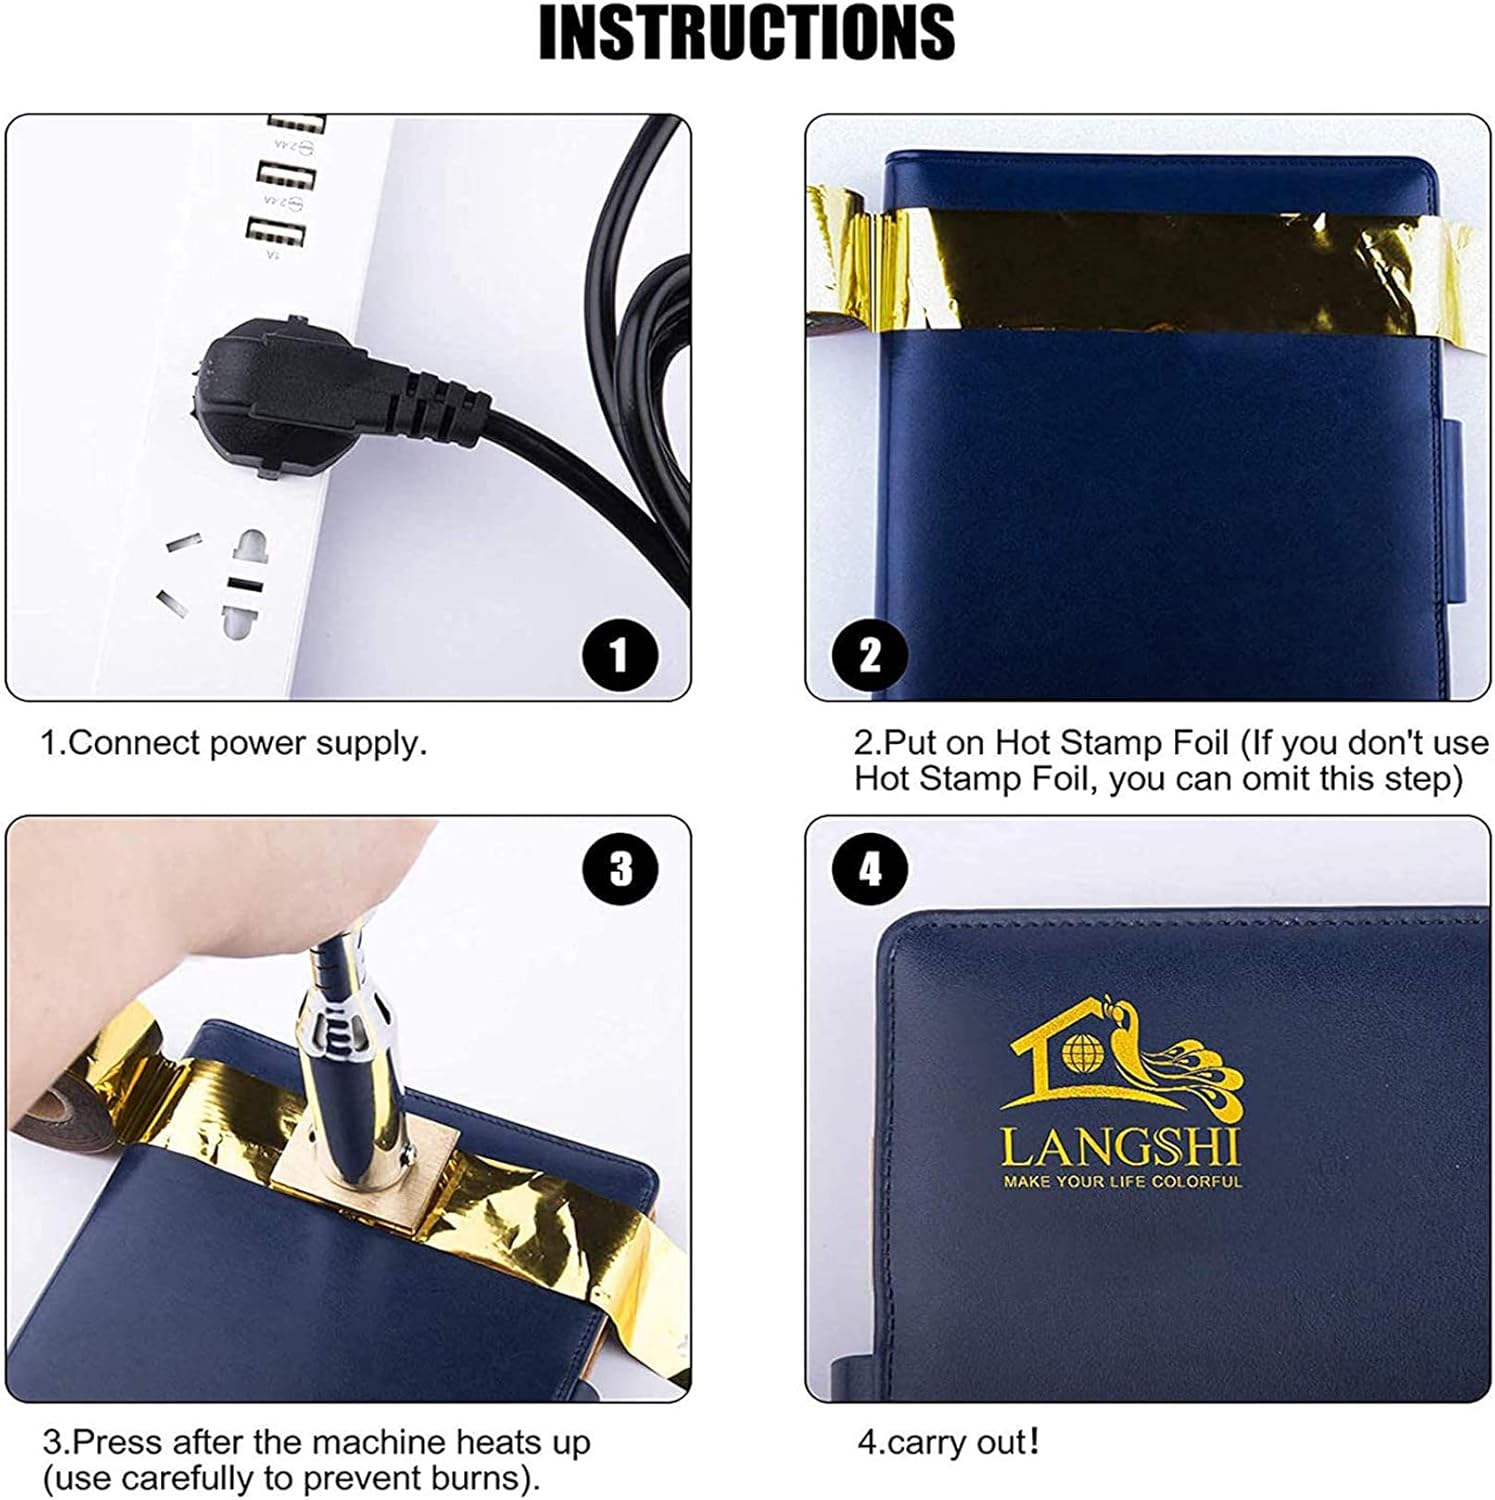
Using Hot Stamp Foil (Optional)
For a metallic or colored effect, you can use hot stamp foil. This step is optional and can be omitted if not desired.
- Connect Power Supply: Ensure the branding iron is plugged in and preheated.
- Position Foil: Place the hot stamp foil over the material where you want the brand to appear. The colored side of the foil should face upwards.
- Apply Pressure: Carefully press the heated branding iron onto the foil and material. Apply firm, even pressure for 3-5 seconds. Exercise caution to prevent burns.
- Remove Iron and Foil: Lift the branding iron, then carefully peel off the hot stamp foil to reveal the branded design.
Custom Logo Design Considerations
The custom logo mold is created based on your design. For best results, provide a clear black and white JPG image. The black areas in your design will be the parts that burn or brand onto the material.


Maintenance
Proper maintenance ensures the longevity and optimal performance of your branding iron.
- Cleaning the Branding Head: After the iron has completely cooled, gently wipe the brass logo mold with a soft, dry cloth to remove any residue. For stubborn residue, a brass brush can be used carefully. Do not use abrasive cleaners or immerse the iron in water.
- Storage: Store the branding iron in a dry, safe place, away from moisture and extreme temperatures. Ensure the power cord is neatly coiled and not kinked.
- Inspection: Periodically inspect the branding iron and power cord for any signs of wear or damage.
Troubleshooting
If you encounter issues with your Arokimi Electric Branding Iron, refer to the following common problems and solutions:
| Problem | Possible Cause | Solution |
|---|---|---|
| Iron not heating up | Not plugged in; Power outlet issue; Damaged cord | Ensure iron is securely plugged in. Test the outlet with another device. Inspect the power cord for damage; if damaged, discontinue use and contact support. |
| Uneven brand impression | Insufficient preheating time; Uneven pressure; Material surface irregularities | Allow full 10-15 minutes for preheating. Apply firm, even pressure across the entire logo. Ensure the material surface is flat and smooth. |
| Brand is too light or too dark | Incorrect branding duration or temperature | Adjust the branding duration. For lighter brands, decrease time; for darker brands, increase time slightly. Ensure proper preheating. |
| Smoke or strong odor | Normal for some materials; Material burning excessively | Ensure adequate ventilation. Reduce branding duration if material is burning too much. If smoke is excessive or smells electrical, unplug immediately and contact support. |
Specifications
- Model Number: 111
- Power: 200W
- Product Dimensions: 8 x 2 x 2 inches
- Item Weight: 1.54 pounds
- Manufacturer: Arokimi
- Compatible Materials: Wood, Leather, Plastic, Paper, and more
Warranty and Support
The Arokimi Electric Branding Iron comes with a limited warranty. For specific details regarding your warranty coverage, please refer to the documentation included with your purchase or contact the manufacturer directly.
For technical support, troubleshooting assistance, or inquiries regarding custom logo designs, please contact Arokimi customer service or the seller, Aroko Tech, through your purchase platform.