ATPEAM AE-18-43
ATPEAM Macpherson Strut Spring Compressor Kit: Instruction Manual
Model: AE-18-43
1. Introduction
This manual provides essential instructions for the safe and effective use of your ATPEAM Macpherson Strut Spring Compressor Kit. This universal interchangeable fork coil extractor tool set is designed for the assembly and disassembly of Macpherson shock absorber springs on various vehicles. It is compatible with models such as BMW (E31, E32, E33, E34, E36, E39, Z3, Z3 Coupe) and Mercedes Benz (W163, W164, W171, W210, W211, W219, W230, W245, W251, W203 & W209 4-Matic only). Please read this manual thoroughly before operation to ensure proper usage and personal safety.
2. Safety Information
WARNING: Spring compressors can be dangerous if not used correctly. Improper use can result in serious injury or death. Always follow these safety guidelines:
- Always wear appropriate personal protective equipment, including safety glasses and heavy-duty gloves.
- Ensure the tool is correctly assembled and all components are securely fastened before applying tension.
- Never use impact wrenches or guns with this spring compressor. Use only manual wrenches to control compression gradually and safely.
- Inspect the tool for any damage or wear before each use. Do not use if any part is damaged.
- Ensure the spring is properly seated within the jaws/yokes and the safety lip locks the spring in place during compression.
- Work on a stable, level surface.
- Keep bystanders away from the work area.
- Do not exceed the specified compression limits of the yokes.
- If the spring begins to curve or show signs of instability during compression, stop immediately and re-evaluate the setup.
3. Package Contents
Verify that all components are present and undamaged upon opening the kit:

Image Description: A diagram illustrating the individual components of the ATPEAM Macpherson Strut Spring Compressor Kit. It shows the main compressor body (A), three pairs of spring holders (yokes) in black (B), silver (C), and gold (D), six retaining bolts (E), and a spacer (F). Each component is labeled with a letter for easy identification.
- 1x Compression Rod
- 2x Small Yokes (Gold, for 65-125mm springs)
- 2x Medium Yokes (Black, for 88-160mm springs)
- 2x Large Yokes (Silver, for 126-212mm springs)
- 6x Retaining Bolts
- 1x Adjustment Hook
- 1x Blow Mold Case for storage and transport
4. Specifications
| Feature | Detail |
|---|---|
| Model Number | AE-18-43 |
| Material | High-quality forged steel |
| Item Weight | Approximately 34 pounds (15.4 kg) |
| Product Dimensions (Case) | 19 x 15 x 4 inches (48.3 x 38.1 x 10.2 cm) |
| Yoke Sizes (Spring Diameter) |
|
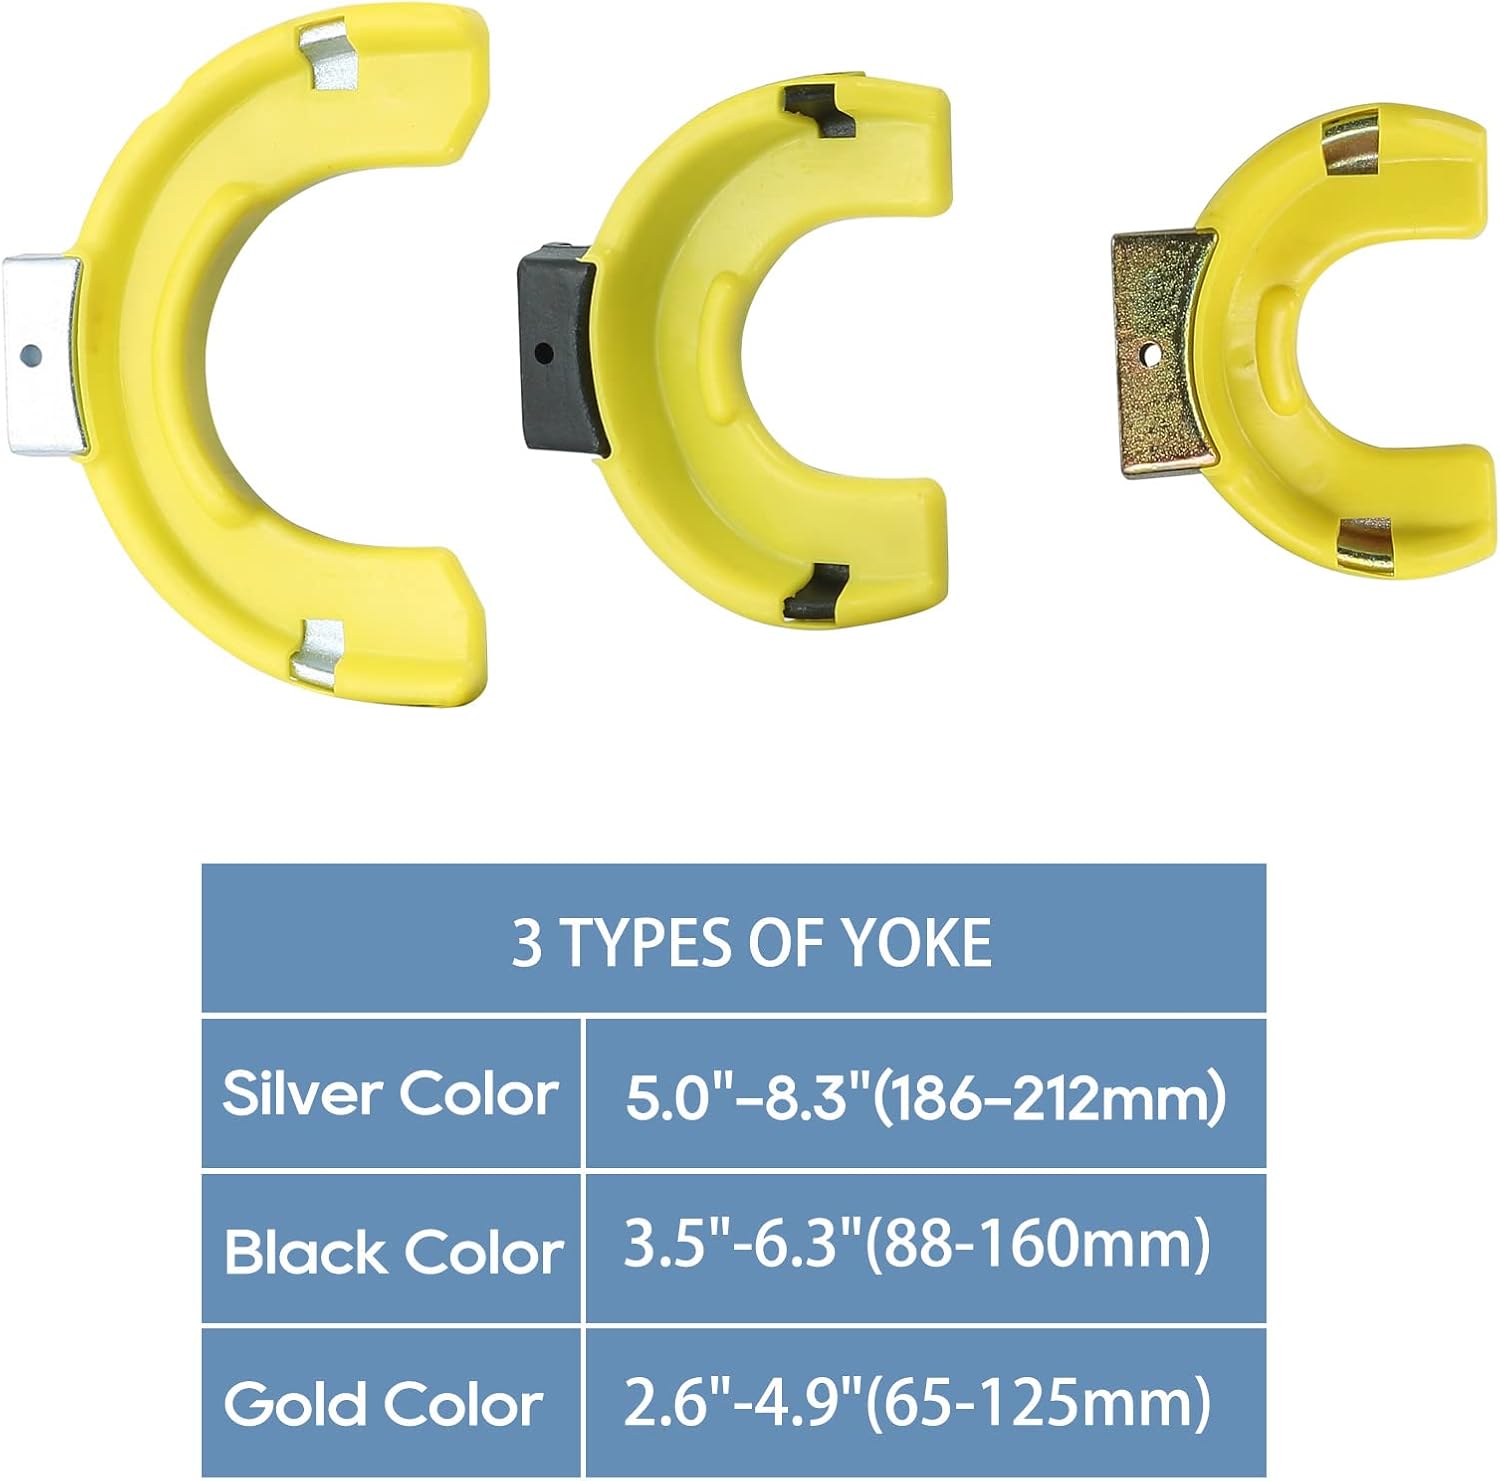
Image Description: A visual representation of the three different yoke sizes included in the kit: gold, black, and silver. Each yoke is labeled with its color and the corresponding spring diameter range it can accommodate in both inches and millimeters. This helps users select the correct yoke for their specific strut spring.
5. Setup
Before beginning any work, ensure you have read and understood all safety warnings. Prepare your workspace and the strut assembly.
- Inspect Components: Check the compression rod, yokes, and bolts for any signs of wear, damage, or deformation. Do not use the tool if any component is compromised.
- Select Correct Yokes: Identify the appropriate pair of yokes (gold, black, or silver) that best fit the diameter of the strut spring you intend to compress. The yokes should securely grip the spring coils without excessive play. Refer to the specifications section for size ranges.
- Attach Yokes: Securely attach the selected yokes to the compression rod using the provided retaining bolts. Ensure the bolts are tightened firmly. The safety lip on the jaws should face inwards to lock the spring.
- Position the Strut: Place the strut assembly on a stable, flat surface. Ensure it cannot move or shift during the compression process.
6. Operating Instructions
Follow these steps carefully to safely compress and decompress Macpherson strut springs:

Image Description: A visual guide demonstrating the three main steps for using the strut spring compressor. Step 1: Shows selecting the correct yoke size for the strut spring. Step 2: Illustrates positioning the yokes onto the spring, ensuring the coil is fully inserted. Step 3: Depicts the compression process using a manual wrench on the compression rod, emphasizing safe and controlled operation.
- Position Yokes on Spring: Carefully place the assembled compression tool onto the strut spring. Ensure the yokes are positioned on opposing coils of the spring, ideally near the top and bottom, to distribute the compression force evenly. The spring coils must be fully inserted into the yoke's grooves.
- Secure the Spring: Confirm that the safety lips on the yokes are securely gripping the spring coils. The spring should be stable and not able to slip out of the yokes.
- Begin Compression: Using a manual wrench (do NOT use impact wrenches or guns), slowly turn the adjustment hook on the compression rod. This will draw the yokes closer together, compressing the spring.
- Monitor Compression: Continuously observe the spring during compression. Ensure it compresses evenly and remains securely seated in the yokes. Stop compressing once the spring tension is relieved from the strut mount, allowing for safe removal of the top nut and strut components.
- Disassembly: Once the spring is compressed, carefully remove the strut components as required for repair or replacement.
- Decompression: After reassembly of the strut components, slowly and gradually release the tension on the compression rod by turning the adjustment hook in the opposite direction. Ensure the spring expands evenly and seats correctly.
- Remove Tool: Once the spring is fully decompressed and seated, remove the compression tool from the strut assembly.
Important: Always maintain control of the compression process. If at any point the spring appears unstable or misaligned, stop immediately and re-evaluate the setup before proceeding.
7. Maintenance
Proper maintenance will extend the life of your ATPEAM Strut Spring Compressor Kit:
- Cleaning: After each use, clean all components to remove dirt, grease, and debris. Use a clean cloth.
- Lubrication: Periodically apply a light coat of grease or oil to the threads of the compression rod to ensure smooth operation and prevent corrosion.
- Inspection: Regularly inspect the yokes, bolts, and compression rod for signs of wear, cracks, bends, or other damage. Replace any damaged components immediately.
- Storage: Store the kit in its original blow mold case in a dry, clean environment to protect it from moisture and physical damage.

Image Description: The ATPEAM Macpherson Strut Spring Compressor Kit neatly organized within its durable blue blow mold case. The main compression rod, various yokes, and smaller components are visible, illustrating the ease of storage and transport provided by the case.
8. Troubleshooting
If you encounter issues during operation, consider the following:
- Spring Slipping:
- Ensure the correct yoke size is selected for the spring diameter.
- Verify that the spring coils are fully seated within the yoke grooves and the safety lips are engaged.
- Check that the yokes are positioned symmetrically on the spring.
- Inspect yokes for wear that might reduce grip.
- Difficulty Compressing:
- Ensure the compression rod threads are clean and adequately lubricated.
- Confirm that the yokes are not binding on the spring or other components.
- Verify that you are using a manual wrench and not an impact tool, which can damage the compressor.
- Tool Damage:
- Immediately cease operation if any part of the tool shows signs of bending, cracking, or deformation.
- Do not attempt to repair damaged components. Contact ATPEAM support for replacement parts or guidance.
9. Warranty and Support
For information regarding warranty coverage, replacement parts, or technical assistance, please contact ATPEAM customer support. Keep your purchase receipt and model number (AE-18-43) available when contacting support.
You can find more information and contact details by visiting the official ATPEAM store: ATPEAM Store on Amazon.
Related Documents - AE-18-43
 |
Vorsprung Secus Fork Air Spring Upgrade Kit: Standard Service Procedure Detailed standard service procedure for the Vorsprung Secus Fork Air Spring Upgrade Kit, focusing on dynamic seal replacement. Includes warnings, tools required, exploded views, seal schedules, and step-by-step instructions for disassembly and reassembly. |
 |
WP AER 43 Cone Valve Fork Owner's Manual Comprehensive owner's manual for the WP AER 43 Cone Valve Fork, detailing setup, maintenance, service, and tuning procedures for optimal performance and safety. Includes technical specifications and safety guidelines. |
 |
Front Lower Ball Joint Components - 1997 Toyota Paseo Repair Manual Detailed diagram and component list for the front lower ball joint assembly of a 1997 Toyota Paseo, including part names and torque specifications from the repair manual. |
 |
Panasonic VIXELL: Advanced Thermal Insulated Shippers for Pharmaceutical Cold Chain Explore Panasonic VIXELL, a leading reusable thermal insulated shipping solution designed for the demanding pharmaceutical cold chain. Featuring innovative Vacuum Insulated Case (VIC) technology, VIXELL ensures exceptional cooling performance, robustness, and reliability for global transport. |
 |
Rheem RPQL Heat Pump Parts List This document provides a comprehensive parts list for Rheem RPQL series heat pumps, detailing model explanations, serial number breakdowns, and part numbers for various components including sheet metal, electrical, fan, coil, and compressor groups, as well as accessories. |
 |
Meissner Deluxe Signal Shifter Coil Set Reference Reference guide for Meissner Deluxe Signal Shifter plug-in coil sets, listing part numbers, frequency ranges, and band coverage for general coverage and amateur bands. |
Ask a question about this manual
Ask about setup, troubleshooting, compatibility, parts, safety, or missing instructions. Manuals+ will review the question and use this page’s manual context to help answer it.