
Introduction
This manual provides essential information for the safe and effective installation, operation, and maintenance of your Keenso Brushless Motor Controller. This controller is designed for 48V, 60V, 64V, and 72V electric bikes and scooters, supporting motors from 1000W to 1500W. Please read this manual thoroughly before use to ensure proper function and longevity of the product.

Image: Keenso Brushless Motor Controller shown with an electric scooter, illustrating its application.
Product Overview
The Keenso Brushless Motor Controller is a high-performance component engineered for electric vehicles. Its robust design ensures reliable operation and efficient power management.
- Wide Application: Compatible with 48V, 60V, 64V, and 72V brushless motors ranging from 1000W to 1500W.
- Efficient Heat Dissipation: Features a durable metal shell with a groove design to effectively dissipate heat, protecting internal circuits from thermal overload.
- Durable Construction: Equipped with high-performance wires and interfaces, ensuring a low failure rate and extended service life.
- Responsive Control: Provides stable speed control and sensitive response to braking and direction changes, enhancing ride safety and smoothness.

Image: A close-up view of the Keenso Brushless Motor Controller, highlighting its metal casing with a groove design engineered for efficient heat dissipation.

Image: The Keenso Brushless Motor Controller, displaying its compact dimensions of 17.7cm (7in) length, 8.4cm (3.3in) width, and 3cm (1.7in) height.
Safety Information
Always prioritize safety when working with electrical components. Failure to follow these guidelines may result in injury or damage to the product.
- Ensure the power supply is disconnected before performing any installation, maintenance, or troubleshooting.
- Wear appropriate personal protective equipment, including insulated gloves and eye protection.
- Verify that all connections are secure and correctly matched to prevent short circuits or improper operation.
- Do not expose the controller to water or extreme temperatures.
- If you are unsure about any step, consult a qualified technician.
Setup and Installation
The controller is designed for straightforward installation. Carefully follow the wiring instructions below. Refer to the wiring diagram for visual guidance.
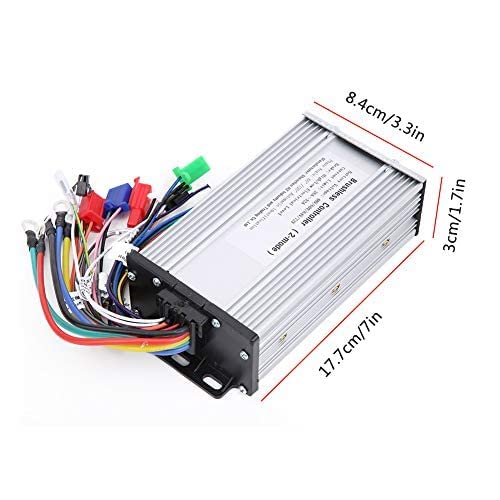
Image: Detailed wiring diagram for the Keenso Brushless Motor Controller, showing all connectors and their labels for proper installation.
Wiring Instructions:
- Power Connection: Connect the main power wires (typically red for positive, black for negative) from your battery to the controller's "Power" input. Ensure correct polarity.
- Motor Phase Lines: Connect the three thick motor phase wires (usually yellow, green, blue) from the controller to the corresponding motor phase wires.
- Hall Sensor Wires: Connect the smaller Hall sensor wires (typically five wires: red, black, yellow, green, blue) from the controller to the motor's Hall sensor connector.
- Electric Door Lock: Connect the electric door lock wire (often red/orange) to your vehicle's ignition or power switch.
- Speed Control Handle (Throttle): Connect the throttle wires (typically red, green, black) to the speed control handle.
- Brake Levers: Connect the "Low Level Brake" and "High Level Brake" wires to your brake levers. These provide signals to cut motor power during braking.
- Shift Three-speed Gear: If your vehicle has a three-speed gear function, connect the corresponding wires.
- Anti-theft Alarm Signal/Power: Connect these wires if your system includes an anti-theft alarm.
- Reverse Gear: Connect this wire if your vehicle supports a reverse function.
- Learning Wire: These two wires are typically used for initial motor identification. Connect them briefly, allow the motor to spin, then disconnect. Refer to specific motor instructions for this process.
- Multiple Data Meter: Connect to your vehicle's display unit for speed, battery level, and other data.
After all connections are made, double-check each wire against the diagram and ensure they are firmly seated. Incorrect wiring can damage the controller or other components.
Operating Instructions
Once the controller is correctly installed and all connections are secure, follow these steps to operate your electric vehicle:
- Power On: Turn on the electric door lock or ignition switch. The display (if connected) should illuminate.
- Throttle Control: Gently twist the speed control handle (throttle) to accelerate. The motor will respond proportionally to the throttle input.
- Braking: Apply the brake levers to slow down or stop. The controller will cut power to the motor when the brakes are engaged.
- Gear Shifting (if applicable): Use the three-speed gear switch to select your desired speed mode.
- Reverse (if applicable): Engage the reverse switch to move backward.
Always operate your vehicle responsibly and in accordance with local regulations. Avoid sudden acceleration or braking to prolong the life of your motor and controller.
Maintenance
Regular maintenance helps ensure the longevity and optimal performance of your Keenso Brushless Motor Controller.
- Keep Clean: Periodically clean the exterior of the controller to prevent dust and debris buildup, which can hinder heat dissipation. Use a dry, soft cloth.
- Check Connections: Regularly inspect all wiring connections for looseness, corrosion, or damage. Tighten any loose connections.
- Avoid Overheating: Ensure the controller is mounted in a location with adequate airflow to prevent overheating, especially during prolonged use or high loads.
- Environmental Protection: Protect the controller from direct exposure to rain, excessive moisture, and extreme temperatures.
Troubleshooting
If you encounter issues with your controller, refer to the following common problems and solutions:
| Problem | Possible Cause | Solution |
|---|---|---|
| Motor does not run. | No power, loose connections, faulty throttle, faulty motor, brake engaged. | Check battery charge. Verify all power and motor connections. Test throttle function. Ensure brake levers are not engaged. |
| Motor runs intermittently or with reduced power. | Loose Hall sensor wires, partial power connection, motor overload, low battery. | Inspect Hall sensor and power connections. Reduce load. Charge battery. |
| Controller gets excessively hot. | Motor overload, insufficient ventilation, internal fault. | Reduce motor load. Ensure controller has adequate airflow. If problem persists, discontinue use and seek professional assistance. |
| Vehicle does not respond to throttle. | Throttle not connected, faulty throttle, brake engaged, learning wires not disconnected. | Check throttle connection. Ensure brake levers are not engaged. Verify learning wires are disconnected after initial setup. |
If troubleshooting steps do not resolve the issue, contact Keenso customer support or a qualified technician.
Specifications
| Brand | Keenso |
| Model Number | Keensovqgy8ro4kc663 |
| Compatible Voltage | 48V, 60V, 64V, 72V |
| Compatible Motor Power | 1000W - 1500W |
| Material | Metal |
| Item Weight | 566.64 Grams |
Warranty and Support
Keenso products are manufactured to high-quality standards. For warranty information or technical support, please refer to the retailer where you purchased the product or visit the official Keenso store on Amazon: