TFCFL OT-ML-279-JHIN
TFCFL 2-Stroke 3.5HP 49CC Outboard Motor User Manual
Model: OT-ML-279-JHIN
1. Product Overview
This manual provides essential information for the safe and efficient operation, maintenance, and troubleshooting of your TFCFL 2-Stroke 3.5HP 49CC Petrol Outboard Trolling Motor. Please read this manual thoroughly before operating the motor.

Figure 1: TFCFL 2-Stroke 3.5HP 49CC Outboard Motor. This image shows the complete outboard motor assembly, highlighting its compact design and key components like the engine head, tiller handle, and propeller shaft.
The TFCFL 2-Stroke 3.5HP 49CC Outboard Motor is designed for use with various small watercraft, including inflatable boats, fishing boats, and canoes. It features a manual start system, half water-cooling and half air-cooling system, and tiller control for easy maneuverability.
2. Safety Information
WARNING: Failure to follow these safety instructions could result in serious injury or death.
- Always wear a personal flotation device (PFD) when operating or riding in a boat.
- Ensure the motor is securely mounted to the transom before starting.
- Never operate the motor in poorly ventilated areas due to carbon monoxide risk.
- Keep hands, feet, and clothing clear of the propeller when the engine is running or could accidentally start.
- Use the correct fuel mixture as specified in this manual. Incorrect fuel can damage the engine.
- Do not touch hot engine parts during or immediately after operation.
- Always use the flameout switch for immediate shutdown in emergencies.
- Ensure the boat's transom plate height is suitable (≤42cm/16.53in) for this short shaft motor.

Figure 2: Key Safety and Reassurance Features. This image highlights the suspension tilt adjustment pins for stable hull operation, the stable plate designed to reduce vortices, and the flameout button for immediate engine shutdown, all contributing to safer use.
3. Package Contents
Upon opening the package, verify that all the following items are included:
- 1x Outboard Motor
- 1x Tool Kit
- 1x Fuel Oil Mixing Bottle
- 1x Funnel
- 1x Spare Pull Rope
- 1x English Manual (this document)
4. Specifications
Refer to the table below for detailed technical specifications of your outboard motor:
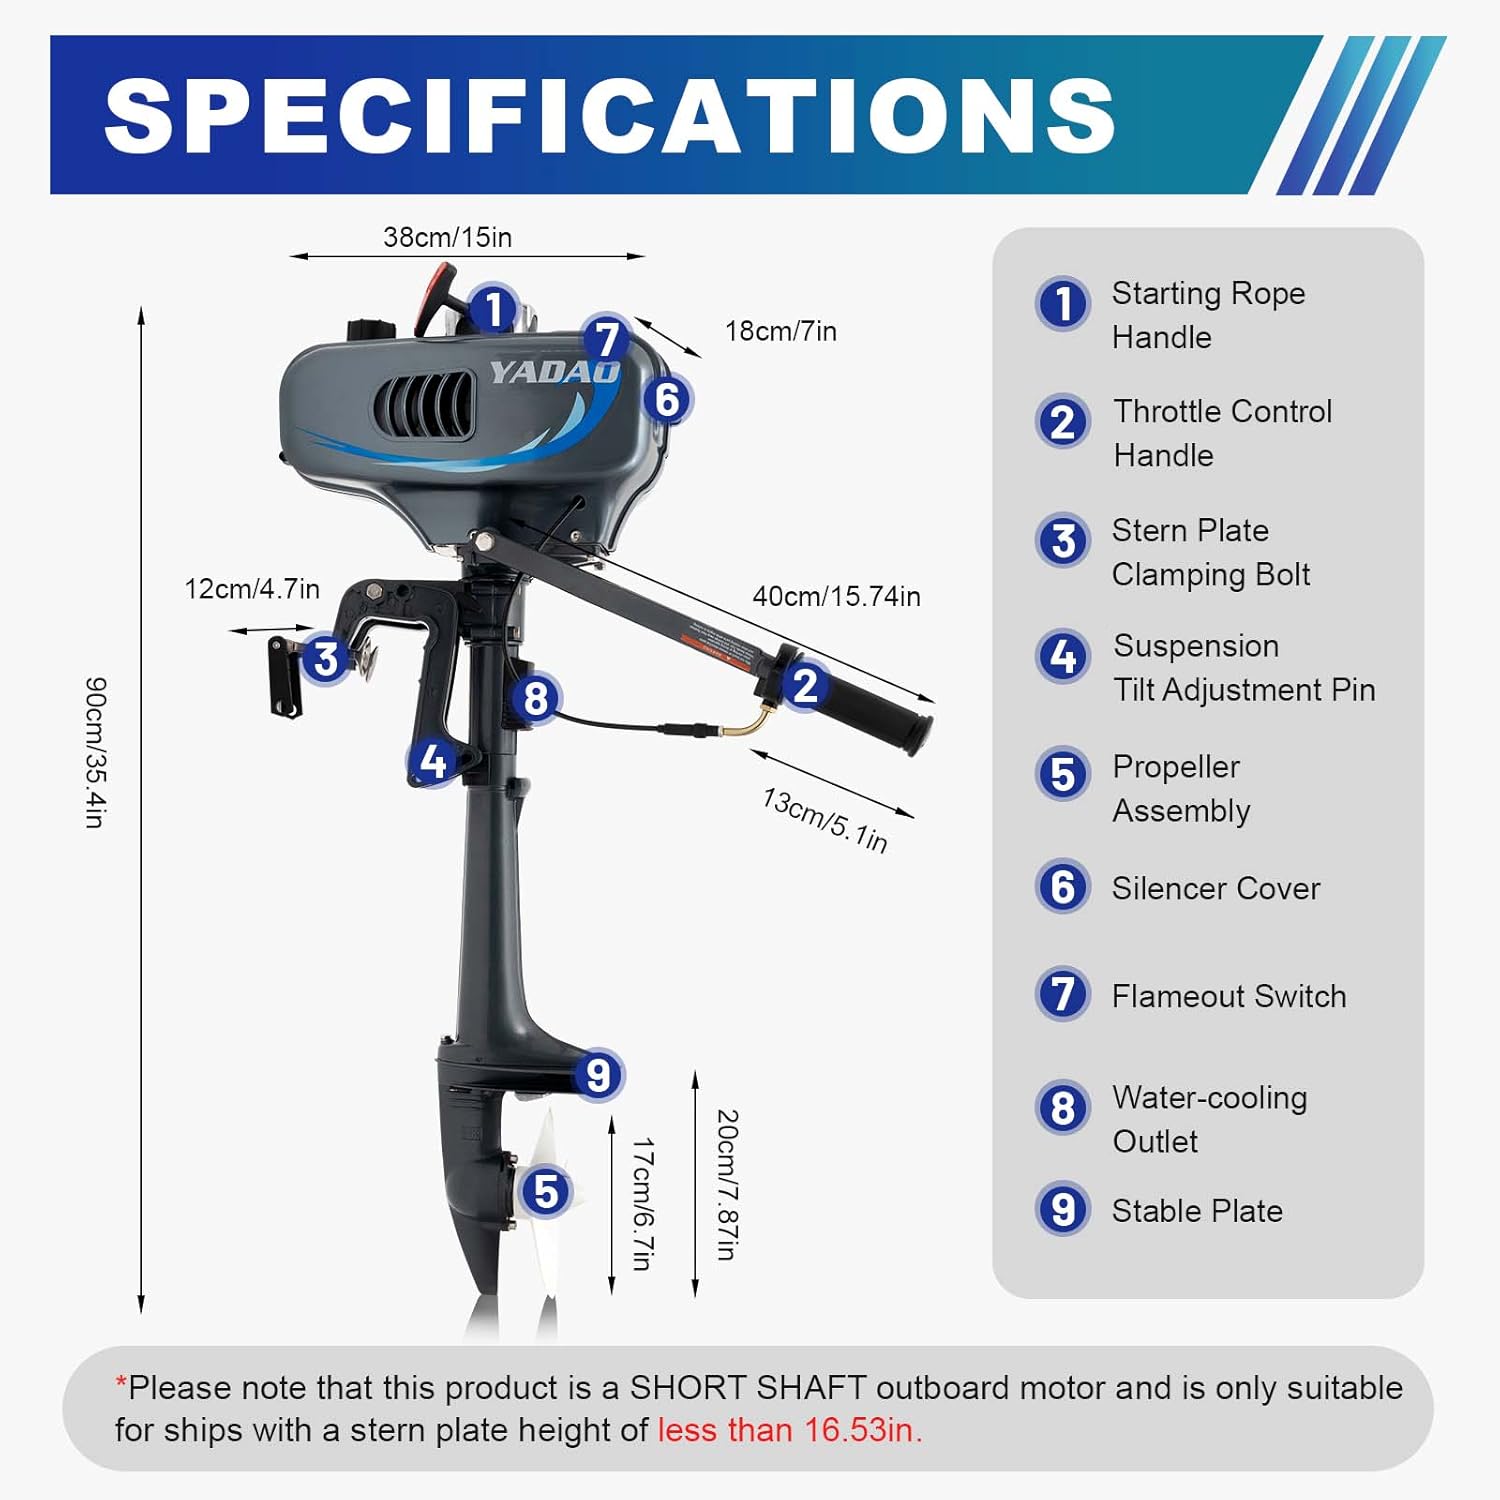
Figure 3: Detailed Specifications and Labeled Components. This diagram provides key dimensions and labels important parts of the outboard motor, including the starting rope handle, throttle control, stern plate clamping bolt, suspension tilt adjustment pin, propeller assembly, silencer cover, flameout switch, water-cooling outlet, and stable plate.
| Feature | Specification |
|---|---|
| Material | Aluminum Alloy, Rubber |
| Color | Grey |
| Engine Type | 2-stroke |
| Displacement | 49cc |
| Max. Output | 2.5KW / 3.5hp |
| Max. Speed | 4000-5000 r/Min |
| Noise Level | About 80dB |
| Gear Positions | Clutch |
| Ignition System | CDI |
| Cooling System | Half Water-cooling, Half Air-cooling |
| Control System | Tiller Control |
| Starting System | Manual Start |
| Recommended Gasoline | No.92 Lead-free Gasoline |
| Fuel Tank Capacity | 1.3L / 0.34gal |
| Fuel Consumption Rate | 1.1L / 0.3gal / h |
| Propeller Diameter | 17cm / 6.7in |
| Joystick Length | 40cm / 15.74in |
| Handle Length | 13cm / 5.1in |
| Adaptive Transom Plate Height | ≤42cm / 16.53in |
| Net Weight | 9.8kg / 21.6lbs |
| Product Size (LxWxH) | 90x38x18cm / 35.4x15x7in |
5. Setup and Installation
5.1 Unpacking and Inspection
Carefully remove all components from the packaging. Inspect for any signs of damage during transit. If any parts are missing or damaged, contact customer support immediately.
5.2 Mounting the Outboard Motor
The motor is designed for boats with a transom plate height of less than or equal to 42cm (16.53 inches). Ensure your boat meets this requirement.
- Position the outboard motor on the boat's transom.
- Tighten the stern plate clamping bolts (refer to Figure 3, item 3) securely to firmly fix the motor to the boat.
- Verify that the motor is stable and does not wobble.

Figure 4: Thoughtful Design Details. This image showcases the tail plate clamping bolt for secure motor fixation, the rubber handle cover for a reliable grip, the cooling water outlet for monitoring engine status, and the prevention of warping mechanism to ensure components return to their correct position.
5.3 Fuel Preparation
This is a 2-stroke engine and requires a specific fuel mixture of gasoline and 2-stroke engine oil.
- Use No.92 lead-free gasoline.
- Use a high-quality 2-stroke engine oil.
- Run-in Period (First 10 hours of operation): Mix 25 parts Gasoline to 1 part 2-stroke Engine Oil (25:1 ratio). Use the provided fuel oil mixing bottle for accurate measurement.
- After Run-in Period: Mix 50 parts Gasoline to 1 part 2-stroke Engine Oil (50:1 ratio).
- Always mix fuel in a separate, approved container before pouring into the motor's fuel tank.
6. Operating Instructions
6.1 Starting the Engine
- Ensure the motor is submerged in water up to the anti-vortex plate (above the propeller).
- Fill the fuel tank with the correct fuel mixture (refer to Section 5.3).
- Locate the choke switch (refer to Figure 5). For a cold start, set the choke to the "ON" position. For a warm start, the choke may not be necessary.
- Locate the starting rope handle (refer to Figure 3, item 1). Pull the starting rope firmly and smoothly until the engine starts. Do not pull the rope to its full extension or let it snap back.
- Once the engine starts, gradually move the choke switch to the "OFF" position as the engine warms up.

Figure 5: Easy Operation Controls. This image illustrates the throttle lever for acceleration and steering, the infinitely variable speed control for precise adjustment, and the choke switch for starting the engine.
6.2 Tiller Control and Speed Adjustment
The tiller handle provides direct control over acceleration and steering.
- Steering: Rotate the tiller handle left or right to steer the boat.
- Acceleration: Twist the throttle lever on the tiller handle to increase or decrease engine speed. The motor features stepless speed regulation for fine control.
- Clutch: The motor operates with a clutch system. When the engine is running at idle, the propeller will not engage. As you increase throttle, the clutch engages the propeller.
6.3 Stopping the Engine
To stop the engine, reduce the throttle to idle and then press the flameout switch (refer to Figure 3, item 7, and Figure 2) until the engine shuts off.
6.4 Product in Action
Video 1: 360-Degree View of the Outboard Motor. This video provides a comprehensive rotating view of the TFCFL 2-Stroke 3.5HP 49CC Outboard Motor, showcasing its design from all angles, including the engine head, shaft, and propeller.
7. Maintenance
Regular maintenance is crucial for the longevity and optimal performance of your outboard motor.
7.1 After Each Use
- Flush the cooling system with fresh water if used in saltwater.
- Wipe down the exterior of the motor with a clean cloth.
- Inspect the propeller for any damage or entanglement.
- Check the fuel lines and connections for leaks.
7.2 Periodic Maintenance
- Spark Plug: Inspect and clean the spark plug regularly. Replace if worn or fouled.
- Fuel Filter: Check and clean or replace the fuel filter as needed.
- Propeller: Ensure the propeller is free of debris and securely fastened.
- Lubrication: Consult a qualified technician for periodic lubrication of moving parts.
For detailed maintenance procedures, it is recommended to consult a professional marine engine technician.
8. Troubleshooting
This section addresses common issues you might encounter with your outboard motor.
| Problem | Possible Cause | Solution |
|---|---|---|
| Engine does not start | No fuel or incorrect fuel mixture Choke not set correctly Spark plug fouled or damaged Engine not submerged enough | Check fuel level and mixture Adjust choke (ON for cold start) Clean or replace spark plug Ensure propeller is fully submerged |
| Engine runs rough or stalls | Incorrect fuel mixture Clogged fuel filter Fouled spark plug Carburetor issues | Verify fuel mixture ratio Clean or replace fuel filter Clean or replace spark plug Consult a technician for carburetor service |
| Low power output | Damaged propeller Incorrect fuel mixture Engine overheating | Inspect and replace propeller if damaged Verify fuel mixture ratio Check cooling water outlet for flow (Figure 4) |
| Excessive smoke | Too much oil in fuel mixture Engine issues | Drain and refill with correct fuel mixture Consult a technician |
9. Warranty and Support
For warranty information and customer support, please refer to the documentation provided at the time of purchase or contact the seller directly. Keep your purchase receipt as proof of purchase.
For technical assistance or parts inquiries, please contact TFCFL customer service through their official channels.