Introduction
This user manual provides detailed instructions for the installation and use of the DTech PC Front Panel Cable Kit. This kit is designed to replace or extend the power button, reset button, HDD activity LED, and power indicator LED functionalities for your computer case.
Ensure you read all instructions carefully before proceeding with installation to prevent damage to your components.
Package Contents
- 1 x PC Front Panel Cable Kit (includes Power Switch, Reset Switch, Power LED, HDD LED)

Image: The DTech PC Front Panel Cable Kit, showing the bundled cables and connectors for power, reset, HDD LED, and Power LED.
Setup and Installation
Before beginning installation, ensure your computer is completely powered off and unplugged from the wall outlet. It is recommended to discharge any static electricity by touching a grounded metal object before handling internal components.
- Identify Front Panel Headers: Locate the front panel header pins on your motherboard. These are typically found at the bottom edge of the motherboard and are labeled. Common labels include F_PANEL, FPANEL, or similar. Refer to your motherboard's manual for the exact pinout diagram.
- Connect Power Switch (POWER SW): The "POWER SW" connector from the kit connects to the "POWER SW" or "PWR_BTN" pins on your motherboard. This connection is non-polar, meaning it can be connected in either orientation.
- Connect Reset Switch (RESET SW): The "RESET SW" connector from the kit connects to the "RESET SW" or "RST_BTN" pins on your motherboard. This connection is also non-polar.
- Connect Power LED (POWER LED): The "POWER LED" connector from the kit connects to the "POWER LED" or "PLED" pins. This connection is polar. Ensure the positive (+) wire (usually colored) connects to the positive pin on the motherboard, and the negative (-) wire (usually white or black) connects to the negative pin. Incorrect polarity will result in the LED not lighting up.
- Connect HDD LED (H.D.D LED): The "H.D.D LED" connector from the kit connects to the "HDD LED" or "HD_LED" pins. This connection is also polar. Ensure the positive (+) wire connects to the positive pin and the negative (-) wire connects to the negative pin.
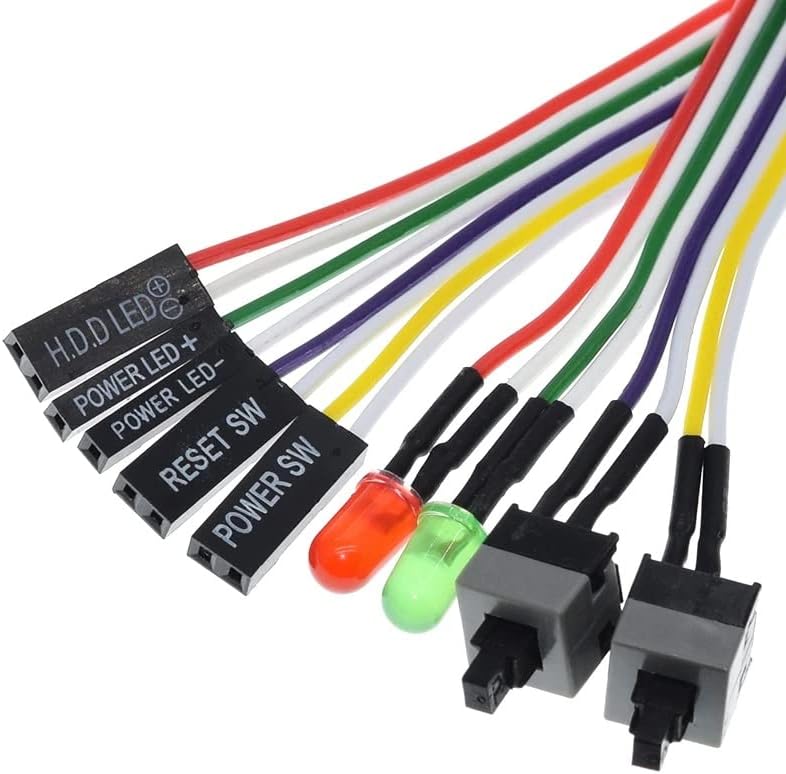
Image: A close-up view of the individual connectors (POWER SW, RESET SW, POWER LED, H.D.D LED) with their respective labels, showing the distinct wires and their polarity markings for the LEDs.
After connecting all cables, carefully route them to avoid interference with fans or other components. Secure them if necessary using cable ties.
Operating Instructions
Once the DTech PC Front Panel Cable Kit is correctly installed, its operation is integrated with your computer's functionality:
- Power Button: Pressing the Power Switch will turn your computer on or off, or put it into sleep mode, depending on your operating system's power settings. A long press (typically 4-5 seconds) will force a shutdown.
- Reset Button: Pressing the Reset Switch will initiate a system restart without powering down the computer completely. This is useful for resolving system freezes.
- Power LED: The Power LED will illuminate when your computer is powered on and may blink when the computer is in sleep mode, depending on your motherboard's configuration.
- HDD LED: The HDD LED will flash to indicate activity from your hard drive or solid-state drive (SSD), showing when data is being read from or written to storage.
Maintenance
The DTech PC Front Panel Cable Kit requires minimal maintenance. Periodically inspect the cables and connectors for any signs of wear, damage, or loose connections. Ensure they are not obstructing airflow within the computer case.
Keep the interior of your computer case clean from dust, as excessive dust can lead to overheating and component malfunction. Use compressed air to gently remove dust from components and cables.
Troubleshooting
- Buttons Not Responding:
- Verify that the "POWER SW" and "RESET SW" connectors are securely attached to the correct pins on the motherboard.
- Ensure the pins on the motherboard are not bent or damaged.
- Consult your motherboard manual to confirm the correct pinout for the front panel headers.
- LEDs Not Lighting Up:
- Check the polarity of the "POWER LED" and "H.D.D LED" connectors. LEDs are diodes and will only light up if connected with the correct positive (+) and negative (-) orientation. Reverse the connector if the LED does not light.
- Ensure the LED connectors are firmly seated on the motherboard pins.
- Confirm that the LEDs themselves are not damaged.
- Intermittent Functionality:
- Inspect all cable connections for looseness.
- Ensure cables are not pinched or damaged by other components within the case.
Specifications
| Feature | Description |
|---|---|
| Brand | DTech |
| Model | B091GS6JDF |
| Product Type | PC Front Panel Cable Kit (Power Switch, Reset Switch, Power LED, HDD LED) |
| Cable Type | PC Power Cable |
| Compatible Devices | PC, Custom Computer Modules (Case Mods), Mining RIGs |
| Connector Gender | Male-Male |
| Product Weight | 10 g |
| Package Dimensions | 12.3 x 8.4 x 1.5 cm |
| EAN | 7895648912340 |
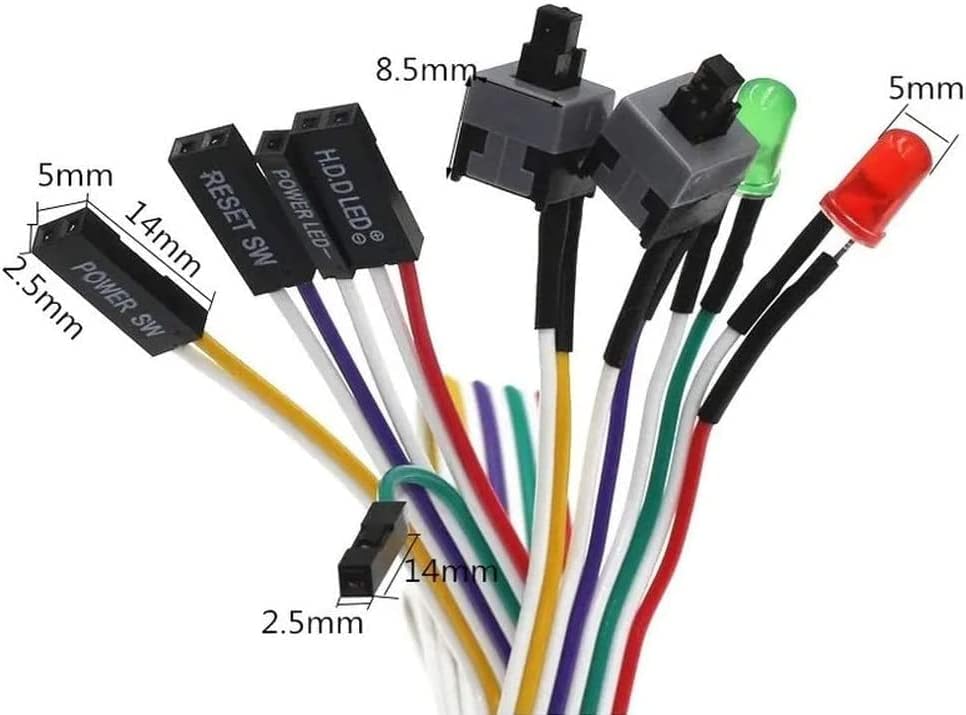
Image: The individual connectors of the DTech PC Front Panel Cable Kit, illustrating their approximate dimensions for reference during installation.
Warranty and Support
DTech products are manufactured to high quality standards. For warranty information or technical support, please refer to the retailer's return policy or contact DTech customer service through their official channels. Keep your purchase receipt as proof of purchase.
For further assistance, you may visit the product page on Amazon: DTech PC Front Panel Cable Kit on Amazon.com.br


