1. Introduction
The AIPOI 3.2L Ultrasonic Cleaner is a versatile device designed for efficient and thorough cleaning of various items using high-frequency ultrasonic waves. This manual provides essential information for the safe and effective operation, maintenance, and troubleshooting of your ultrasonic cleaner. It is suitable for professional applications in medical offices, laboratories, jewelry stores, watchmakers, and opticians, as well as for personal use to clean items like jewelry, coins, and eyeglasses.
The unit features a digital timer, a heating function, and a Degas function to enhance cleaning performance.
2. Safety Instructions
Please read all safety instructions carefully before operating the device.
- Electrical Safety: Ensure the unit is properly grounded. Do not operate with wet hands. Disconnect from power before cleaning or servicing.
- Water Level: Operation without liquid is strictly forbidden. The water level must always be above 2/3 of the tank's capacity to prevent damage to the transducers.
- Hot Liquid: Exercise caution when handling hot liquid. The unit can heat water up to 80°C. Allow liquid to cool before draining or handling.
- Ventilation: Ensure adequate ventilation around the unit during operation.
- Chemicals: Use only cleaning solutions recommended for ultrasonic cleaners. Avoid flammable, corrosive, or abrasive solutions.
- Placement: Place the unit on a stable, level, and heat-resistant surface. Keep away from children and pets.
- Maintenance: Do not attempt to disassemble or repair the unit yourself. Refer all servicing to qualified personnel.
3. Product Overview
3.1 Components
The AIPOI 3.2L Ultrasonic Cleaner consists of the main unit, a stainless steel tank, and a lid.
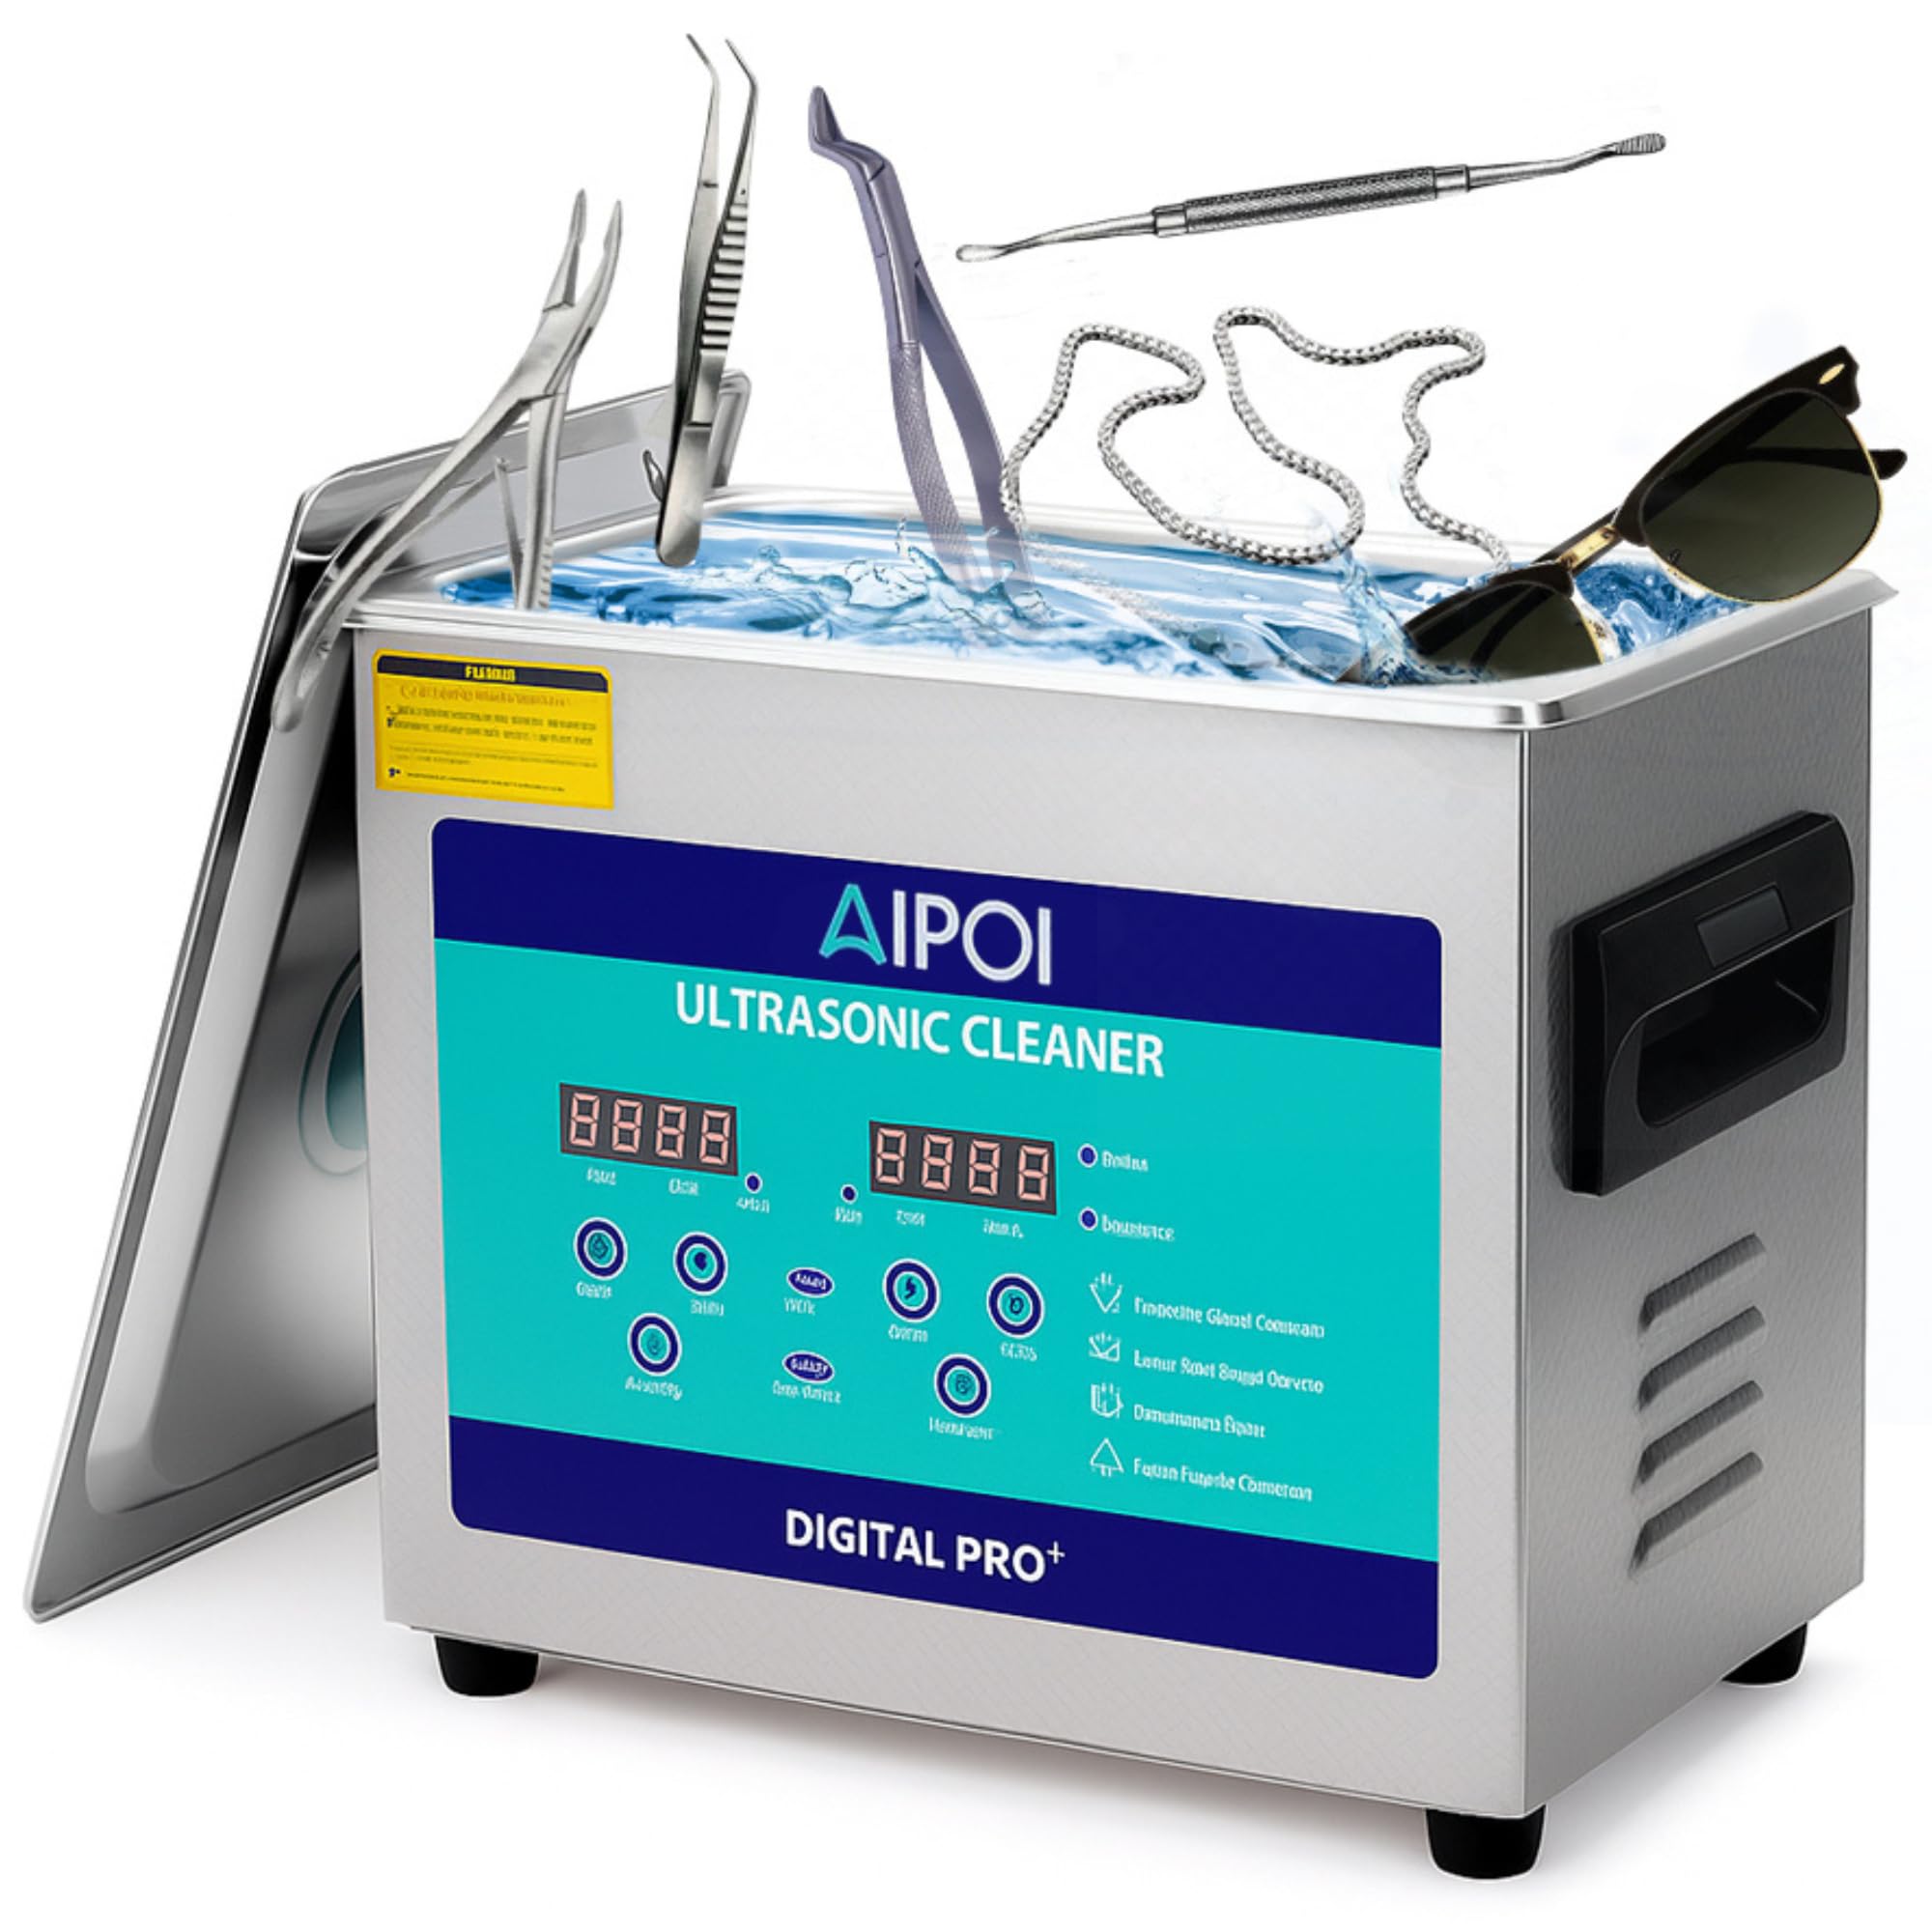
Figure 1: Front view of the AIPOI 3.2L Ultrasonic Cleaner.

Figure 2: Key components of the ultrasonic cleaner, including the portable cover, side handle, exhaust port, and charging port.
- Main Unit: Houses the ultrasonic transducers, heating element, and control circuitry.
- Stainless Steel Tank: The reservoir for cleaning solution and items.
- Lid: Helps contain heat and reduce noise during operation.
- Handles: Located on the sides for easy transport.
- Exhaust Port: For heat dissipation.
- Charging Port: Power input connection.
3.2 Control Panel
The digital control panel allows for precise setting of cleaning parameters.
- Set °C / Actual °C Display: Shows the target and current temperature of the cleaning solution.
- Minute / Second Display: Shows the set cleaning time and remaining time.
- TEMP+ / TEMP- Buttons: Adjust the desired heating temperature.
- DEGAS Button: Activates the Degas function to remove dissolved gases from the cleaning solution.
- SEMIWAVE Button: Activates the Semiwave function for specific cleaning needs.
- TIME+ / TIME- Buttons: Adjust the cleaning duration.
- ON/OFF Buttons: Power on/off the unit and start/stop the cleaning cycle.
4. Setup
- Unpacking: Carefully remove the ultrasonic cleaner from its packaging. Inspect for any damage.
- Placement: Place the unit on a firm, level, and dry surface. Ensure there is sufficient space around the unit for ventilation.
- Power Connection: Connect the power cord to the charging port on the back of the unit, then plug it into a grounded electrical outlet.
- Fill Tank: Open the lid and fill the stainless steel tank with water or an appropriate ultrasonic cleaning solution. Ensure the liquid level is above the minimum fill line (at least 2/3 of the tank capacity) but below the maximum fill line.
- Initial Degassing (Recommended): For new solutions, it is recommended to perform an initial degassing cycle to remove dissolved gases that can reduce cleaning efficiency. Add the solution, close the lid, and run the Degas function for 5-10 minutes without items.
5. Operating Instructions
5.1 Basic Cleaning Cycle
- Prepare Items: Ensure items to be cleaned are suitable for ultrasonic cleaning. Remove any loose dirt or debris.
- Place Items: Carefully place items into the cleaning basket (if included) or directly into the tank. Ensure items are fully submerged but not touching the bottom of the tank directly. Do not overload the tank.
- Set Temperature (Optional): Press the 'TEMP+' or 'TEMP-' buttons to set the desired cleaning temperature (up to 80°C). The unit will begin heating. Heating can improve cleaning effectiveness, especially for oils and waxes.
- Set Time: Press the 'TIME+' or 'TIME-' buttons to set the desired cleaning duration (1 to 30 minutes).
- Start Cleaning: Press the 'ON/OFF' button to start the ultrasonic cleaning process. The display will show the remaining time.
- End of Cycle: The unit will automatically stop when the timer reaches zero.
- Remove Items: Carefully remove the items from the tank. Rinse them with clean water and dry thoroughly.
5.2 Degas Function
The Degas function helps remove dissolved gases from the cleaning solution, which can interfere with the efficiency of ultrasonic cavitation. This is particularly useful when using fresh cleaning solution or when cleaning highly sensitive items.
- Fill the tank with cleaning solution.
- Press the 'DEGAS' button. The unit will run a specific cycle to degas the solution.
- Once degassed, proceed with your normal cleaning cycle.
5.3 Semiwave Function
The Semiwave function provides an alternative ultrasonic mode, which may be beneficial for certain delicate items or specific cleaning requirements. Consult your cleaning solution manufacturer's guidelines or test on a small, inconspicuous area if unsure.
- After setting time and temperature, press the 'SEMIWAVE' button to activate this mode before starting the cleaning cycle.
- Press 'ON/OFF' to begin cleaning.

Figure 3: Illustration of 40kHz ultrasonic frequency and transducer operation.

Figure 4: Visual comparison demonstrating the efficient cleaning capability of the unit.
6. Maintenance
Regular maintenance ensures the longevity and optimal performance of your ultrasonic cleaner.
- Draining the Tank: After each use, especially with cleaning solutions, drain the tank. Disconnect the power cord before draining.
- Cleaning the Tank: Rinse the stainless steel tank with clean water. Wipe the interior and exterior with a soft, damp cloth. Do not use abrasive cleaners or steel wool.
- Exterior Cleaning: Wipe the exterior of the unit with a soft, dry cloth. Avoid getting water into the control panel or electrical components.
- Storage: Store the unit in a cool, dry place away from direct sunlight and extreme temperatures. Ensure the tank is empty and dry before storage.
7. Troubleshooting
| Problem | Possible Cause | Solution |
|---|---|---|
| Unit does not power on. | No power supply. | Check if the power cord is securely plugged into the unit and the electrical outlet. Ensure the outlet is functional. |
| No ultrasonic action (no buzzing sound or visible cavitation). | Unit not started, insufficient water, or faulty transducer. | Press the 'ON/OFF' button. Ensure the water level is above 2/3 of the tank capacity. If the problem persists, contact support. |
| Poor cleaning results. | Incorrect cleaning solution, insufficient cleaning time, low temperature, or items too crowded. | Use an appropriate cleaning solution. Increase cleaning time. Activate heating function. Ensure items are not overcrowded and are fully submerged. Perform a Degas cycle. |
| Liquid not heating. | Heating function not activated or faulty heating element. | Press 'TEMP+' to set a desired temperature. Allow time for heating. If no heat, contact support. |
8. Specifications
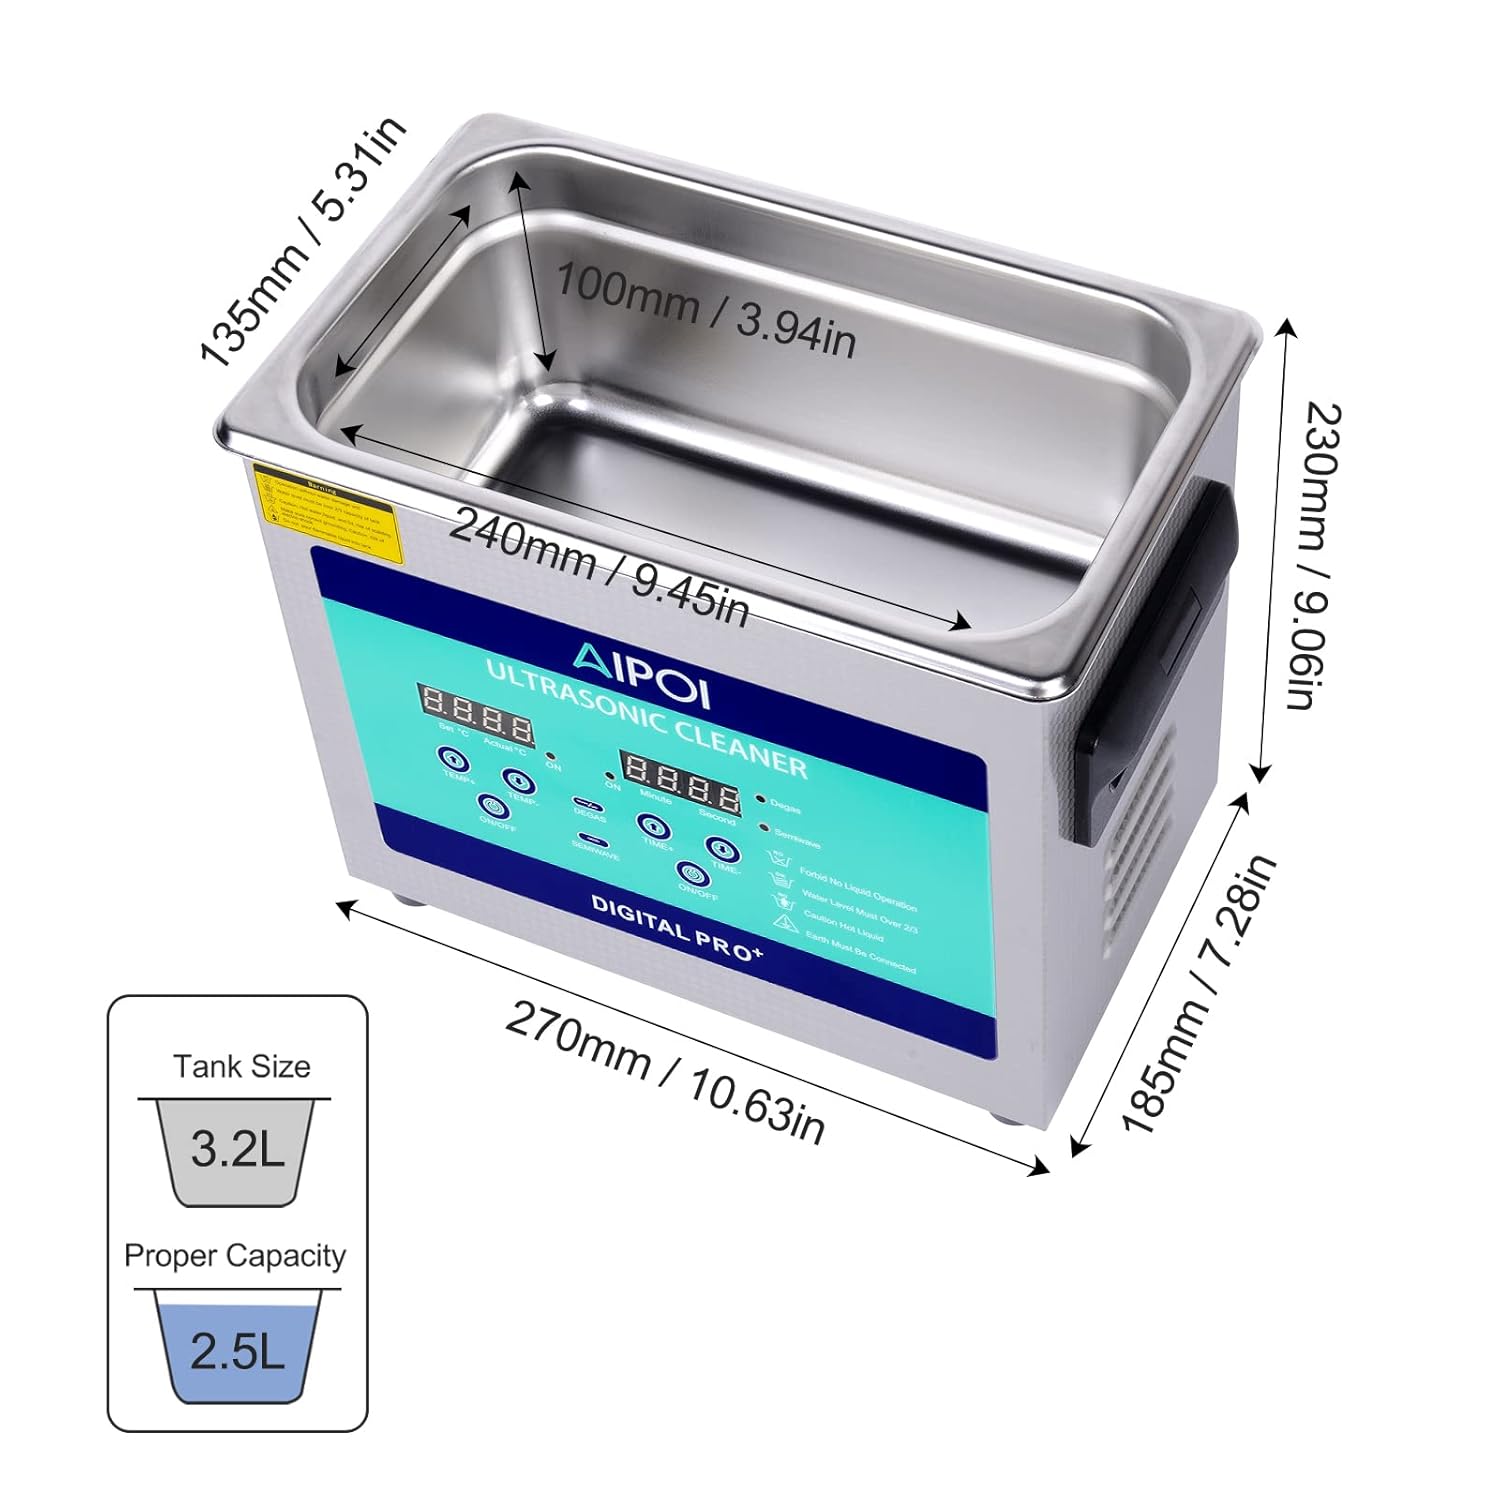
Figure 5: Dimensions of the AIPOI 3.2L Ultrasonic Cleaner.
- Model: AI-0001T
- Tank Capacity: 3.2 Liters (Note: Actual usable volume may be slightly less due to curved bottom design)
- Ultrasonic Power: 100W
- Heating Power: 120W
- Ultrasonic Frequency: 40 kHz
- Timer Settings: 1 to 30 minutes (Digital LED display)
- Temperature Settings: Up to 80°C
- Tank Material: Stainless Steel
- Tank Dimensions (L x W x H): 24 x 13.5 x 10 cm (9.45 x 5.31 x 3.94 inches)
- Overall Unit Dimensions (L x W x H): 27 x 18.5 x 23 cm (10.63 x 7.28 x 9.06 inches)
- Weight: Approximately 3.69 kg
9. Warranty and Support
For warranty information, please refer to the documentation provided at the time of purchase or contact your retailer. Information regarding spare parts availability is currently not provided. For technical support or service inquiries, please contact the manufacturer or your authorized dealer.