1. Introduction
This manual provides detailed instructions for the Abovsare Digital Alarm Clock, Model 8810. This device features a large LED display, automatic brightness adjustment, multiple alarm settings, and a memory function to retain time data during power interruptions. It displays time, date, and temperature, making it a versatile addition to various indoor environments.

Figure 1: Abovsare Digital Alarm Clock (Model 8810)
2. Safety Information
- Power Supply: Only connect the device with the provided USB port or a 5V/1A or 5V/2A adapter. Using excessive voltage may cause screen damage or malfunction.
- Placement: Ensure the clock is placed on a stable surface or securely mounted on a wall to prevent falling.
- Environment: Avoid exposing the device to extreme temperatures, direct sunlight, high humidity, or dusty environments.
- Cleaning: Do not use abrasive cleaners or immerse the device in water. Refer to the Maintenance section for proper cleaning instructions.
- Disassembly: Do not attempt to disassemble or repair the device yourself. Contact customer support for assistance.
3. Package Contents
Verify that all items are present in the package:
- Abovsare Digital Alarm Clock (Model 8810)
- USB Power Cable
- User Manual (this document)
4. Product Overview
The Abovsare Digital Alarm Clock features a large LED display for clear visibility and intuitive controls for easy operation.
4.1 Front Display
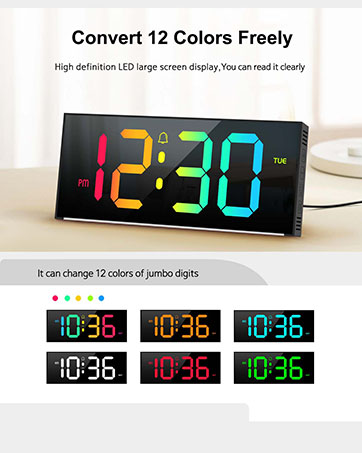
Figure 2: Multifunctional Digital Clock Display
- Time Display: Large digits show current time (12-hour or 24-hour format).
- Date Display: Shows month and day.
- Temperature Display: Shows ambient temperature in Celsius or Fahrenheit.
- Alarm Indicators: Icons for Alarm 1 and Alarm 2.
- AM/PM Indicator: For 12-hour time format.
4.2 Rear Controls

Figure 3: Rear Control Buttons and Ports
- SET Button: Enters setting mode for time, date, and alarms.
- UP/DOWN Buttons: Adjust values during setting mode or change brightness/volume.
- ALARM 1/ALARM 2 Buttons: Activate/deactivate specific alarms.
- USB Power Port: For connecting the power cable.
- Wall Mounting Holes: For optional wall installation.
5. Setup
5.1 Power Connection
- Connect the provided USB power cable to the USB Power Port on the back of the clock.
- Plug the other end of the USB cable into a 5V/1A or 5V/2A USB adapter (not included) or a compatible USB port.
- The display will illuminate, indicating the clock is powered on.
Note: This clock is corded electric and requires continuous power. It is not battery operated for primary function, but has a built-in memory function (CR2032 3V button battery) to retain settings during power outages.

Figure 4: Power Connection and Memory Function
5.2 Initial Time and Date Setting
Upon first power-up or after a prolonged power disconnection, you may need to set the time and date.
- Press and hold the SET button to enter time setting mode. The hour digits will flash.
- Use the UP or DOWN buttons to adjust the hour.
- Press SET again to confirm the hour and move to minute setting. The minute digits will flash.
- Use the UP or DOWN buttons to adjust the minutes.
- Continue pressing SET to cycle through year, month, and day settings, adjusting each with the UP or DOWN buttons.
- Press SET one last time to exit setting mode.
Tip: Ensure the clock is set to the correct year before setting the time/date for accurate day-of-week calculations.
6. Operating Instructions
6.1 Brightness Adjustment
The clock features 5 levels of brightness adjustment and an automatic dimmer function.

Figure 5: Brightness Adjustment Feature
- Manual Adjustment: Touch the top button of the alarm clock to cycle through 5 brightness levels.
- Automatic Dimmer: The clock automatically adjusts brightness based on the time period:
- 7:00 - 17:59: Highlight brightness
- 18:00 - 22:59: Medium brightness
- 23:00 - 5:59: Darkest brightness
- 6:00 - 6:59: Medium highlight brightness
- Manual Override: After manual adjustment, the clock will remember your setting for that specific period. However, at the start of a new period, the brightness will revert to the system's preset automatic rules.
6.2 Setting Alarms
The clock supports two independent alarm settings.

Figure 6: Two Alarm Settings Example
- Press the ALARM 1 or ALARM 2 button to activate/deactivate the respective alarm. An alarm icon will appear/disappear on the display.
- To set an alarm time, press and hold the ALARM 1 or ALARM 2 button. The hour digits will flash.
- Use the UP or DOWN buttons to adjust the hour.
- Press the ALARM button again to confirm the hour and move to minute setting. The minute digits will flash.
- Use the UP or DOWN buttons to adjust the minutes.
- Press the ALARM button one last time to exit alarm setting mode.
6.3 Ringtones and Volume
The clock offers 40 selectable ringtones and 4 volume levels.
- While in alarm setting mode (after setting the time), press the ALARM button again to enter ringtone selection. Use UP/DOWN to cycle through 40 ringtones.
- Press the ALARM button again to enter volume adjustment. Use UP/DOWN to select one of 4 volume levels.
- Press the ALARM button to save and exit.
6.4 Snooze Function
When an alarm sounds, gently tap the top of the clock to activate the snooze function. The alarm will pause and sound again after a set interval (typically 5-9 minutes, refer to specific product documentation for exact duration).
6.5 Mounting Options
The clock can be placed on a tabletop or mounted on a wall.
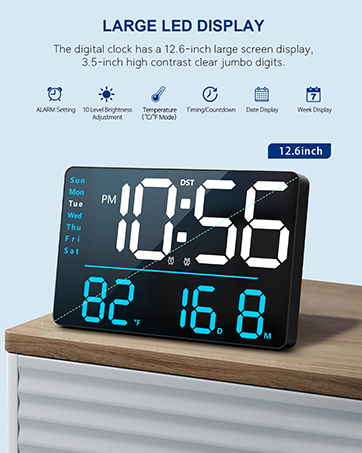
Figure 7: Tabletop and Wall Mounting Options
- Tabletop Placement: Simply place the clock on any flat, stable surface.
- Wall Mounting: Use the double wall hanging holes on the back of the clock. Ensure appropriate hardware (screws, anchors) is used for your wall type to securely mount the device.
7. Maintenance
- Cleaning: Wipe the clock's surface with a soft, dry, or slightly damp cloth. Do not use harsh chemicals, abrasive cleaners, or solvents.
- Dust Removal: Regularly dust the clock to prevent accumulation, especially around the display and buttons.
- Power Disconnection: If the clock will not be used for an extended period, disconnect it from the power source. The internal memory battery will retain settings.
8. Troubleshooting
| Problem | Possible Cause | Solution |
|---|---|---|
| Display is off or flickering. | No power, incorrect adapter, loose connection. | Ensure the USB cable is securely connected. Use a 5V/1A or 5V/2A adapter. Check power outlet. |
| Time/Date is incorrect. | Not set correctly, power interruption without memory backup. | Follow instructions in Section 5.2 to reset time and date. The internal memory battery should prevent loss during brief outages. |
| Alarm does not sound. | Alarm not activated, volume too low, incorrect time set. | Ensure the alarm icon is visible. Check alarm time. Adjust alarm volume (Section 6.3). |
| Brightness changes unexpectedly. | Automatic dimmer is active. | This is normal behavior for the automatic brightness dimmer. Manual adjustments are temporary for the current period. |
| Buttons are unresponsive. | Temporary software glitch, conflict with touch keys. | Disconnect power for a few seconds and reconnect. Avoid touching the top touch keys while adjusting rear buttons. |
9. Specifications
- Brand: Abovsare
- Model Number: 8810
- Color: Wired-black
- Display Type: Digital LED
- Product Dimensions: 10.4"W x 2.8"H
- Power Source: Corded Electric (USB-5V Power Supply)
- Material: Acrylonitrile Butadiene Styrene (ABS)
- Mounting Type: Tabletop or Wall Mounted
- Item Weight: 9.6 ounces
- Memory Battery: 1 CR2032 battery required (for memory function only)
- Special Features: Large LED display, Automatic Brightness Dimmer, Memory Function, Multiple Ringtones, Dual Alarms, Date, Temperature Display.
10. Warranty and Support
For warranty information or technical support, please refer to the retailer's return policy or contact Abovsare customer service through the official brand store or your purchase platform.
Return Policy: Typically 30 days for refund/replacement (check with your retailer).
Abovsare Brand Store: Visit the Abovsare Store on Amazon