
WFLY ET16S
WFLY ET16s RC Radio Instruction Manual
Model: ET16S
Brand: WFLY
1. Introduction
This manual provides detailed instructions for the proper setup, operation, and maintenance of your WFLY ET16s RC Radio. The ET16s is a versatile 2.4G 16-channel multi-protocol transmitter featuring Hall Gimbals, designed for a wide range of RC models including drones, FPV aircraft, helicopters, gliders, airplanes, and multicopters. Please read this manual thoroughly before using the product to ensure safe and efficient operation.

Image 1.1: The WFLY ET16s RC Radio transmitter shown with its accompanying RF209S receiver.
2. Package Contents
Upon opening the package, please verify that all the following items are included:
- 1 x WFLY ET16s Radio Transmitter
- 1 x RF209S Receiver (RF201S optional, depending on package)
- 1 x 18650 Battery Tray (for 2x 18650 batteries, batteries not included)
- 1 x WFLY Textile Neck Strap
- 1 x Voltage Input Cable

Image 2.1: The WFLY ET16s transmitter with the included 18650 battery tray detached from the rear compartment.
3. Key Features
The WFLY ET16s RC Radio offers a range of advanced features for enhanced control and user experience:
- Hall Gimbals: Provides smoother and more precise control with longer lifespan due to contactless sensing.
- Multi-Protocol Support: Compatible with various external protocols including Walkera Devo, FrSky, Futaba SFHSS, FlySky, FlySky AFHDS2A, Hubsan, JJRC, Wltoys, HiSky, Syma, ASSAN, and most other Chinese models.
- JR Bay Interface: Supports external modules such as 4-in-1 modules, Team Blacksheep (TBS) modules, and FrSky R9M modules, allowing for extended range and protocol compatibility, including ExpressLRS.
- 16 Linear Channels: Offers full 4096 resolution for precise control.
- 3.5-inch TFT Touch Color Screen: Industrial-grade display with 480x320 resolution, readable outdoors, providing an intuitive interface for programming and settings.
- Wireless Copy Function: Allows for wireless transmission and reception of model data between compatible transmitters.
- 10 Sets of Program Mixes: User-defined program mixes for advanced personalization, from proportional to precise curve mixing.
- Relay Flight: Supports two pilots operating radios for relay flight.
- Vibration Feedback & Voice Broadcast: Provides tactile and audible alerts for critical information.
- USB Online Upgrade: Firmware can be updated via USB.

Image 3.1: Illustration highlighting the Hall Sensor Gimbals for smoother, longer-lasting control and the anti-fingerprint surface technology.

Image 3.2: The WFLY ET16s transmitter demonstrating its JR Bay interface, compatible with various external modules like TBS, JP 4-in-1, and ELRS for expanded functionality.
4. Setup
4.1 Battery Installation
The WFLY ET16s requires two 18650 batteries or a 2S LiPo battery (not included). Use the provided 18650 battery tray if using 18650 cells.
- Locate the battery compartment on the back of the transmitter.
- Open the battery compartment cover.
- Insert two 18650 batteries into the battery tray, ensuring correct polarity. Alternatively, connect a compatible 2S LiPo battery to the designated connector.
- Place the battery tray/LiPo battery into the compartment and close the cover securely.
4.2 Receiver Binding (RF209S)
To establish communication between the transmitter and the RF209S receiver:
- Ensure both the transmitter and receiver are powered off.
- Connect the RF209S receiver to a power source (e.g., flight controller, external BEC).
- Press and hold the bind button on the RF209S receiver while powering it on. The receiver's LED should flash rapidly, indicating bind mode.
- Power on the ET16s transmitter. Navigate to the binding menu on the touch screen (refer to the on-screen interface for specific steps).
- Initiate the binding process on the transmitter. The receiver's LED should turn solid, indicating successful binding.
- Power cycle both the transmitter and receiver to confirm the connection.

Image 4.1: The WFLY RF209S RC Receiver, which is included with the ET16s transmitter for immediate use.
4.3 External Module Installation (Optional)
For extended protocol support, external modules can be installed in the JR Bay:
- Ensure the transmitter is powered off.
- Locate the JR Bay slot on the back of the transmitter.
- Carefully insert the desired external module (e.g., 4-in-1, TBS, ELRS) into the JR Bay slot, ensuring it is seated correctly.
- Power on the transmitter. The system should automatically detect the installed module. Refer to the module's specific instructions for configuration.
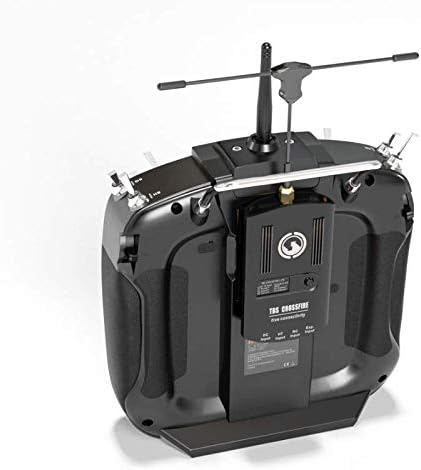
Image 4.2: Rear view of the WFLY ET16s transmitter, showing an installed TBS Crossfire module in the JR Bay for extended range and protocol capabilities.
5. Operating the ET16s
5.1 Basic Controls
Familiarize yourself with the primary controls:
- Gimbals: Control the primary flight surfaces (throttle, aileron, elevator, rudder). The ET16s features Hall Gimbals for smooth and precise input.
- Switches: Various 2-position, 3-position, and momentary switches are available for controlling flight modes, gear, flaps, and other functions.
- Dials/Sliders: Proportional controls for auxiliary functions.

Image 5.1: Front view of the WFLY ET16s RC Radio, displaying the gimbals, switches, and the central display screen.
5.2 Touch Screen Navigation
The 3.5-inch touch screen provides access to all settings and programming options:
- Tap icons or menu items to select.
- Swipe to navigate between pages or lists.
- Use the physical buttons adjacent to the screen for quick access to common functions or confirmation.
5.3 Model Setup and Programming
The ET16s allows for extensive model customization:
- Model Memory: Store up to 30 different model configurations.
- Channel Assignment: Assign channels to specific controls and functions.
- Mixes: Utilize the 10 sets of program mixes for complex control setups, including custom curves.
- End Points & Sub-Trims: Fine-tune servo travel and center positions.
- Wireless Copy: Transfer model data wirelessly between two ET16s transmitters (ensure both are the same model and version).

Image 5.2: Visual representation of the 10 sets of program mixes for advanced customization and the concept of relay flight with two transmitters.
5.4 Relay Flight
The relay flight feature allows two pilots to operate a single model, with one acting as the main transmitter and the other as a sub-transmitter. This is useful for training or complex maneuvers. Refer to the on-screen menu for specific setup procedures for relay flight.
6. Maintenance
To ensure the longevity and optimal performance of your WFLY ET16s RC Radio, follow these maintenance guidelines:
- Cleaning: Use a soft, dry cloth to clean the transmitter's exterior. For stubborn dirt, a slightly damp cloth can be used, but ensure no moisture enters the device. Avoid abrasive cleaners or solvents.
- Storage: Store the transmitter in a cool, dry place away from direct sunlight, extreme temperatures, and high humidity. Remove batteries if storing for extended periods to prevent leakage.
- Gimbal Care: The Hall Gimbals are designed for durability, but avoid exposing them to excessive dust or debris. Do not apply lubricants unless specifically instructed by WFLY support.
- Firmware Updates: Periodically check the WFLY official website for firmware updates. Keeping your transmitter's firmware up-to-date ensures access to the latest features and bug fixes. Updates are typically performed via USB connection.
7. Troubleshooting
This section addresses common issues you might encounter with your WFLY ET16s RC Radio.
| Problem | Possible Cause | Solution |
|---|---|---|
| Transmitter does not power on. | Low or dead batteries; incorrect battery installation. | Check battery charge level. Ensure batteries are inserted with correct polarity. Try new batteries. |
| Receiver not binding. | Incorrect binding procedure; receiver too far/close; interference. | Repeat binding steps carefully. Ensure transmitter and receiver are within 1 meter during binding. Avoid sources of 2.4GHz interference. |
| No control response from model. | Receiver not bound; incorrect model setup; servo/ESC issues. | Verify receiver is bound and LED is solid. Check model settings (channel assignments, mixes). Test servos/ESCs independently. |
| Touch screen unresponsive. | Software glitch; physical damage. | Restart the transmitter. If issue persists, consider a firmware re-flash. Contact support if physical damage is suspected. |
| External module not detected. | Module not fully inserted; incompatible module; module fault. | Ensure module is firmly seated in the JR Bay. Verify module compatibility with ET16s. Test with another module if available. |
8. Specifications
Key technical specifications for the WFLY ET16s RC Radio:
- Model: ET16S
- Dimensions: W60 x H200 x L190mm (approx. 7 x 7 x 8 inches)
- Weight: 520g (without battery) / approx. 2 pounds
- Operating Voltage: DC3.5-13V
- Channels: 16CH (linear)
- Resolution: 4096
- Screen: 3.5 inch 480*320 TFT touch color screen
- Gimbals: Hall Gimbals
- External Module Bay: JR Bay interface (supports 4-in-1, TBS, ELRS, etc.)
- Response Time: 3.6ms
- Battery Compatibility: 2 x 18650 (with tray) or 2S LiPo
- Supported Protocols (Internal/External): WFLY protocol (internal), Walkera Devo, FrSky, Futaba SFHSS, FlySky, FlySky AFHDS2A, Hubsan, JJRC, Wltoys, HiSky, Syma, ASSAN, ExpressLRS (with updated ET16S version and external module).

Image 8.1: A summary table detailing the various advantages and features of the WFLY ET16s, including two-way transmission, 16 linear channels, touch screen, and Hall Gimbals.
9. Warranty and Support
For warranty information, technical support, or service inquiries regarding your WFLY ET16s RC Radio, please contact WFLY customer service directly. Details can typically be found on the official WFLY website or through your point of purchase. Please retain your proof of purchase for warranty claims.
Manufacturer: WFLY
Recommended Age: 6 - 20 years
10. Product Video
Video 10.1: An official WFLY video showcasing the ET16S FPV remote control, highlighting its Hall Gimbals and JR bay compatibility. This video provides a visual overview of the transmitter's design and key features.
Related documentsET16S


Ask a question about this manual
Ask about setup, troubleshooting, compatibility, parts, safety, or missing instructions. Manuals+ will review the question and use this page’s manual context to help answer it.