
Introduction
This manual provides instructions for assembling and using your Alloyseed Diamond Painting Tissue Box Cover. This product combines a creative diamond painting activity with a functional tissue dispenser, allowing you to personalize your home decor. The kit includes all necessary components to create a sparkling, three-dimensional design on the tissue box cover.
Setup and Diamond Painting Assembly
Follow these steps to assemble your diamond painting tissue box cover:
- Prepare the Kit: Open the box and verify that all components of the diamond painting kit are present and complete.
- Select Diamonds: Refer to the color code chart provided. Choose the corresponding diamond color and place them into the provided plate. Working with one color at a time can help increase efficiency.
- Prepare the Surface: The tissue box cover has an adhesive surface protected by a film. Carefully lift off the film from one section of the adhesive surface to begin pasting. The box is covered with film on five sides; work on one side at a time.
- Apply Drill Mud: Use the point drill pen. Dip the tip of the pen into the drill mud (wax) to pick up a small amount. The drill mud should be embedded in the tip of the pen.
- Arrange Diamonds: Gently shake the drill plate left and right to arrange the diamonds with their flat side down. Use the point drill pen with the drill mud to pick up a diamond from the front (faceted side) of the drill.
- Place Diamonds: Locate the corresponding symbol on the adhesive surface of the tissue box cover. Carefully place the diamond onto the symbol and press it down firmly to ensure it adheres properly.
- Complete and Secure: Continue this process until all desired sections are covered with diamonds. Once finished, place some heavy books or a flat object on top of the completed diamond painting surface for a few hours to help the diamonds adhere more firmly.

Figure 1: Diamond Painting Assembly Steps
This image illustrates the four main steps for applying the diamond beads to the tissue box cover: preparing the adhesive surface, loading the drill pen with wax, picking up diamonds, and placing them onto the corresponding symbols.
Operating Instructions
Once your diamond painting tissue box cover is assembled, follow these steps to insert and dispense tissues:
- Open the Bottom: Locate the bottom cover of the tissue box. Gently open or slide it to access the interior compartment.
- Insert Tissues: Place a suitable paper towel or tissue pack into the box. Ensure the tissue pack dimensions are compatible with the internal space (refer to specifications for dimensions).
- Close the Bottom: Securely close the bottom cover of the tissue box.
- Dispense Tissues: Pull a tissue from the opening at the top of the cover as needed.
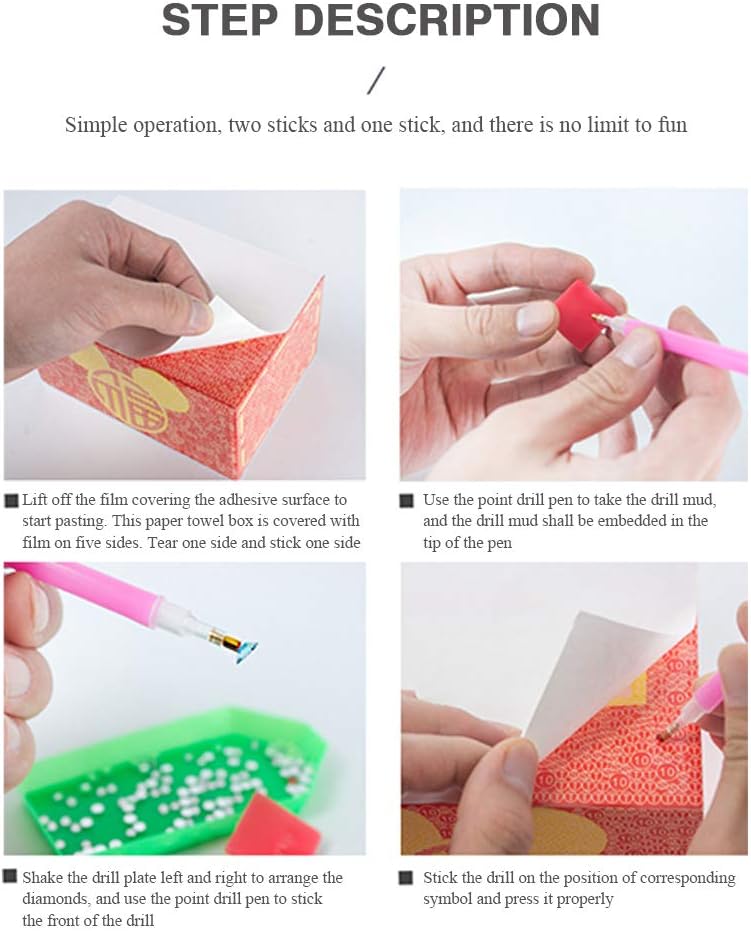
Figure 2: Tissue Loading and Dispensing
This image demonstrates the process of opening the tissue box, inserting a tissue pack, and retrieving a tissue from the top opening.

Figure 3: Tissue Dispensing in Use
This image shows the diamond-painted school bus tissue box cover in use, with a hand pulling a tissue from the top opening.
Maintenance
To maintain the appearance and longevity of your diamond painting tissue box cover:
- Cleaning: Gently wipe the surface with a soft, dry, or slightly damp cloth. Avoid abrasive cleaners or harsh chemicals that could damage the diamonds or the adhesive.
- Dusting: Use a soft brush or a lint roller to remove dust from the diamond-painted surface.
- Storage: Store the tissue box cover in a dry environment away from direct sunlight or extreme temperatures to prevent adhesive degradation.
Troubleshooting
Tissues Do Not Fit Inside the Box
The internal dimensions of the tissue box cover are designed to accommodate small and medium-sized soft tissue packs. Please ensure your tissue pack meets the following criteria:
- Maximum Tissue Pack Dimensions: Less than 140mm (5.51 inches) in length and 110mm (4.33 inches) in width.
Before purchasing tissue refills, check the outer packaging dimensions to ensure compatibility. Standard large rectangular tissue boxes may not fit.

Figure 4: Tissue Size Compatibility
This graphic indicates the maximum dimensions for tissue packs that can be accommodated by the tissue box cover.
Diamonds Not Sticking Properly
Ensure the protective film is peeled back only from the area you are currently working on to keep the adhesive fresh. Also, make sure the drill pen has enough drill mud (wax) to pick up and firmly press each diamond onto its designated symbol.
Specifications
| Brand | Alloyseed |
| Model | B091CKNH1C |
| Color/Design | School Bus |
| Material | Resin (for diamonds), Plastic (for box) |
| Product Dimensions (External) | 5.7 inches (L) x 4.13 inches (W) x 3.03 inches (H) / 14.5 cm (L) x 10.5 cm (W) x 7.7 cm (H) |
| Maximum Tissue Pack Dimensions (Internal) | Less than 140mm (5.51 inches) L x 110mm (4.33 inches) W |

Figure 5: Product Dimensions
This image provides a visual representation of the external dimensions of the tissue box cover in centimeters.
Warranty and Support
Information regarding product warranty and customer support is not available in this manual. Please refer to your purchase documentation or contact the retailer for details.