Introduction
This manual provides detailed instructions for the safe and effective operation, setup, and maintenance of your VEVOR Professional Rotary Laser. Please read this manual thoroughly before using the device to ensure proper function and to prevent damage or injury. This rotary laser system is designed for precise leveling and alignment tasks in various construction and surveying applications, offering a wide working range and robust performance.
Safety Information
Always adhere to the following safety guidelines to prevent personal injury or damage to the equipment:
- Laser Radiation: This product emits Class 2 laser radiation. Do not stare directly into the laser beam. Avoid direct eye exposure.
- Protective Eyewear: Always wear the provided laser safety goggles when operating the device, especially in bright conditions, to enhance visibility and protect your eyes.
- Operating Environment: Use the device in a stable and secure environment. Ensure the tripod is firmly planted on level ground to prevent tipping.
- Water and Dust: The device has an IP54 rating, making it water and dustproof. However, avoid submerging it in water or exposing it to extreme conditions beyond its rating.
- Power Source: Use only the specified DC 4.8-6V power supply and charger. Do not use damaged cables or chargers.
- Maintenance: Do not attempt to disassemble or repair the device yourself. Refer all servicing to qualified personnel.
- Children and Pets: Keep the device out of reach of children and pets.
Package Contents
Verify that all items listed below are present in your package:
- 1 x Rotary Laser
- 1 x Aluminum Stand (Tripod)
- 1 x 5m Latte (Leveling Staff)
- 1 x Sturdy Carrying Case
- 1 x Goggles (Laser Safety Glasses)
- 1 x Laser Target Disc
- 1 x Receiver and Handle
- 1 x Remote Control
- 1 x Charger
- 1 x Carry Bag Key

Figure 1: Overview of the VEVOR Professional Rotary Laser kit, including the rotary laser unit, aluminum tripod, leveling staff, receiver, remote control, laser glasses, target disc, charger, and carrying case.
Product Overview
Rotary Laser Unit
The main unit projects a 360-degree rotating laser beam for precise leveling. It features controls for rotation speed, scanning angle, and tilt settings.

Figure 2: Detailed view of the rotary laser unit, showing its control panel and robust housing.
Aluminum Tripod
The lightweight yet durable aluminum tripod provides a stable base for the rotary laser. Its height is adjustable from 1.04 to 1.65 meters (3.41 to 5.41 feet).

Figure 3: The aluminum tripod and the 5-meter leveling staff, essential for accurate height measurements.

Figure 4: Illustration of the adjustable height range of the aluminum tripod, from 1.04m to 1.65m.
5m Leveling Staff (Latte)
This telescopic staff extends up to 5 meters and features double-sided, precise scales for accurate and rough measurements. It is designed to remain stable when fully extended.

Figure 5: The 5-section leveling staff, highlighting its stability and measurement markings.
Setup
- Unpack Components: Carefully remove all items from the sturdy carrying case.
- Set Up Tripod:
- Extend the legs of the aluminum tripod to the desired height (1.04m to 1.65m).
- Ensure the tripod is placed on a stable, level surface. The pointed feet can be inserted into soft ground for added stability.
- Secure the leg clamps to prevent accidental collapse.
- Mount Rotary Laser:
- Place the rotary laser unit onto the tripod head.
- Secure the laser unit to the tripod using the mounting screw on the tripod head. Ensure it is firmly attached.
- Power On: Insert the charged battery or connect the charger to the rotary laser unit. Press the power button to turn on the device.
- Prepare Leveling Staff: Extend the 5-meter leveling staff to the required length for your measurement task. Ensure all sections are locked securely.
Operating Instructions
Self-Leveling Function
The VEVOR Rotary Laser features an automatic self-leveling system. Upon powering on, the device will automatically adjust itself within a range of ±5 degrees to achieve a perfectly level plane.
- Place the laser unit on a surface that is roughly level (within ±5°).
- Turn on the power. The laser will begin to self-level.
- Wait for the laser beam to stabilize, indicating that self-leveling is complete. An audible alert or indicator light may signal completion.

Figure 6: Demonstration of the self-leveling capability of the rotary laser, automatically adjusting within a ±5° range.
360-Degree Rotation and Scanning
The laser can project a continuous 360-degree rotating beam or a specific scanning angle.
- Rotation Speed: Use the controls on the unit or remote to select rotation speeds: 0, 60, 120, 300, or 600 rpm. Higher speeds are suitable for general leveling, while lower speeds are better for precise alignment.
- Scanning Angle: For specific area work, adjust the direction sensing angle to 0°, 10°, 45°, 90°, or 180°. This creates a visible laser line segment instead of a full rotation.
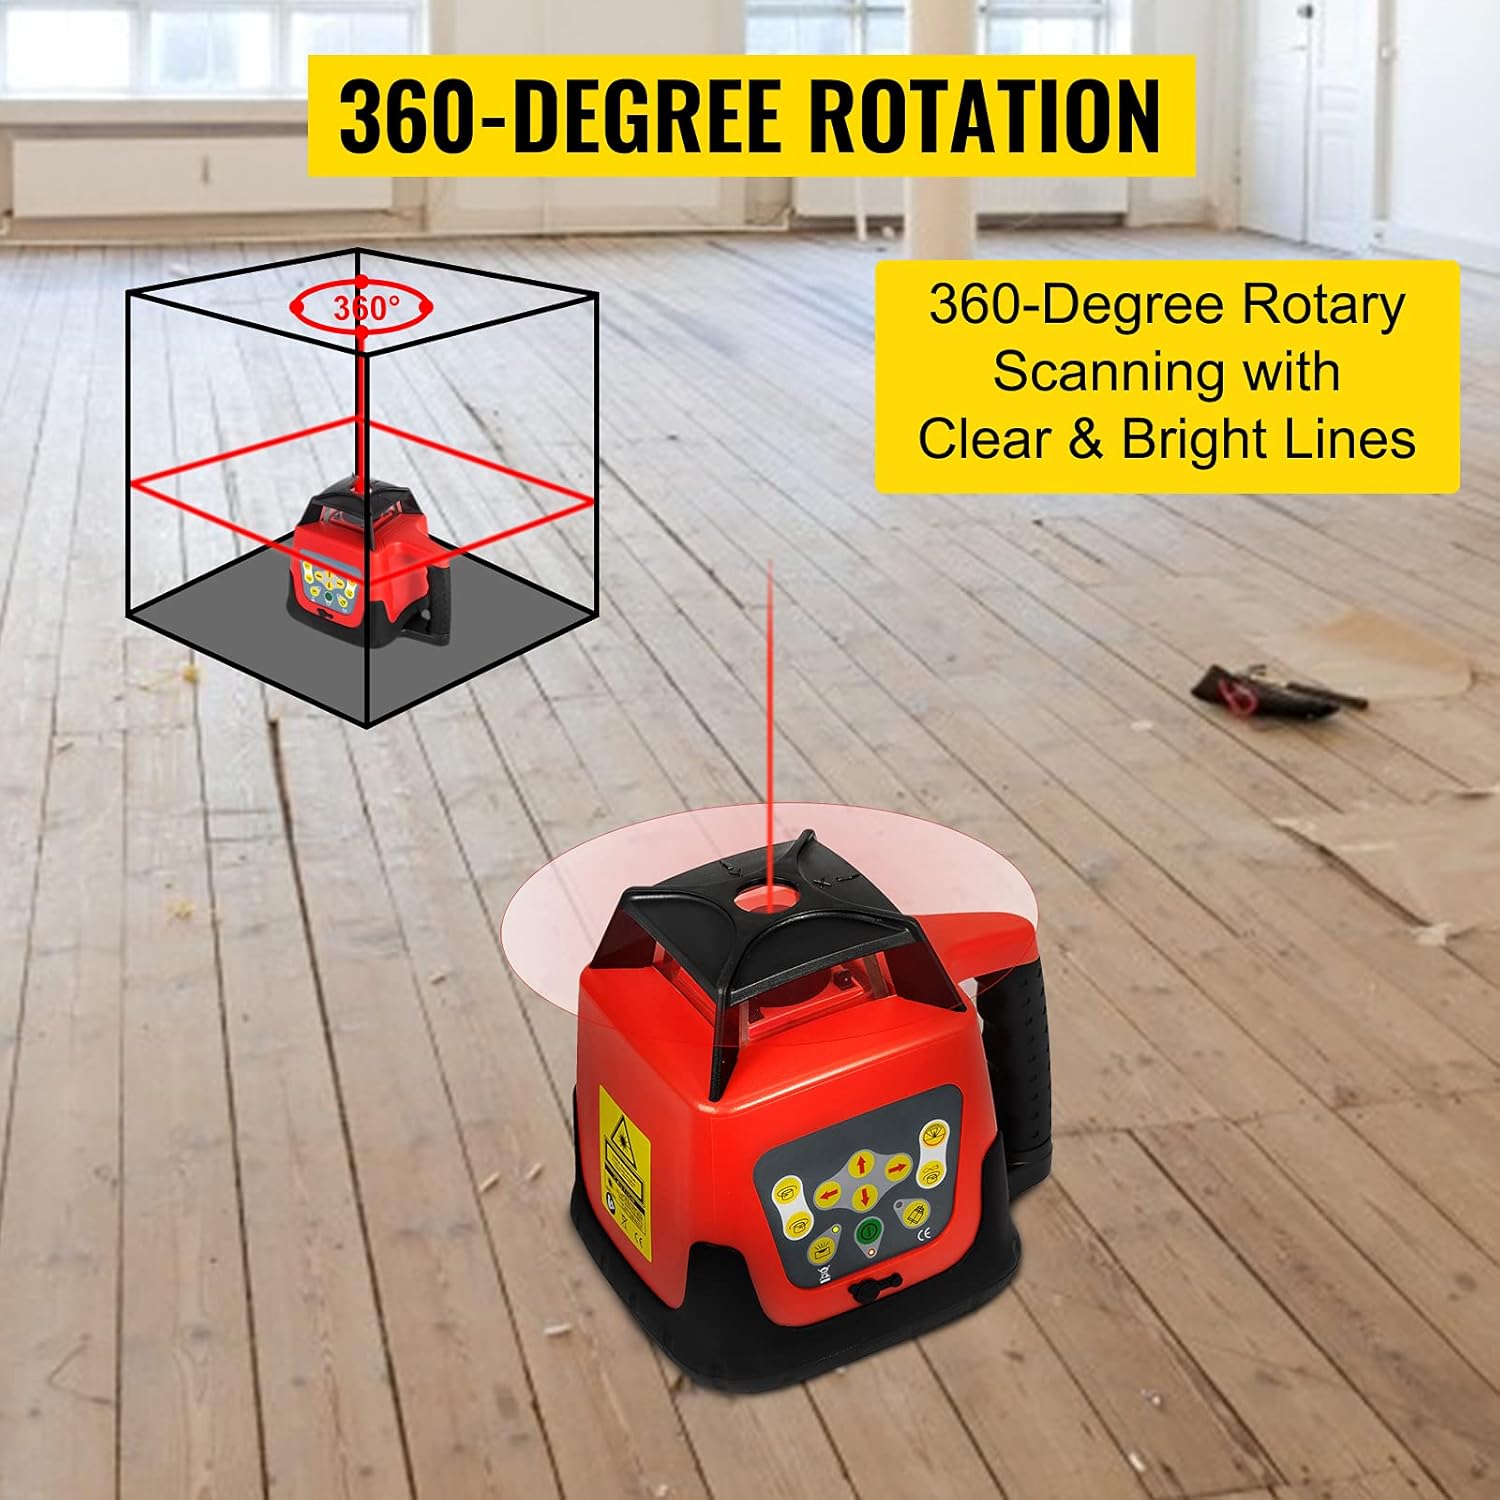
Figure 7: Visual representation of the 360-degree rotary scanning function, producing clear and bright lines across the work area.
Using the Receiver and Target Disc
For outdoor use or over long distances (up to 500m diameter), the laser receiver is essential for detecting the laser beam.
- Attach the receiver to the leveling staff using its handle.
- Turn on the receiver. It will emit an audible signal and display indicators when the laser beam is detected.
- Move the receiver up or down the staff until the center indicator on the receiver signals that it is precisely at the laser level.
- The laser target disc can be used for enhanced visibility over shorter distances or indoors.

Figure 8: The rotary laser system in an outdoor construction setting, demonstrating its 500m working distance with the use of the leveling staff and receiver.
Tilt Setting
The device allows for a manual tilt setting of ±5° in bi-directional axes for sloped applications.
- Consult the device's control panel or remote for specific buttons to adjust the X and Y axis tilt.
- Adjust the tilt gradually until the desired slope is achieved.
Maintenance
- Cleaning: Wipe the device, tripod, and staff with a soft, damp cloth. Do not use abrasive cleaners or solvents. Ensure the laser output window is clean for optimal performance.
- Storage: When not in use, store the rotary laser and all accessories in the provided sturdy carrying case in a dry, cool place, away from direct sunlight and extreme temperatures.
- Battery Care: Fully charge the battery before long-term storage. If storing for extended periods, recharge the battery every few months to maintain its health.
- Calibration: While the device features self-leveling, periodic professional calibration is recommended to ensure long-term accuracy, especially after significant impacts or heavy use.
Troubleshooting
| Problem | Possible Cause | Solution |
|---|---|---|
| Laser beam is not visible or weak. |
|
|
| Device does not self-level. |
|
|
| Remote control not working. |
|
|
| Inaccurate measurements. |
|
|
Specifications
| Feature | Specification |
|---|---|
| Model | Rotationslaser |
| Leveling Accuracy (Horizontal) | ± 20 arc seconds |
| Leveling Accuracy (Vertical) | ± 20 arc seconds |
| Leveling Range | ±5° |
| Measuring Range (Diameter) | 500m (with laser detector) |
| Rotation Speed | 0/60/120/300/600 rpm |
| Direction Sensing Angle | 0°/10°/45°/90°/180° |
| Tilt Setting Range | ± 5° (bi-directional) |
| Light Source | Laser Diode, Wavelength: 635nm (Red Laser) |
| Down-Point-Diode Accuracy | ± 1mm/1.5m |
| Remote Control Distance | Approx. 20m |
| Working Temperature | -20°C to 45°C (4°F to 113°F) |
| Waterproof Rating | IP54 |
| Power Supply | DC 4.8-6V |
| Continuous Work Time | 20 hours |
| Dimensions (L×B×H) | 161mm × 161mm × 184mm |
| Weight (Laser Unit) | 2kg |
| Tripod Height | 1.04 - 1.65 meters (3.41 - 5.41 ft) |
| Leveling Staff Length | 5 meters (16.4 ft) |
| Material | Plastic (Laser Unit), Aluminum (Tripod, Staff) |
Warranty and Support
VEVOR products are designed for durability and performance. For warranty information, technical support, or service inquiries, please refer to the warranty card included with your product or visit the official VEVOR website. Please have your model number (Rotationslaser) and purchase details ready when contacting support.
For further assistance, you may also refer to the seller's information on the platform where the product was purchased.


