
1. Important Safety Information
Please read all instructions before operating the toy. Keep this manual for future reference.
- Recommended Age: This toy is suitable for children aged 6 years and up.
- Battery Safety:
- Do not mix old and new batteries.
- Do not mix alkaline, standard (carbon-zinc), or rechargeable (nickel-cadmium) batteries.
- Non-rechargeable batteries are not to be recharged.
- Rechargeable batteries are only to be charged under adult supervision.
- Remove exhausted batteries from the toy.
- Dispose of batteries properly.
- Choking Hazard: Small parts may be present. Not for children under 3 years.
- Material Safety: Made of child-friendly ABS material, BPA-free, with durable and smooth edges.
2. Package Contents
Ensure all items are present in the package:
- 1 x GILOBABY Velociraptor Dinosaur Toy
- 1 x 2.4 GHz Remote Control
- 1 x USB Charging Cable
- 1 x Small Screwdriver
- 1 x Instruction Manual (this document)

Figure 2.1: Package contents including the dinosaur, remote, USB cable, screwdriver, and manual.
3. Setup
3.1 Attaching the Tail
- Locate the main body of the dinosaur and the detachable tail.
- Align the connector on the tail with the slot on the dinosaur's body.
- Gently push the tail into place until it clicks securely.

Figure 3.1: Attaching the dinosaur's tail.
3.2 Charging the Dinosaur Toy
The dinosaur toy includes a built-in rechargeable Lithium Polymer battery.
- Locate the charging port on the dinosaur toy (usually on the underside or side).
- Connect the small end of the USB charging cable to the dinosaur's charging port.
- Connect the larger end of the USB charging cable to a USB power source (e.g., computer USB port, USB wall adapter, power bank).
- The indicator light on the dinosaur will show charging status (e.g., red for charging, off when fully charged).
- Charging typically takes 2-3 hours. Do not overcharge.

Figure 3.2: USB charging connection for the dinosaur toy.
3.3 Installing Remote Control Batteries
The remote control requires 2x AAA batteries (not included).
- Using the provided screwdriver, open the battery compartment on the back of the remote control.
- Insert 2 new AAA batteries, ensuring correct polarity (+/-).
- Close the battery compartment and secure it with the screw.
4. Operating Instructions
4.1 Remote Control Overview
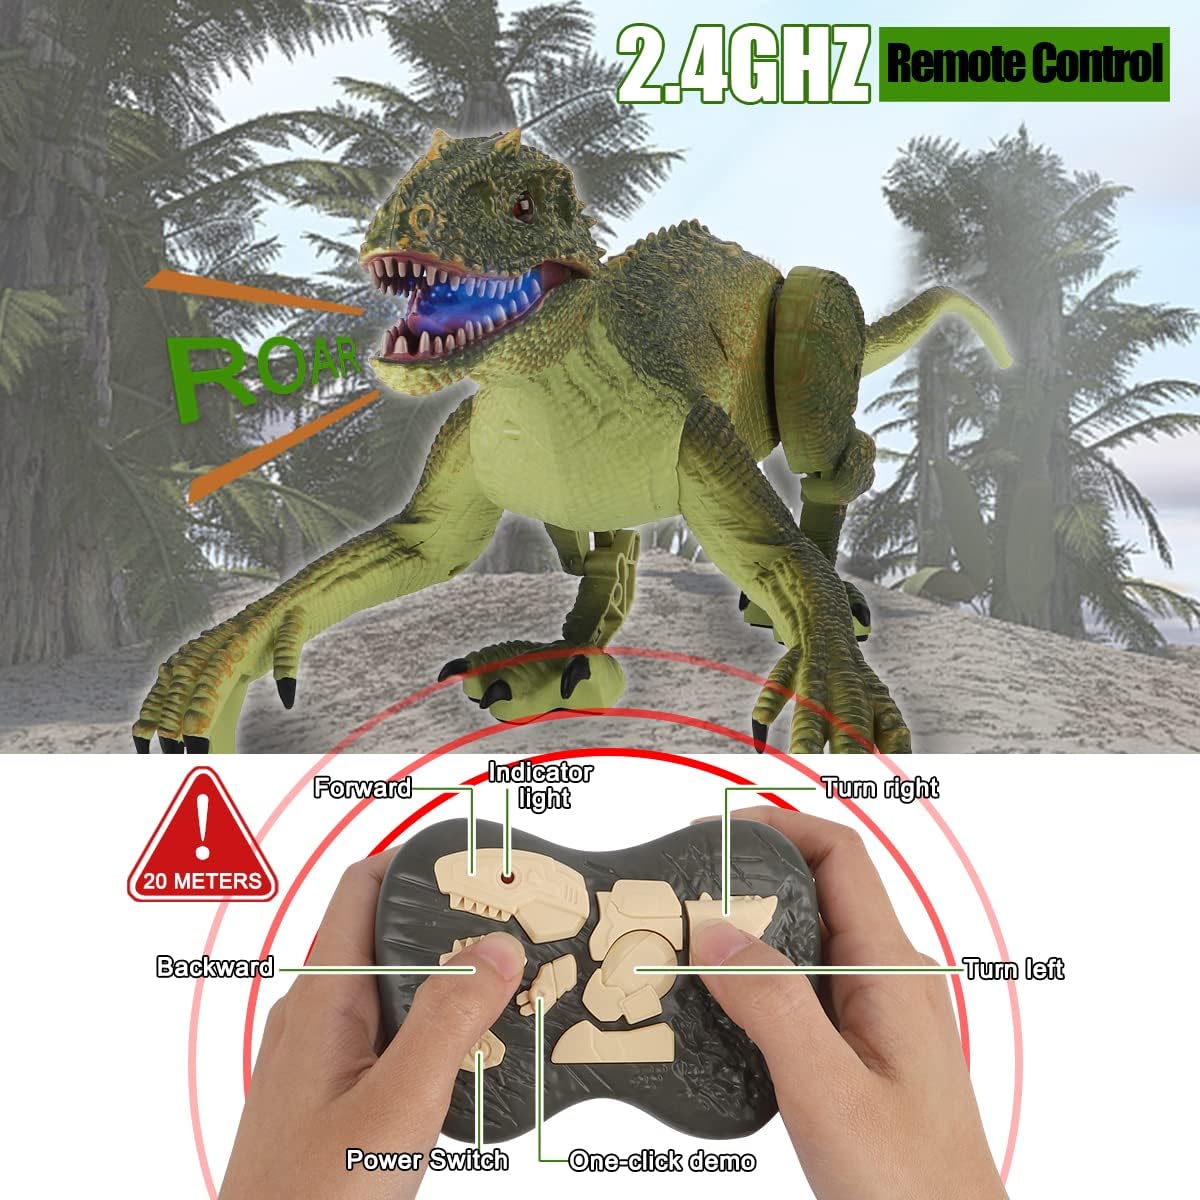
Figure 4.1: Remote control button layout and functions.
4.2 Powering On and Pairing
- Ensure the dinosaur toy is fully charged and the remote control has fresh batteries.
- Turn on the dinosaur toy using its power switch (usually on the underside).
- Turn on the remote control using its power switch.
- The remote and dinosaur should automatically pair. If not, turn both off and on again.
4.3 Basic Movement Controls
Use the directional buttons on the remote control to move the dinosaur:
- Forward: Press the 'Forward' button.
- Backward: Press the 'Backward' button.
- Turn Left: Press the 'Turn Left' button.
- Turn Right: Press the 'Turn Right' button.

Figure 4.2: Dinosaur movement capabilities.
4.4 One-Key Demo Function
Press the 'One-Key Demo' button on the remote control to activate an automatic demonstration of the dinosaur's movements, roaring sounds, and LED lights.
4.5 Roaring Sound and LED Lights
The dinosaur features realistic roaring sounds and LED lights in its mouth and eyes, which activate during movement and the demo mode.

Figure 4.3: Key features of the dinosaur toy.
4.6 Attack Mode
The dinosaur can enter an attack mode, allowing it to simulate a fight with other compatible dinosaur toys. Refer to specific instructions for multi-player interaction if applicable.
5. Maintenance
- Cleaning: Wipe the toy and remote control with a clean, damp cloth. Do not immerse in water.
- Storage: Store the toy in a cool, dry place away from direct sunlight when not in use.
- Battery Care: For prolonged storage, remove batteries from the remote control. Ensure the dinosaur's battery is fully charged before storing for long periods, and recharge periodically to maintain battery health.
6. Troubleshooting
| Problem | Possible Cause | Solution |
|---|---|---|
| Dinosaur does not move or respond. | Low battery in dinosaur or remote; Not paired; Power switch off. | Charge dinosaur battery; Replace remote batteries; Ensure both power switches are ON; Re-pair by cycling power. |
| Dinosaur moves erratically or flips over. | Uneven surface; Obstruction; Low battery. | Operate on a flat, smooth surface; Clear any obstructions; Charge dinosaur battery. |
| Tail or legs detach frequently. | Loose connection; Impact during play. | Re-attach parts firmly. If issue persists, contact customer service. |
| Remote control stops working. | Dead batteries; Remote malfunction. | Replace remote batteries; Try re-pairing. If still unresponsive, contact customer service. |
7. Specifications
- Product Dimensions: 8 x 19 x 7 inches (Dinosaur)
- Item Weight: 1.43 pounds
- Recommended Age: 6 years and up
- Dinosaur Battery: 1 x Lithium Polymer battery (included, rechargeable)
- Remote Control Battery: 2 x AAA batteries (not included)
- Control Frequency: 2.4 GHz
- Control Range: Up to 20 meters

Figure 7.1: Product dimensions for the dinosaur and remote control.
8. Warranty and Support
GILOBABY provides a worry-free 12-month warranty for this product. If you encounter any issues or are not completely satisfied with your purchase, please contact GILOBABY customer service for assistance.
Customer Service Contact: Refer to the packaging or the GILOBABY official website for the most up-to-date contact information.