Braun BC15B-DCF
Braun BC15B-DCF Digital Projection Radio Controlled Alarm Clock User Manual
1. Introduction
Thank you for choosing the Braun BC15B-DCF Digital Projection Radio Controlled Alarm Clock. This device combines precise timekeeping with convenient features such as time projection, a clear negative LCD display, and a crescendo alarm. Please read this manual carefully to ensure proper use and optimal performance of your new alarm clock.

The Braun BC15B-DCF alarm clock in a bedroom, demonstrating its projection feature on the wall.
2. Important Safety Information
- Do not expose the unit to extreme temperatures, direct sunlight, or high humidity.
- Avoid dropping the clock or subjecting it to strong impacts.
- Do not attempt to disassemble or repair the unit yourself. Refer all servicing to qualified personnel.
- Keep batteries out of reach of children. Dispose of used batteries responsibly according to local regulations.
- Use only the specified power adapter provided with the clock.
3. Package Contents
Please check that all items are present and in good condition:
- Braun BC15B-DCF Digital Projection Radio Controlled Alarm Clock
- Power Adapter
- User Manual (this document)
Note: 3 x AA batteries are required for operation but are NOT included in the package.

The retail packaging for the Braun BC15B-DCF alarm clock.
4. Product Overview
The Braun BC15B-DCF features a sleek design with a clear negative LCD display and an integrated projection arm.

Front view of the alarm clock with its digital display and active time projection.
Key Features:
- Radio Controlled Time (DCF): Automatically sets and controls time for the Central European Time Zone. The function can be switched off for manual setting in other regions.
- Time Projection: Projects the current time onto a wall or ceiling. This feature requires the power adapter and can be set to remain active permanently. The projection can be rotated for correct orientation.
- Negative LCD Display: Clear digital display with 12-hour or 24-hour format options. Display contrast may vary with room lighting.
- Adjustable Backlight: Four customizable levels of display brightness when using the power adapter.
- Crescendo Beep Alarm: The alarm sound increases in frequency and volume if not turned off.
- Snooze Function: Provides a 5-minute snooze interval.
5. Setup
5.1. Battery Installation
- Open the battery compartment cover on the back of the clock.
- Insert 3 x AA batteries (not included), ensuring correct polarity (+ and -).
- Close the battery compartment cover.
Batteries allow the clock to operate the display. For permanent backlight and projection features, the power adapter is required.
5.2. Connecting the Power Adapter
- Plug the provided power adapter into the DC input port on the clock.
- Plug the other end of the adapter into a standard wall outlet.
Connecting the power adapter enables the permanent backlight and projection functions.
5.3. Initial Time Setting (Radio Controlled)

The radio controlled signal icon on the display.
Upon initial power-up (with batteries or power adapter), the clock will automatically attempt to receive the DCF radio signal for the Central European Time Zone. This process may take several minutes. Ensure the clock is placed near a window for better reception.
- A radio signal icon will appear on the display when reception is successful.
- If the signal is not received, the clock can be manually set (refer to Section 6.1). The radio controlled function can be switched off if desired.
6. Operating Instructions
6.1. Manual Time Setting
If the radio controlled signal is unavailable or switched off:
- Press and hold the 'SET' button (location typically on the back or bottom) until the hour digits begin to flash.
- Use the '+' or '-' buttons to adjust the hour.
- Press 'SET' again to confirm the hour and move to minute adjustment.
- Use the '+' or '-' buttons to adjust the minutes.
- Press 'SET' to confirm and exit manual time setting.
6.2. 12/24 Hour Format Selection
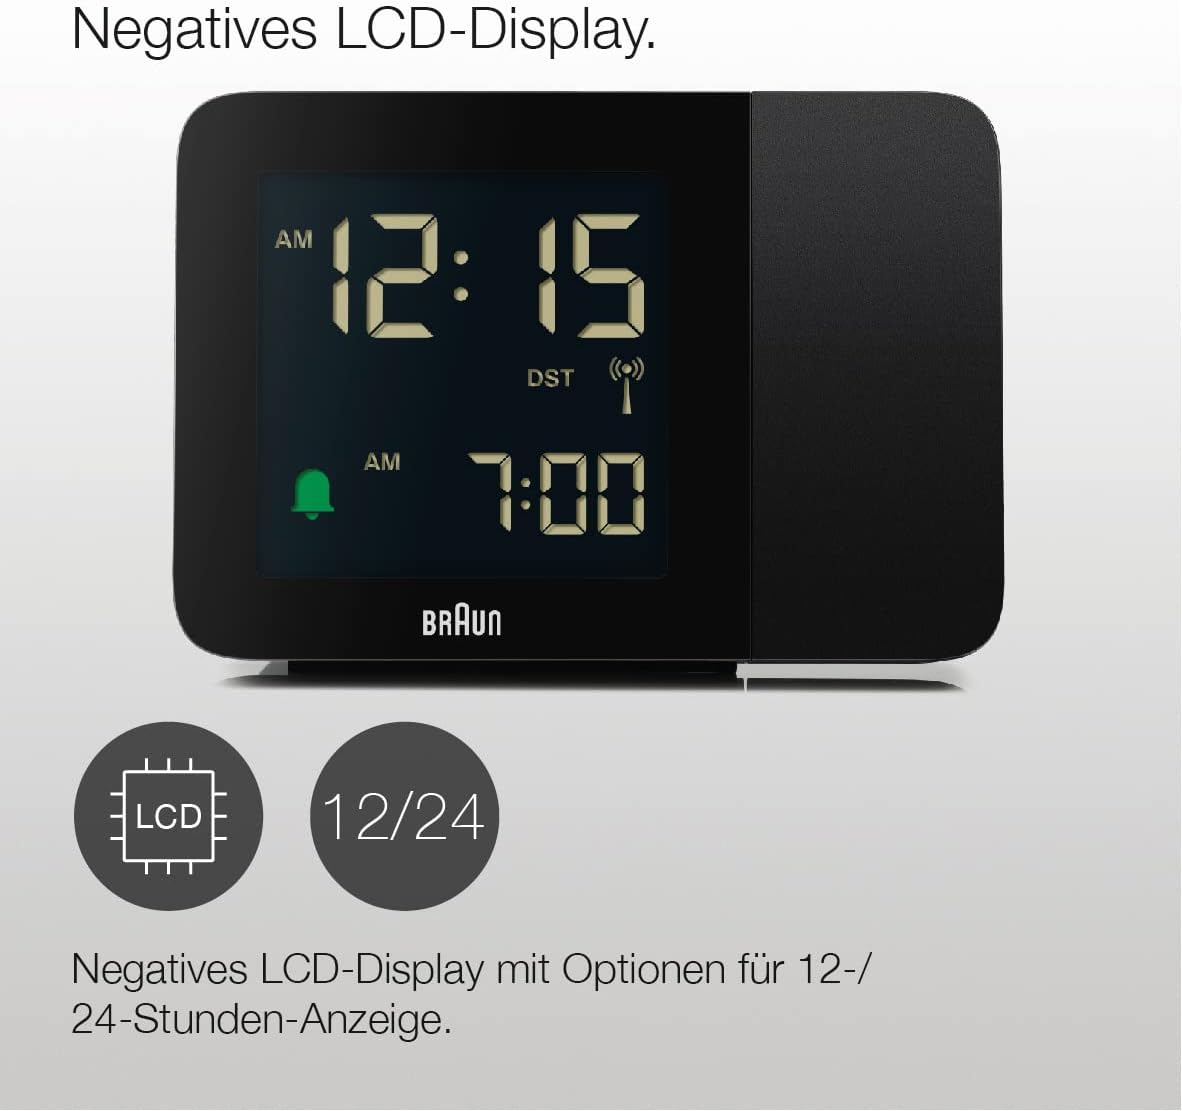
The negative LCD display with time and alarm settings.
Press the '12/24H' button (refer to the clock's physical buttons) to toggle between 12-hour (with AM/PM indicator) and 24-hour time formats.
6.3. Setting the Alarm

Alarm icon and set alarm time on the display.
- Press and hold the 'ALARM' button until the alarm hour digits flash.
- Use the '+' or '-' buttons to adjust the alarm hour.
- Press 'ALARM' again to confirm the hour and move to alarm minute adjustment.
- Use the '+' or '-' buttons to adjust the alarm minutes.
- Press 'ALARM' to confirm and activate the alarm. An alarm icon will appear on the display.
6.4. Snooze Function
When the alarm sounds, press the 'SNOOZE/LIGHT' button (typically a large button on top) to temporarily silence the alarm. The alarm will sound again after approximately 5 minutes.
6.5. Backlight Adjustment

Icons indicating adjustable backlight brightness levels.
When the power adapter is connected, press the 'LIGHT' or 'SNOOZE/LIGHT' button repeatedly to cycle through the four available backlight brightness levels. The backlight can remain on permanently when powered by the adapter.
6.6. Time Projection
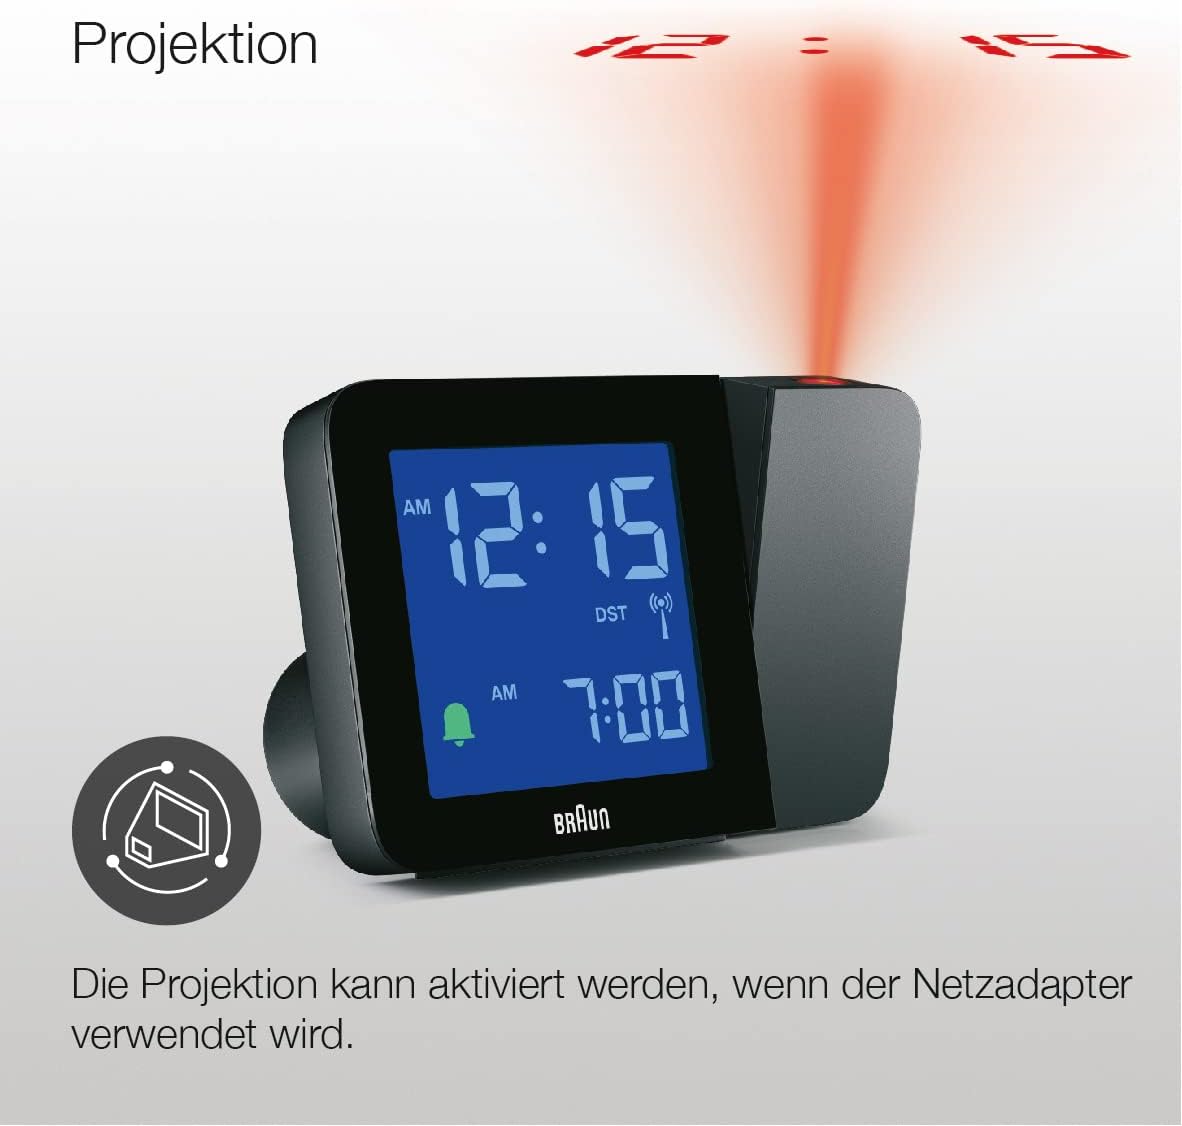
The projection feature displaying the time.
The projection feature is active only when the power adapter is connected.
- Activating Projection: Locate the 'PROJECTION' button (or similar, refer to your clock's specific layout). Press it to turn the projection on/off.
- Adjusting Projection Angle: The projection arm can be physically rotated to direct the time onto your desired surface (wall or ceiling).
- Rotating Projected Image: Use the 'ROTATE' button (or similar) to adjust the orientation of the projected time digits, ensuring they are displayed correctly.
7. Maintenance
7.1. Cleaning
Wipe the clock with a soft, dry cloth. Do not use abrasive cleaners or solvents, as these may damage the surface. For stubborn marks, a slightly damp cloth can be used, followed by immediate drying.
7.2. Battery Replacement
If the clock is running on batteries and the display becomes dim or unresponsive, replace all three AA batteries with new ones. Ensure correct polarity.
8. Troubleshooting
| Problem | Possible Cause | Solution |
|---|---|---|
| Clock display is blank or dim. | Low batteries or power adapter not connected/faulty. | Replace batteries or ensure power adapter is securely connected and functional. |
| Radio controlled time not setting. | Poor signal reception or outside DCF zone. | Move clock closer to a window. If outside DCF zone, switch off radio control and set time manually. |
| Projection not working. | Power adapter not connected or projection feature is off. | Ensure power adapter is connected. Press the 'PROJECTION' button to activate. |
| Alarm does not sound. | Alarm not set or turned off. | Verify alarm time is set and the alarm icon is visible on the display. |
9. Specifications

Dimensions of the Braun BC15B-DCF alarm clock.
- Brand: Braun
- Model: BC15B-DCF
- Color: Black
- Product Dimensions: 13 x 5 x 9 cm
- Weight: 180 g
- Material: Plastic
- Display Type: Digital Negative LCD
- Time Format: 12/24 Hour selectable
- Special Functions: Alarm, Snooze, Time Projection, Radio Controlled (DCF), Backlight
- Power Source: 3 x AA batteries (not included) or Power Adapter (included)
- Indoor/Outdoor Use: Indoor
10. Warranty and Support
Braun products are manufactured to high quality standards. This product comes with a standard manufacturer's warranty. For specific warranty details, please refer to the warranty card included in your package or visit the official Braun website.
For technical support, troubleshooting assistance, or to inquire about replacement parts, please contact Braun customer service through their official website or the contact information provided in your product documentation.
Ask a question about this manual
Ask about setup, troubleshooting, compatibility, parts, safety, or missing instructions. Manuals+ will review the question and use this page’s manual context to help answer it.