
1. Introduction
This manual provides essential instructions for the safe and effective operation, maintenance, and troubleshooting of your Julymoda 110V 400W Tire Grooving Tool (Model T100). Please read this manual thoroughly before using the device to ensure proper function and to prevent injury or damage.
The Julymoda Tire Grooving Tool is designed for engraving new patterns or deepening existing grooves on rubber tires, enhancing traction and extending tire life. It features intelligent temperature control, air-cooling technology, and pulse heating for efficient and precise grooving.
2. Safety Instructions
WARNING: Failure to follow these safety instructions may result in electric shock, fire, or serious injury.
- Electrical Safety: Ensure the power supply matches the tool's requirements (110V). Do not operate the tool with wet hands or in damp conditions. Always unplug the tool when not in use or before performing maintenance.
- Heat Hazard: The grooving blade heats to high temperatures. Avoid direct contact with the blade during and immediately after operation. Use caution to prevent burns.
- Blade Handling: Blades are sharp. Handle with care. Always ensure blades are securely tightened before use.
- Ventilation: Operate the tool in a well-ventilated area to dissipate heat and fumes from rubber.
- Personal Protective Equipment (PPE): Always wear appropriate safety glasses, heat-resistant gloves, and a dust mask during operation.
- Work Area: Keep the work area clean and well-lit. Do not operate near flammable materials.
- Children and Bystanders: Keep children and bystanders away from the operating area.
3. Product Overview
The Julymoda Tire Grooving Tool consists of a control unit and a handheld grooving iron. Key components are labeled below:

Figure 3.1: Main components of the Julymoda Tire Grooving Tool. Labels include Voltmeter, Temperature Adjustment, Gear switch, Power Indicator, Power switch, Handle, and Knife stone.
Key Features:
- Microcomputer Temperature Control: Advanced system for precise heat management.
- Air-Cooling Technology: Integrated exhaust fan for heat dissipation during operation, enhancing safety and reliability.
- Low-Voltage Electric Shock Technology: Power cord made of PV soft material for waterproof and insulated operation.
- German Pulse Heating Technology: Instant heating of the blade when in use, no heating when idle, prolonging blade life.
- Durable Construction: Body made from anti-impact and corrosion-resistant materials.
- Versatile Grooving: Capable of engraving patterns with a width of 3-20mm and a depth of 7-16mm.
4. Setup
- Unpacking: Carefully remove all components from the packaging. Inspect for any shipping damage.
- Blade Installation:
- Select the appropriate blade type (U-type or V-type) and size for your desired groove.
- Loosen the screws on the knife stone (blade holder) of the grooving iron.
- Insert the chosen blade into the slot.
- Important: Ensure the blade is securely tightened using the provided tools. The cutter head and blade may not be fully tightened upon receipt and require user adjustment.

Figure 4.1: Available U-type and V-type blades for different groove profiles and widths.
- Power Connection: Connect the power cord to a standard 110V AC outlet.
- Placement: Place the control unit on a stable, flat surface.
5. Operating Instructions
- Power On: Flip the Power switch on the control unit to the 'ON' position. The Power Indicator light will illuminate.
- Temperature Adjustment: Use the Temperature Adjustment knob to set the desired heating level. The Voltmeter will indicate the current power output. Start with a lower setting and gradually increase if needed.
- Pre-heating: Allow the blade to heat up for a few moments. The pulse heating technology ensures rapid heating.
- Grooving:
- Hold the grooving iron firmly by the handle.
- Gently press the heated blade against the tire surface where you wish to create or deepen a groove.
- Apply steady, even pressure and guide the tool along the desired path. The tool can engrave patterns with a width of 3-20mm and a depth of 7-16mm.
- Avoid excessive force, as this can damage the blade or the tire.
- Work slowly and methodically for best results.
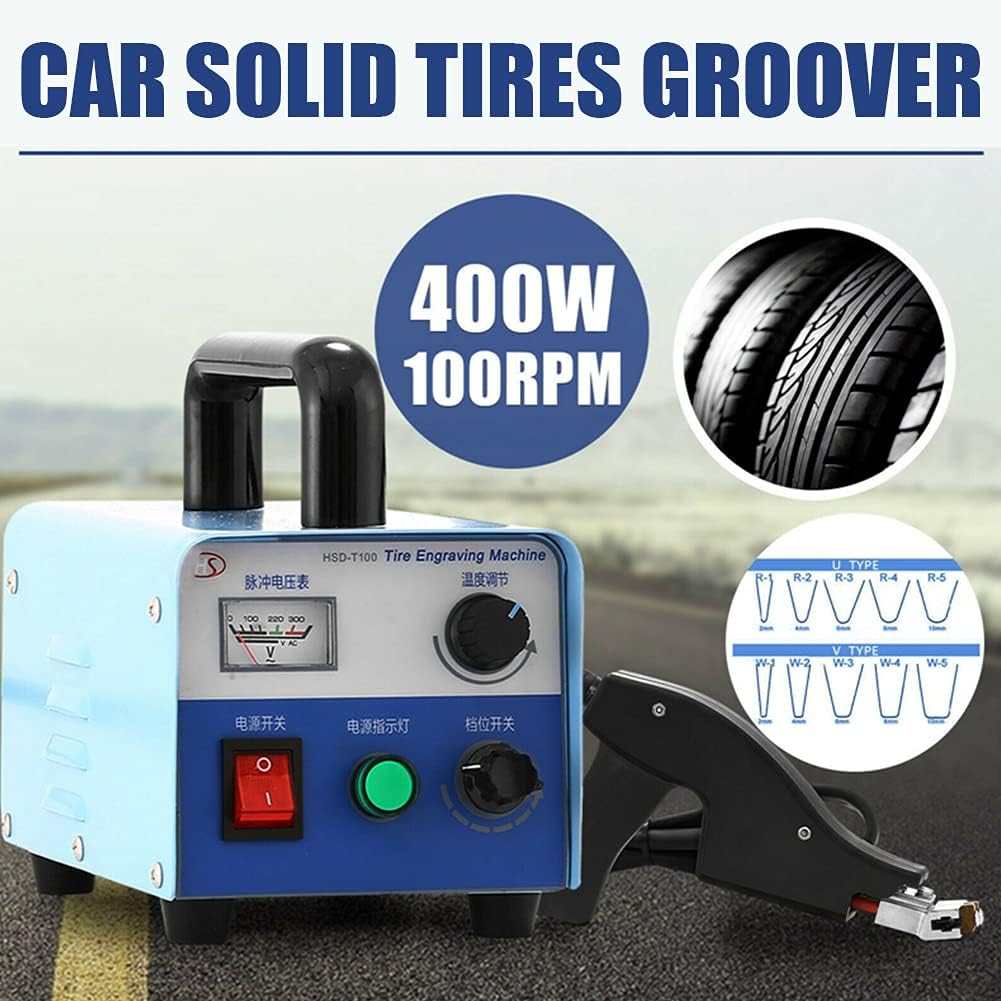
Figure 5.1: The 400W Tire Groover Machine in operation, illustrating its power and the types of grooves it can create.

Figure 5.2: Intelligent temperature control ensures consistent grooving performance.
- Cool Down: After completing your work, turn off the power switch. Allow the blade to cool down completely before handling or storing the tool.
6. Maintenance
- Cleaning: After each use, ensure the tool is unplugged and completely cool. Use a stiff brush to remove any rubber residue from the blade and knife stone. Wipe the control unit with a dry cloth. Do not use abrasive cleaners or solvents.
- Blade Replacement: Replace worn or damaged blades promptly. Follow the blade installation steps in Section 4.
- Storage: Store the tool in a dry, clean place, away from direct sunlight and moisture. Keep it out of reach of children.
7. Troubleshooting
| Problem | Possible Cause | Solution |
|---|---|---|
| Tool does not power on. | No power supply; faulty power cord; internal fault. | Check power outlet and cord. Ensure power switch is ON. If problem persists, contact support. |
| Blade does not heat up. | Incorrect temperature setting; loose blade connection; faulty heating element. | Adjust temperature knob. Ensure blade is securely tightened. If still no heat, contact support. |
| Poor grooving performance. | Blade is dull or incorrect type; insufficient heat; improper technique. | Replace blade. Increase temperature setting. Apply steady, even pressure. |
| Excessive smoke or burning smell. | Blade too hot; grooving too slowly; improper tire material. | Reduce temperature. Move the tool at a consistent pace. Ensure tire is suitable for grooving. |
8. Specifications
| Feature | Detail |
|---|---|
| Model | T100 |
| Power | 400W |
| Voltage | 110V |
| Engraving Width | 3-20mm |
| Engraving Depth | 7-16mm |
| Included Blades | 20 pcs (various U-type and V-type) |
| Item Weight | 7.82 kg |
| Parcel Dimensions | 38.1 x 27.94 x 24.64 cm |
| Manufacturer | Julymoda |
| Country of Origin | China |
9. Warranty Information
For specific warranty details regarding your Julymoda Tire Grooving Tool, please refer to the warranty card included with your product packaging or contact the authorized seller directly. Warranty terms typically cover manufacturing defects for a specified period from the date of purchase.
10. Customer Support
If you encounter any issues or have questions not addressed in this manual, please contact Julymoda customer support or your authorized retailer for assistance. Provide your product model number (T100) and purchase date when seeking support.