1. Introduction
This manual provides essential information for the safe operation, maintenance, and troubleshooting of your Samson Machinery Walk Behind Gas Powered Trencher, Model WP1500E - XR2100. Please read this manual thoroughly before operating the machine to ensure proper use and to prevent injury or damage.

Figure 1.1: Samson Machinery Walk Behind Gas Powered Trencher (Model WP1500E - XR2100)
This image displays the overall view of the Samson Machinery Walk Behind Gas Powered Trencher, highlighting its robust construction and key components such as the engine, handle, and trenching chain assembly.
2. Safety Information
Always prioritize safety when operating this equipment. Failure to follow safety instructions can result in serious injury or death.
- Read and understand the entire manual before operation.
- Wear appropriate personal protective equipment (PPE), including safety glasses, hearing protection, gloves, and sturdy footwear.
- Ensure the work area is clear of bystanders, pets, and obstacles.
- Locate and mark all underground utilities (gas, water, electrical, communication lines) before trenching.
- Never operate the trencher under the influence of alcohol, drugs, or medication that may impair judgment.
- Handle fuel in a well-ventilated area, away from ignition sources.
- Do not modify the trencher in any way. Use only genuine replacement parts.
- Keep hands and feet away from moving parts, especially the trenching chain.
- Turn off the engine and disconnect the spark plug wire before performing any maintenance or adjustments.
3. Components and Controls
Familiarize yourself with the various parts and controls of your trencher.

Figure 3.1: Side View of Trencher Components
This image provides a side profile of the trencher, illustrating the engine, handle assembly, main wheels, and the trenching arm with its chain and teeth. Note the depth control mechanism and the side auger.
Key Components:
- Engine: Powers the trenching chain.
- Handlebar Assembly: Used for steering and controlling the machine. Includes throttle and safety controls.
- Trenching Chain: Equipped with 27 carbide-tipped teeth for cutting through soil.
- Depth Control Lever: Adjusts the trenching depth (8", 16", 24" options).
- Side Auger: Displaces excavated soil away from the trench.
- Wheels: Wide pneumatic tires for stability and maneuverability.
- Centrifugal Clutch: Engages the chain drive.
4. Setup
4.1 Unpacking and Assembly
Carefully remove the trencher from its packaging. Some minor assembly may be required, such as attaching the handlebar assembly. Refer to the assembly diagrams in your separate assembly guide if provided.
4.2 Fuel and Oil
- Engine Oil: Fill the engine crankcase with the recommended type and amount of engine oil. Consult the engine manufacturer's manual for specific oil requirements and capacity.
- Fuel: Fill the fuel tank with fresh, unleaded gasoline. Do not overfill. Ensure the fuel cap is securely tightened.
- Chain Lubrication: Check and ensure the trenching chain is adequately lubricated before first use.
5. Operating Instructions
5.1 Pre-Operation Checklist
- Check engine oil level.
- Check fuel level.
- Inspect the trenching chain for damage or wear. Ensure teeth are secure.
- Verify all fasteners are tight.
- Ensure the work area is clear and utilities are marked.
5.2 Starting the Engine
- Ensure the trencher is on a level surface.
- Set the engine switch to "ON".
- Open the fuel valve.
- Apply choke if the engine is cold.
- Pull the recoil starter handle firmly until the engine starts.
- Once started, gradually push the choke lever to the "OFF" position.
5.3 Trenching Operation
To begin trenching, engage the trenching chain by increasing engine RPM. The centrifugal clutch will engage the chain. Adjust the depth control lever to the desired trench depth.
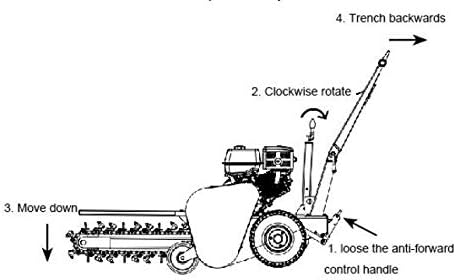
Figure 5.1: Trenching Backwards Operation
This diagram illustrates the steps for trenching backwards: 1. Loose the anti-forward control handle. 2. Clockwise rotate the handle. 3. Move the trenching arm down. 4. Trench backwards.
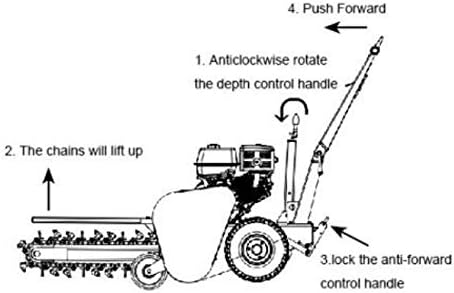
Figure 5.2: Lifting Chains Operation
This diagram shows the process for lifting the trenching chains: 1. Anticlockwise rotate the depth control handle. 2. The chains will lift up. 3. Lock the anti-forward control handle. 4. Push forward.
5.4 Stopping the Engine
- Reduce engine speed to idle.
- Set the engine switch to "OFF".
- Close the fuel valve.
6. Maintenance
Regular maintenance is crucial for the longevity and safe operation of your trencher.
6.1 Daily Checks
- Check engine oil level.
- Inspect trenching chain for wear, damage, or loose teeth.
- Clean debris from the engine and chain area.
- Check tire pressure.
6.2 Periodic Maintenance
- Engine Oil Change: Change engine oil after the first 5 hours of operation, then every 25-50 hours or seasonally.
- Air Filter: Clean or replace the air filter regularly, especially in dusty conditions.
- Spark Plug: Inspect and clean or replace the spark plug as needed.
- Chain Tension: Check and adjust trenching chain tension to prevent excessive wear.
- Greasing: Lubricate all grease points as indicated in the engine manual.
7. Troubleshooting
This section provides solutions to common operational issues.
| Problem | Possible Cause | Solution |
|---|---|---|
| Engine will not start | No fuel; Engine switch OFF; Choke not applied; Fouled spark plug | Add fuel; Turn switch ON; Apply choke; Clean/replace spark plug |
| Loss of power during operation | Low fuel; Clogged air filter; Incorrect engine oil level | Refuel; Clean/replace air filter; Check/adjust oil level |
| Trenching chain not moving | Engine RPM too low; Obstruction in chain; Clutch issue | Increase throttle; Clear obstruction (engine OFF); Consult service if clutch issue persists |
| Excessive vibration | Loose fasteners; Damaged chain teeth; Unbalanced wheels | Tighten fasteners; Replace damaged teeth; Inspect wheels |
8. Technical Specifications
| Specification | Value |
|---|---|
| Model | WP1500E - XR2100 |
| Engine Power | 14 HP |
| Trenching Depth | 8", 16", 24" Inches (Adjustable) |
| Trenching Chain | Carbide Chain with 27 replaceable carbide tipped hardened steel teeth |
| Chain Length | 79" |
| Chain Speed (Max) | 1800' Feet / Minute |
| Overall Size (L x W x H) | 83" x 29" x 44" |
| Item Weight | 414 Pounds |
| Power Source | Gasoline-Powered |
9. Warranty and Support
Your Samson Machinery Walk Behind Gas Powered Trencher comes with a 1-Year Warranty from the date of purchase. This warranty covers defects in materials and workmanship under normal use.
For warranty claims, technical support, or to order replacement parts, please contact Samson Machinery customer service. Keep your purchase receipt as proof of purchase.
For further assistance, please refer to the contact information provided at the point of purchase or on the official Samson Machinery website.