
1. Introduction
This manual provides detailed instructions for the installation, operation, and maintenance of your Mksutary 5MP Wi-Fi Outdoor PTZ Security Camera. Please read this manual thoroughly before use to ensure proper functionality and safety. Keep this manual for future reference.
2. Product Overview
2.1 Key Features
- 5 Megapixel Full HD Resolution: Captures clear video at 2560x1920 pixels.
- Pan-Tilt-Zoom (PTZ) Functionality: 355° horizontal pan and 120° vertical tilt for wide area coverage.
- 5X Optical Zoom: Allows for detailed magnification of specific areas.
- Advanced Night Vision: Supports three modes: Infrared (black & white), Full Color, and Smart Mode (activates spotlights upon motion).
- Humanoid Motion Detection & Tracking: Intelligently identifies human shapes, reduces false alarms, and automatically tracks detected subjects.
- Two-Way Audio: Built-in microphone and speaker for real-time communication.
- IP66 Weatherproof Design: Durable metal casing protects against rain, snow, and dust for outdoor use.
- Multiple Storage Options: Supports up to 128GB Micro SD card storage and cloud storage (subscription may apply).
- Remote Access: View live feed, playback recordings, and control camera functions via a smartphone app (2.4GHz Wi-Fi connection required).
2.2 Package Contents
Verify that all items are present in your package:
- Mksutary 5MP Wi-Fi Outdoor PTZ Security Camera
- Power Adapter
- Mounting Screws and Anchors
- Waterproof Kit for Network Cable (if applicable)
- User Manual
2.3 Camera Components

Image 2.3.1: Front view of the Mksutary PTZ camera, highlighting its pan (355°) and tilt (120°) capabilities. A smartphone screen shows remote control of the camera's view.
- Camera Lens
- Infrared LEDs / White Light Spotlights
- Microphone
- Speaker
- Wi-Fi Antenna
- Mounting Bracket
- Power Port
- Ethernet Port (optional wired connection)
- Micro SD Card Slot (usually under a cover)
- Reset Button (usually near SD card slot)
3. Setup
3.1 Before Installation
- Ensure your Wi-Fi network is 2.4GHz. 5GHz networks are not supported.
- Test the camera's functionality and Wi-Fi signal strength in the desired installation location before mounting.
- Prepare necessary tools: drill, screwdriver, ladder (if mounting high).
3.2 App Download and Account Registration
Download the recommended mobile application (e.g., "iCSee" or similar, check packaging for exact app name) from your smartphone's app store (iOS App Store or Google Play Store). Register for an account and log in.
3.3 Initial Camera Connection (Wi-Fi)
- Power on the camera using the provided power adapter.
- Wait for the camera to initialize (you may hear a prompt or see an indicator light).
- Open the app, tap "Add Device" or "+" icon.
- Select "Wi-Fi Camera" or "Add by Wi-Fi".
- Follow the on-screen instructions to connect the camera to your 2.4GHz Wi-Fi network. This usually involves scanning a QR code generated by the app or entering your Wi-Fi password.
- Once connected, set a strong password for your camera.

Image 3.3.1: Illustration of wireless (Wi-Fi) and wired (Ethernet) connection methods for the camera. Wireless connection has a maximum distance of 20 meters from the router.
3.4 Optional: Wired Connection
For a more stable connection, you can connect the camera directly to your router using an Ethernet cable. After connecting the cable, the camera should automatically switch to a wired connection. Follow app instructions if manual selection is required.
3.5 Optional: 4G Remote Control (SIM Card)
If your camera model supports 4G connectivity, you can insert a compatible SIM card to enable remote viewing without a Wi-Fi network. Refer to your camera's specific instructions for SIM card installation and activation.

Image 3.5.1: Steps for enabling 4G remote control: 4G Camera -> SIM Card -> 4G Signal -> APP Remote Access. This allows viewing video on a mobile phone without a wireless network.
3.6 Mounting the Camera
- Choose a suitable outdoor location with a clear view and strong Wi-Fi signal (if using wireless).
- Use the mounting template (if provided) or the camera base to mark drill holes on the wall.
- Drill holes and insert wall anchors.
- Secure the mounting bracket to the wall using the provided screws.
- Attach the camera to the mounting bracket.
- Adjust the camera angle as needed.
- Ensure all cable connections are waterproofed using the provided kit.

Image 3.6.1: The Mksutary camera demonstrating its IP66 weatherproof capabilities, designed to withstand various outdoor conditions including heat, cold, lightning, and dust.
4. Operating Instructions
4.1 Live View and PTZ Control
- Open the app and select your camera to view the live feed.
- Use the on-screen joystick or swipe gestures to pan (horizontal) and tilt (vertical) the camera.
- Pinch to zoom or use the zoom controls for 5X optical zoom.

Image 4.1.1: The camera's 5X optical zoom feature, illustrating how it can magnify distant objects for clearer detail using its 2.7-13.5 mm lens.
4.2 Night Vision Modes
The camera offers three night vision modes, configurable via the app:
- Normal Mode (Infrared): Provides clear black and white video in low light conditions using infrared LEDs.
- Color Mode (Spotlight): Activates built-in white light spotlights to capture full-color video at night.
- Smart Mode: The camera operates in infrared mode by default. When human motion is detected, the white light spotlights activate, switching to color night vision.
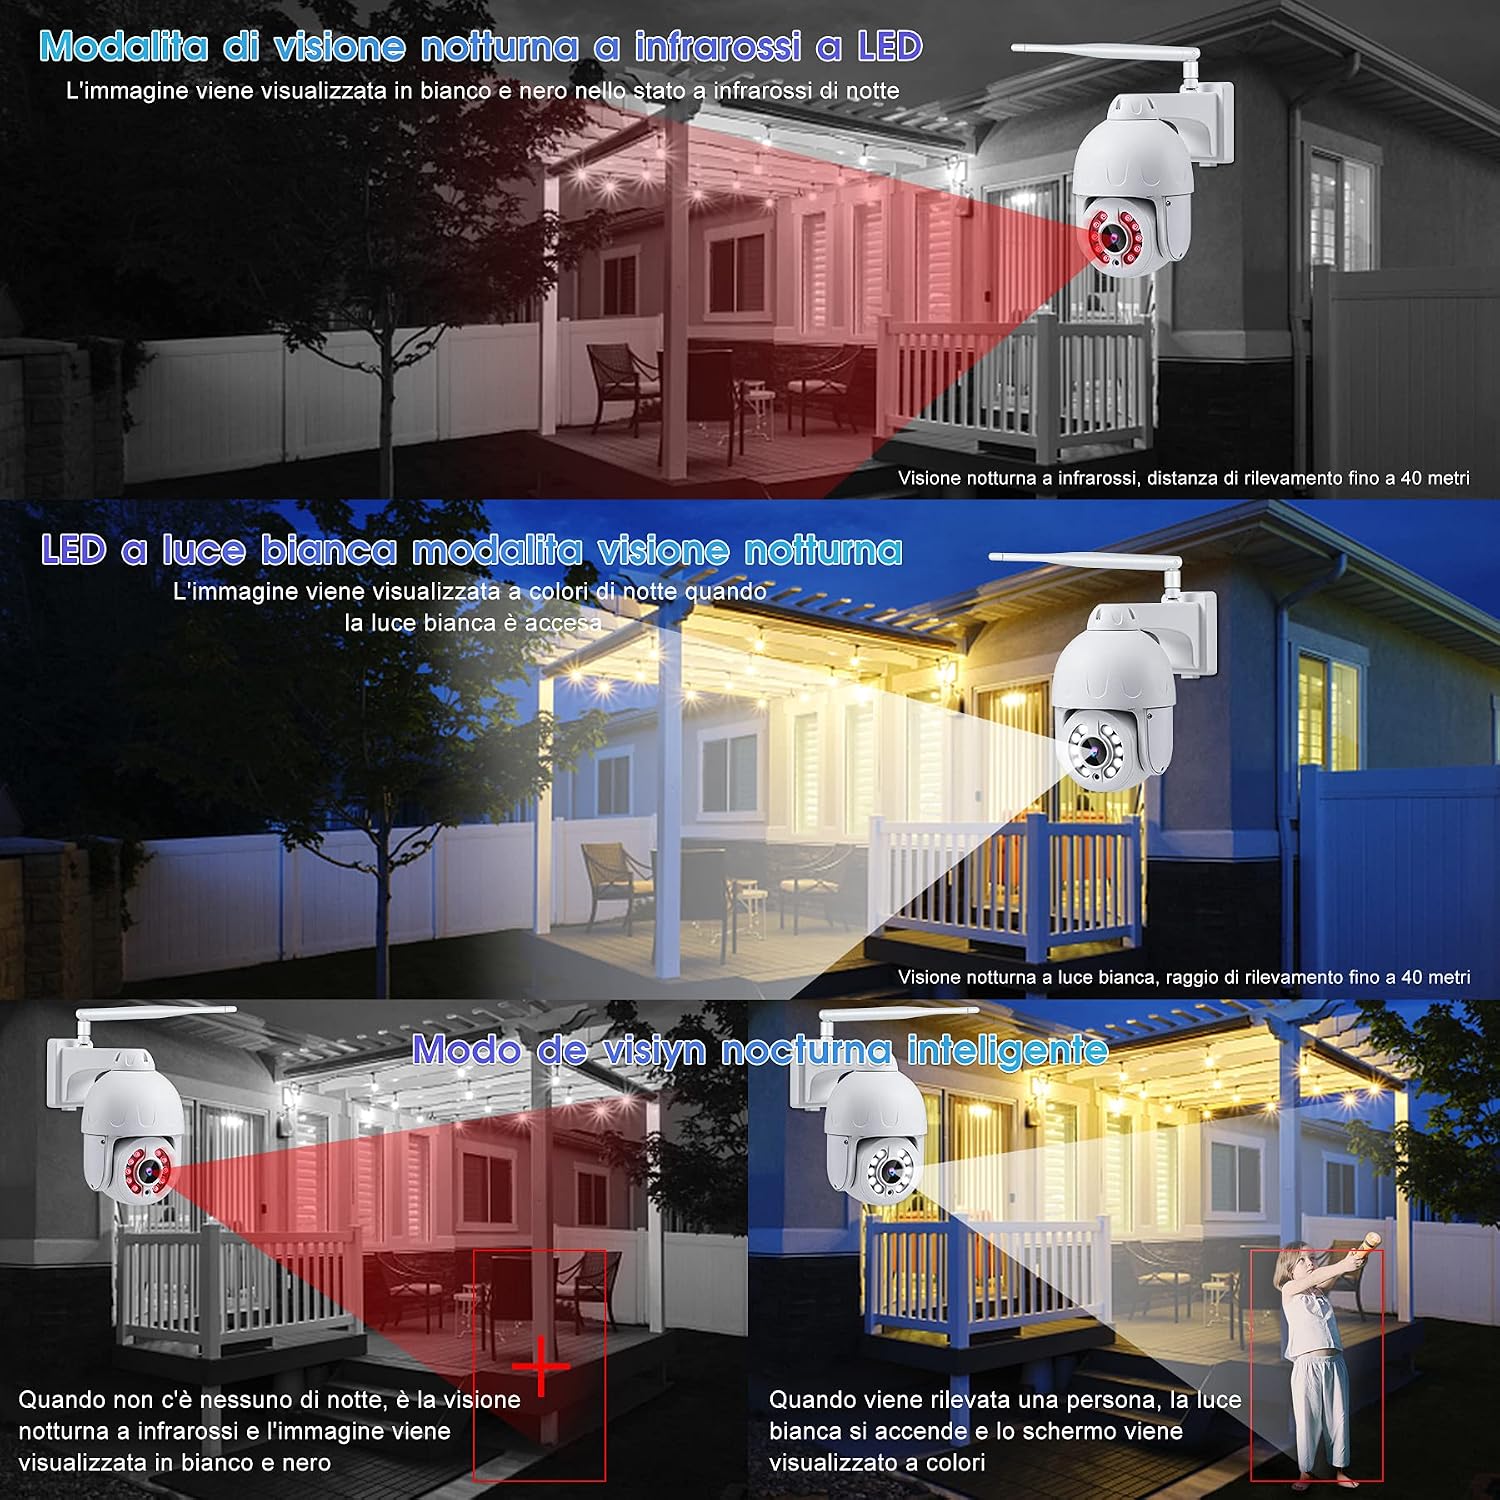
Image 4.2.1: Comparison of night vision modes: Infrared (black and white), White Light (full color), and Smart Mode (switches to color upon motion detection). Detection range up to 40 meters.
4.3 Motion Detection and Alerts
- Enable Motion Detection: In the app settings, activate motion detection.
- Humanoid Detection: The camera can distinguish human shapes from other movements, reducing false alarms.
- Auto-Tracking: When a human is detected, the camera can automatically pan and tilt to follow their movement.
- Customizable Detection Zones: Define specific areas within the camera's view for motion detection.
- Adjust Sensitivity: Set the detection sensitivity to minimize unwanted alerts.
- Push Notifications: Receive instant alerts on your smartphone when motion is detected.

Image 4.3.1: The AI Humanoid Tracking feature in action, demonstrating the camera's ability to automatically follow human figures for more accurate recognition and surveillance.

Image 4.3.2: An example of a humanoid detection alarm, illustrating how the camera detects a person entering a monitored area and sends an immediate alert to the user's smartphone.
4.4 Two-Way Audio
Tap the microphone icon in the live view interface to speak through the camera's speaker. Tap the speaker icon to listen to audio from the camera's microphone.

Image 4.4.1: The two-way audio feature allows remote communication through the camera, enabling users to speak and listen from anywhere.
4.5 Video Recording and Playback
- Micro SD Card Storage: Insert a Micro SD card (up to 128GB, Class 10 or higher recommended) into the camera's slot. The camera will automatically record motion-triggered or continuous video based on your settings.
- Cloud Storage: Check the app for available cloud storage options. A subscription may be required.
- Playback: Access recorded videos through the app's playback feature. You can filter by date and time.
- Download: Download important video clips directly to your smartphone.
5. Maintenance
- Clean the Lens: Regularly wipe the camera lens with a soft, damp cloth to ensure clear image quality. Avoid abrasive cleaners.
- Check Connections: Periodically inspect power and network cable connections for wear or damage, especially in outdoor environments. Ensure waterproof seals are intact.
- Firmware Updates: Check the app regularly for firmware updates. Keeping your camera's firmware updated ensures optimal performance and security.
- SD Card Management: If using an SD card, consider formatting it periodically through the app to maintain performance and prevent data corruption.
- Power Cycle: If the camera becomes unresponsive, try power cycling it by unplugging and re-plugging the power adapter.
6. Troubleshooting
| Problem | Possible Cause | Solution |
|---|---|---|
| Camera offline / Cannot connect to Wi-Fi | Weak Wi-Fi signal, incorrect Wi-Fi password, 5GHz network, camera too far from router. |
|
| No recording to SD card | SD card full, faulty SD card, incorrect recording settings, SD card not inserted correctly. |
|
| Frequent false motion alerts | High sensitivity, environmental factors (e.g., moving branches, insects, light changes). |
|
| Poor image quality | Dirty lens, low network bandwidth, insufficient lighting. |
|
| Two-way audio not working | Microphone/speaker muted in app, network issues, hardware malfunction. |
|
7. Specifications
| Feature | Detail |
|---|---|
| Model | B0914W15FD |
| Brand | Mksutary |
| Resolution | 5 Megapixel (2560 x 1920) |
| Lens | 2.7-13.5mm (5X Optical Zoom) |
| Pan/Tilt Angle | Pan 355°, Tilt 120° |
| Night Vision | Infrared, Full Color, Smart Mode (up to 40m) |
| Connectivity | 2.4GHz Wi-Fi (Wireless), Ethernet (Wired), Optional 4G (SIM card dependent model) |
| Audio | Two-Way Audio (Built-in Microphone & Speaker) |
| Storage | Micro SD Card (up to 128GB), Cloud Storage |
| Weather Resistance | IP66 (Waterproof, Dustproof) |
| Power Supply | DC 12V (Electric Cable) |
| Material | Durable Metal Casing |
| Mounting | Wall Mount |
| Compatible OS | Android, iOS, Windows (via app/client) |
8. Warranty and Support
8.1 Warranty Information
Mksutary products typically come with a limited warranty against defects in materials and workmanship. Please refer to the warranty card included with your product or visit the official Mksutary website for specific warranty terms and duration. Keep your purchase receipt as proof of purchase for warranty claims.
8.2 Technical Support
If you encounter any issues or have questions not covered in this manual, please contact Mksutary customer support. Contact information can usually be found on the product packaging, the official website, or within the mobile application.
- Website: www.mksutary.com (placeholder, actual website may vary)
- Email: support@mksutary.com (placeholder)
When contacting support, please provide your product model number (B0914W15FD) and a detailed description of the issue.