SchuhRia Automotive Circuit Tester User Manual
Model: 12V-24V Circuit Tester
1. Introduction
This manual provides comprehensive instructions for the safe and effective use of your SchuhRia Automotive Circuit Tester. This tool is designed for DIY automotive electrical circuit testing, offering a 6-24V DC voltage testing range. It is ideal for quickly checking various vehicle electrical circuits, including headlights, taillights, turn signal circuits, faulty sockets, and fuse connections, as well as other 6-24V DC wirings and circuits.
Please read this manual thoroughly before operation and retain it for future reference.
2. Safety Information
Always observe the following safety precautions to prevent injury or damage to the tester or vehicle:
- DO NOT USE WITH IGNITION SYSTEMS except as specifically instructed for testing components.
- Ensure the vehicle's ignition is off before connecting or disconnecting the tester, unless testing live circuits as instructed.
- Wear appropriate personal protective equipment, such as safety glasses, when working with vehicle electrical systems.
- Avoid touching live electrical components with bare hands. The probe tip is sharp; handle with care.
- Verify the voltage range of the circuit being tested does not exceed the tester's specified 6-24V DC range.
- Keep the tester clean and dry. Do not expose it to excessive moisture or extreme temperatures.
- If the tester appears damaged, do not use it.
3. Product Overview and Components
The SchuhRia Automotive Circuit Tester consists of the following main components:
- Tester Body: Transparent acetate fiber body housing the bulb.
- Steel Probe: Sharp, durable steel tip for piercing wires and reaching tight areas.
- Indicator Bulb: High-visibility bulb inside the tester body that illuminates to indicate voltage presence. Its brightness varies with voltage.
- Coiled Cable: Premium PU spring wire, offering flexibility and durability. Approximately 140 inches (3.5 meters) when fully extended.
- Alligator Clip: Large, robust clip for secure connection to ground or positive terminals.
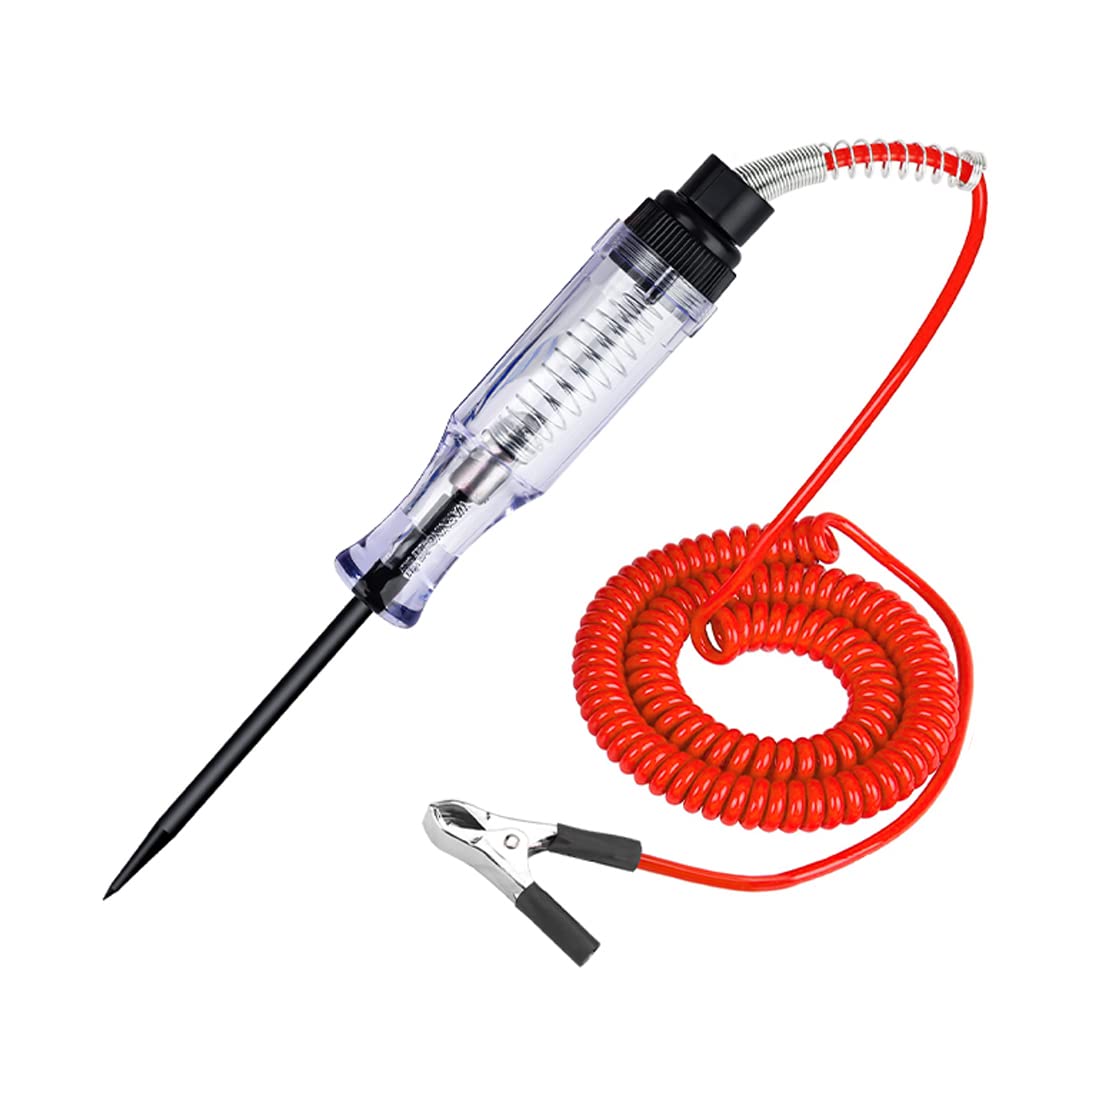
Figure 3.1: Overview of the SchuhRia Automotive Circuit Tester.

Figure 3.2: Detailed view of the tester's components, including the probe, bulb, coiled cable, and alligator clip.

Figure 3.3: Product dimensions showing the 3-inch probe length, 4-inch body length, and maximum 90-inch cable extension.
4. Specifications
| Feature | Specification |
|---|---|
| Voltage Range | 6-24V DC |
| Cable Length | Approx. 140 inches (3.5 meters) extended |
| Handle Material | ABS (Acetate Fiber Body) |
| Probe Material | Steel |
| Cable Type | Premium PU Spring Wire |
| Product Dimensions | 8 x 4 x 1 inches |
| Item Weight | 4.69 Ounces |
| Color | Red |
5. Setup
Before using the circuit tester, ensure the area is well-lit and you have clear access to the vehicle's electrical system.
- Prepare the Vehicle: For most tests, ensure the vehicle's ignition is in the "OFF" position to prevent accidental activation of components or short circuits.
- Connect the Alligator Clip: Connect the large alligator clip to a reliable ground point on the vehicle's chassis or directly to the negative terminal of the battery. For testing positive circuits, connect the clip to a known good positive terminal (e.g., battery positive). The tester is bidirectional, allowing connection to either negative or positive ground.
- Inspect the Tester: Before each use, visually inspect the tester for any signs of damage to the probe, cable, or body.
6. Operating Instructions
The circuit tester is a simple yet effective tool for diagnosing electrical issues. The indicator bulb will illuminate when a complete circuit is detected and voltage is present.
6.1. To Find Live Wires
- Ensure the alligator clip is securely connected to a good ground point (e.g., vehicle chassis or battery negative terminal).
- Carefully touch the steel probe tip to the wire you wish to test.
- If the wire is live (has voltage), the light bulb in the tester's handle will glow. The brightness of the light will vary depending on the voltage.
6.2. To Find Broken Wires
- Connect the alligator clip to a known power source (e.g., battery positive terminal) or a good ground, depending on the circuit you are testing.
- Probe along the wire from the power source or ground point.
- The light will glow until it reaches the point where the wire is broken. The light will cease to glow past the break. This indicates the location of the open circuit.
6.3. To Test Fuses
- Ensure the alligator clip is connected to a good ground point.
- With the fuse installed in its socket, touch the tip of the tester probe to the metal terminals on the top of the fuse (there are usually two small exposed metal points).
- If the fuse is good, the tester light will glow on both terminals. If the light glows on one terminal but not the other, the fuse is blown. If it doesn't glow on either, there is no power to the fuse.
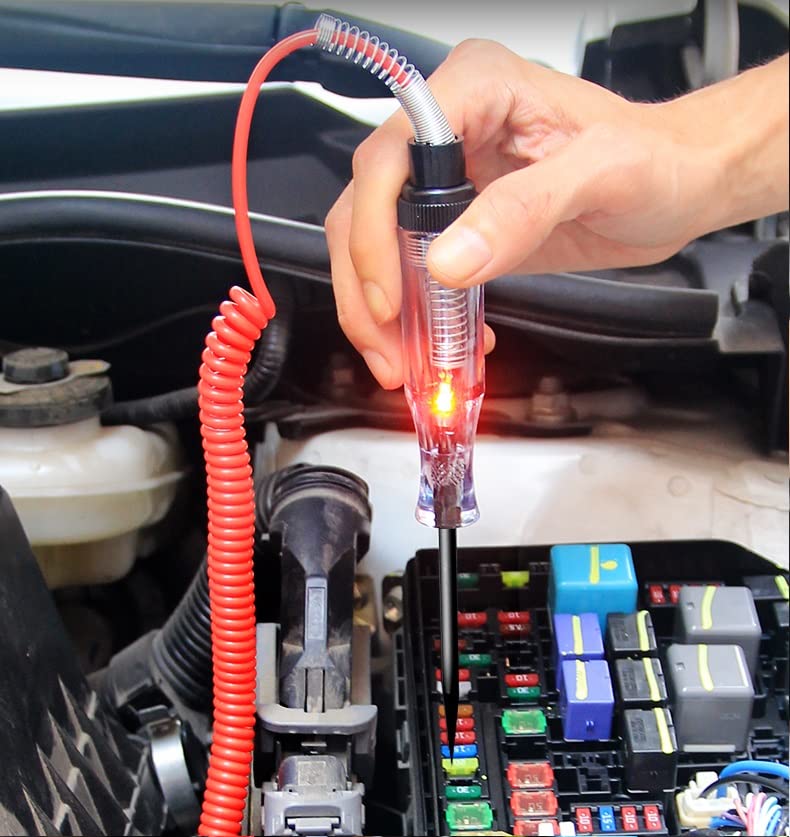
Figure 6.1: Using the circuit tester to check fuses in a vehicle's fuse box.
6.4. To Test Light Sockets (Brake Lights, Back-Up Lights, etc.)
- Connect the alligator clip to the chassis or a good ground point.
- Activate the light circuit you wish to test (e.g., press the brake pedal for brake lights, shift into reverse for back-up lights).
- Touch the probe to the tongue (contact point) at the base of the light bulb socket.
- If power is present at the socket, the tester light will glow. If it does not glow, there may be an issue with the wiring to the socket or the switch.
7. Maintenance
Proper maintenance ensures the longevity and accuracy of your circuit tester:
- Cleaning: After each use, wipe the probe and body of the tester with a clean, dry cloth to remove any dirt, grease, or moisture.
- Storage: Store the tester in a dry place, away from direct sunlight and extreme temperatures. The coiled cable is designed for compact storage.
- Inspection: Periodically check the cable for cuts or fraying, the alligator clip for secure connection, and the probe tip for damage.
- Bulb Replacement: The internal bulb is designed for durability. If it ceases to function, it may indicate a need for replacement or a circuit issue. Consult a qualified technician if the bulb fails prematurely.

Figure 7.1: The durable coiled cable designed for flexibility and easy storage.
8. Troubleshooting
| Problem | Possible Cause | Solution |
|---|---|---|
| Tester light does not glow. | No voltage present in the circuit; poor ground connection; faulty bulb; broken wire in tester. | Verify the circuit is live. Check alligator clip connection to a good ground. Test the tester on a known live circuit (e.g., car battery). Inspect the tester for damage. |
| Light glows dimly. | Low voltage in the circuit; poor connection. | Ensure connections are clean and secure. Check battery voltage if testing a low-voltage circuit. |
| Alligator clip slips off. | Improper attachment; dirty terminal. | Ensure the clip is firmly attached to a clean, bare metal surface. |
9. Warranty and Support
For any questions, technical support, or warranty inquiries regarding your SchuhRia Automotive Circuit Tester, please contact SchuhRia customer service through the retailer where the product was purchased or visit the official SchuhRia store online. Please have your product model and purchase information ready when contacting support.
Online Store: SchuhRia Amazon Store
We are committed to providing quality products and support to our customers.


