
1. Introduction
This manual provides detailed instructions for the assembly, installation, operation, and maintenance of your Leadzm TA-101G Outdoor Rotatable Digital TV Antenna. This antenna is designed to receive UV (UHF/VHF) signals within the 45-860 MHz frequency range, offering a gain of 22-38dB and 360° rotation capability for optimal signal reception. Please read this manual thoroughly before use to ensure proper setup and safe operation.
2. Safety Information
Observe the following safety precautions to prevent injury or damage to the antenna and property:
- Electrical Safety: Always disconnect power before installing or servicing the antenna. Avoid contact with power lines.
- Lightning Protection: For outdoor installations, consider installing a lightning arrestor and proper grounding to protect against lightning strikes.
- Mounting Stability: Ensure the antenna is securely mounted to a stable structure that can withstand wind and weather conditions.
- Fall Hazard: Exercise extreme caution when working at heights. Use appropriate safety equipment.
- Cable Management: Route cables safely to prevent tripping hazards and damage.
3. Package Contents
Verify that all components listed below are present in your package:
- 1 x Main Tube (15x15x350mm)
- 1 x Deputy Tube (15x15x350mm)
- 6 x Foldable Ring Director (φ8 x 230mm)
- 1 x VHF Vibrator (φ10 x 850mm)
- 1 x UHF Vibrator (φ12 x 330mm)
- 2 x Reflector Bracket (14x14x200mm)
- 4 x Reflector (φ8x400mm)
- 1 x Antenna Main Part
- 1 x Square Tube Cap (15x15mm)
- 2 x Square Tube Cap (14*14mm)
- 8 x Round Pipe Cap (φ8mm)
- 4 x Round Pipe Cap (φ12mm)
- 1 x Reflector Tee Bracket
- 2 x Connection Clip (15*15mm)
- 9 x Self-tapping Screws (3x8mm)
- 6 x Self-tapping Screws (3x10mm)
- 2 x Self-tapping Screws (3x18mm)
- 4 x Hex Nuts (M4)
- 4 x Screw (M4x25mm)
- 1 x Power Supply Box
- 1 x Remote Control
- 1 x Instructions (this manual)

Image: All components included in the Leadzm TA-101G antenna package.
4. Specifications
| Frequency Range | 45-860 MHz |
| Gain | 22-38dB |
| Rotation | 360° |
| Channels | VHF1-12, UHF21-69 |
| Impedance | 75 Ω |
| Power Consumption | 3W |
| Power Supply | AC110V |
| Rotation Speed | 2-4 rounds/min |
| Remote Controlled Distance | ≤5m |
| Standing Wave Ratio | ≤1.5 |
| Material | Plastic, Aluminum |
| Weight | 1200g (42.33oz) |
5. Assembly Instructions
Follow these steps to assemble your antenna:
- Attach Main and Deputy Tubes: Connect the Main Tube and Deputy Tube using the provided connection clips and screws.
- Install Reflector Brackets and Reflectors: Secure the two Reflector Brackets to the main antenna structure. Insert the four Reflectors (φ8x400mm) into the brackets and secure them. Use the Reflector Tee Bracket as needed.
- Mount VHF and UHF Vibrators: Attach the VHF Vibrator (φ10 x 850mm) and UHF Vibrator (φ12 x 330mm) to their designated positions on the antenna main part.
- Attach Foldable Ring Directors: Install the six Foldable Ring Directors (φ8 x 230mm) to the front section of the antenna.
- Secure Antenna Main Part: Connect the assembled antenna elements to the Antenna Main Part, ensuring all connections are firm. Use the appropriate self-tapping screws and hex nuts.
- Apply Tube Caps: Place the Square Tube Caps and Round Pipe Caps on the ends of the tubes and vibrators for protection and a finished look.
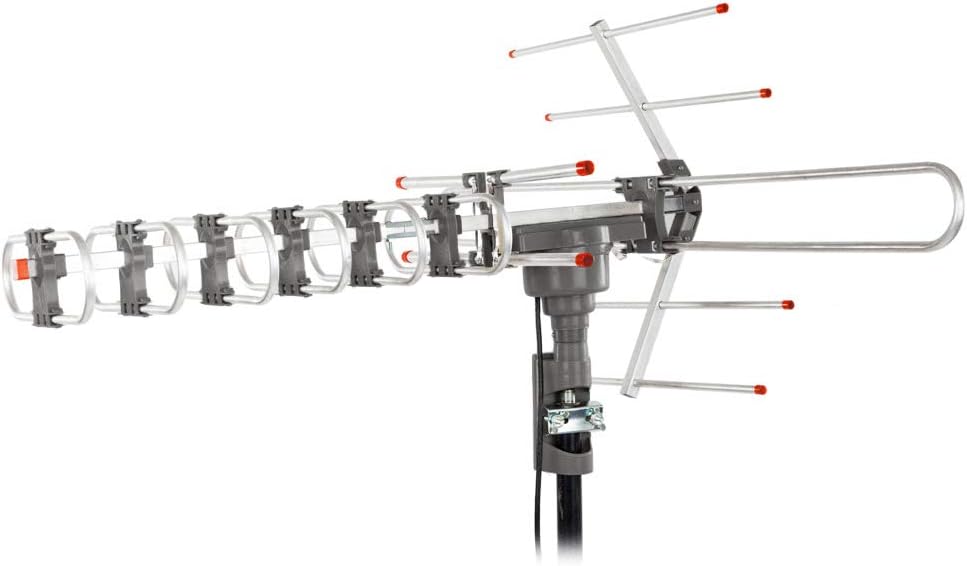
Image: Fully assembled Leadzm TA-101G antenna.
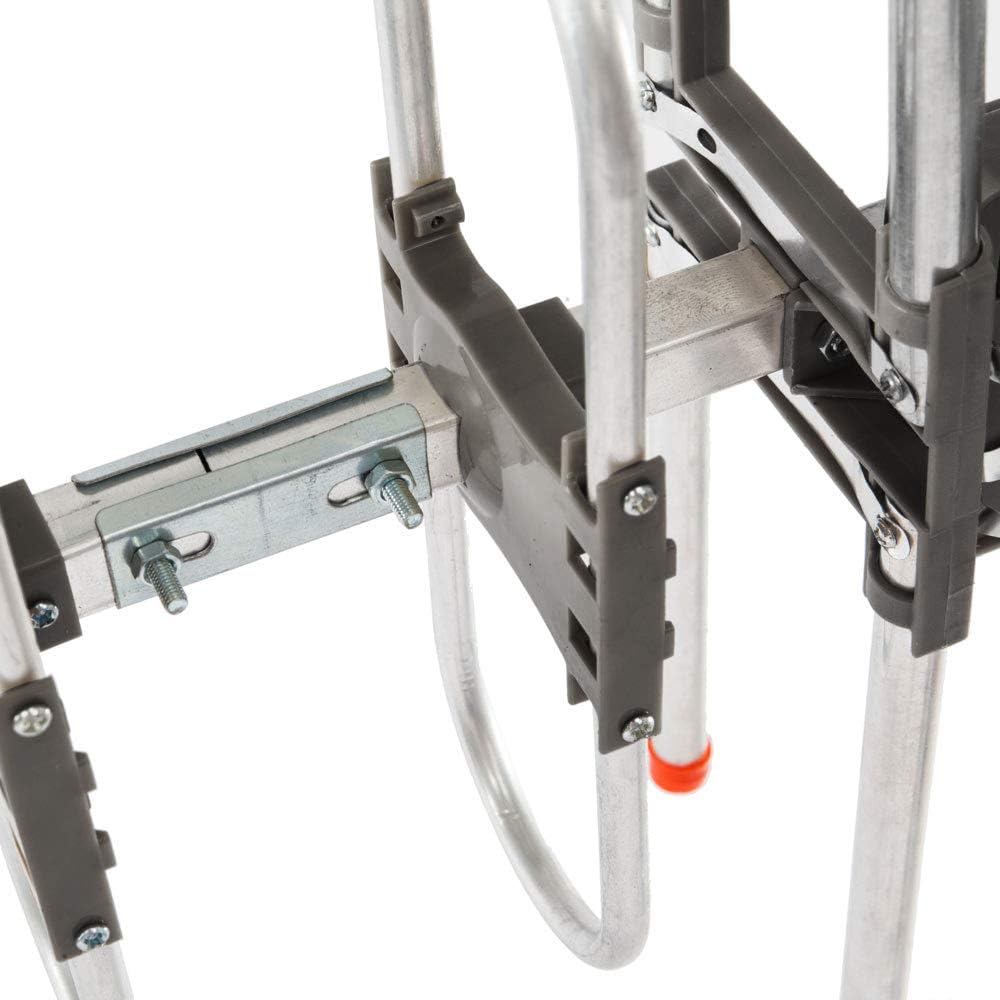
Image: Detail of antenna element attachment points.

Image: Connection point for the main antenna part.
6. Installation
Proper installation is crucial for optimal performance. Consider signal strength in your area and clear line of sight to broadcast towers.
- Mounting Location: Choose a high, unobstructed location for mounting the antenna, such as a roof or mast. Ensure the mounting surface is sturdy.
- Secure Mounting: Use the provided mounting bracket to securely attach the antenna to a mast (mast not included). Tighten all screws firmly to prevent movement in windy conditions.
- Connect Coaxial Cable: Connect a coaxial cable (not included) from the antenna's output to the "ANTENNA" input on the Power Supply Box.
- Connect to TV: Connect another coaxial cable from the "TV OUT" port on the Power Supply Box to the antenna input on your television or digital converter box.
- Power Connection: Plug the Power Supply Box into a standard AC110V electrical outlet.

Image: Detail of the antenna mounting bracket.

Image: Coaxial cable connections on the power supply box.
7. Operating Instructions
Once installed, operate your antenna using the remote control:
- Power On: Ensure the Power Supply Box is plugged in and the antenna is connected.
- Scan for Channels: Perform a channel scan on your television or digital converter box. Refer to your TV's manual for specific instructions.
- Rotate Antenna: Use the provided remote control to rotate the antenna 360°. Press the rotation buttons on the remote to adjust the antenna's direction. The antenna rotates at a speed of 2-4 rounds per minute.
- Optimize Signal: While performing a channel scan or viewing a channel, slowly rotate the antenna using the remote until you achieve the best possible signal strength and picture quality.
- Remote Control Range: The remote control operates effectively within a distance of approximately 5 meters (16 feet) from the Power Supply Box.

Image: Power supply box and remote control.
8. Maintenance
To ensure long-term performance of your antenna:
- Periodic Inspection: Regularly check the antenna and mounting hardware for any signs of wear, corrosion, or loosening, especially after severe weather.
- Cleaning: Gently clean the antenna elements with a soft cloth to remove dirt, dust, or debris that may accumulate and affect signal reception. Do not use harsh chemicals.
- Cable Check: Inspect coaxial cables for cracks, fraying, or damage. Replace damaged cables to maintain signal quality.
9. Troubleshooting
If you encounter issues with your antenna, refer to the following common problems and solutions:
- No Signal or Poor Picture Quality:
- Ensure all cable connections are secure.
- Verify the Power Supply Box is plugged in and powered on.
- Rotate the antenna using the remote control to find the optimal direction for broadcast towers.
- Perform a new channel scan on your TV.
- Check for obstructions (trees, buildings) blocking the line of sight to broadcast towers.
- Antenna Not Rotating:
- Check if the Power Supply Box is receiving power.
- Ensure the remote control has working batteries.
- Verify the remote control is within the 5-meter operating range of the Power Supply Box.
- Inspect the cable connecting the antenna to the Power Supply Box for damage.
- Remote Control Not Responding:
- Replace the batteries in the remote control.
- Ensure there are no obstructions between the remote and the Power Supply Box.
10. Warranty and Support
Specific warranty information for the Leadzm TA-101G antenna is not provided in this manual. For warranty claims, technical support, or further assistance, please contact Leadzm customer service directly or refer to the product packaging for contact details.