JORAIR 17132, 2225N, 2582N, 25821, 2519, 1785
JORAIR Replacement Multi-Surface Brush Rolls and Filters for Bissell CrossWave Vacuums
Instruction Manual
1. Introduction
This manual provides instructions for the installation, maintenance, and general use of JORAIR replacement multi-surface brush rolls and filters. These components are designed to maintain the performance of your compatible Bissell CrossWave vacuum cleaner.
2. Compatibility
The JORAIR replacement brush rolls and filters are compatible with the following Bissell CrossWave models:
- Bissell CrossWave 1785 Series: 1785G, 1785B, 1785F, 1785, 17853, 17854, 17855, 17856, 1785Q, 1785A, 17852, 17858, 17859, 1785P, 1785R, 1785T, 1785V, 1785W
- Bissell CrossWave 2300 Series: 2328, 2305, 2305K, 2303, 2306A, 2306, 23062, 23068
- Bissell CrossWave 2500 Series: 2551
- Bissell CrossWave 3888A
- Bissell CrossWave Multi-Surface Wet Dry Vacuum Cleaner models: 17132, 2225N, 2582N, 25821, 2519
Note: These replacements are NOT compatible with Bissell CrossWave Cordless Max series (2554, 2590, 2593, 2596), HydroSteam series, or HF3 models.
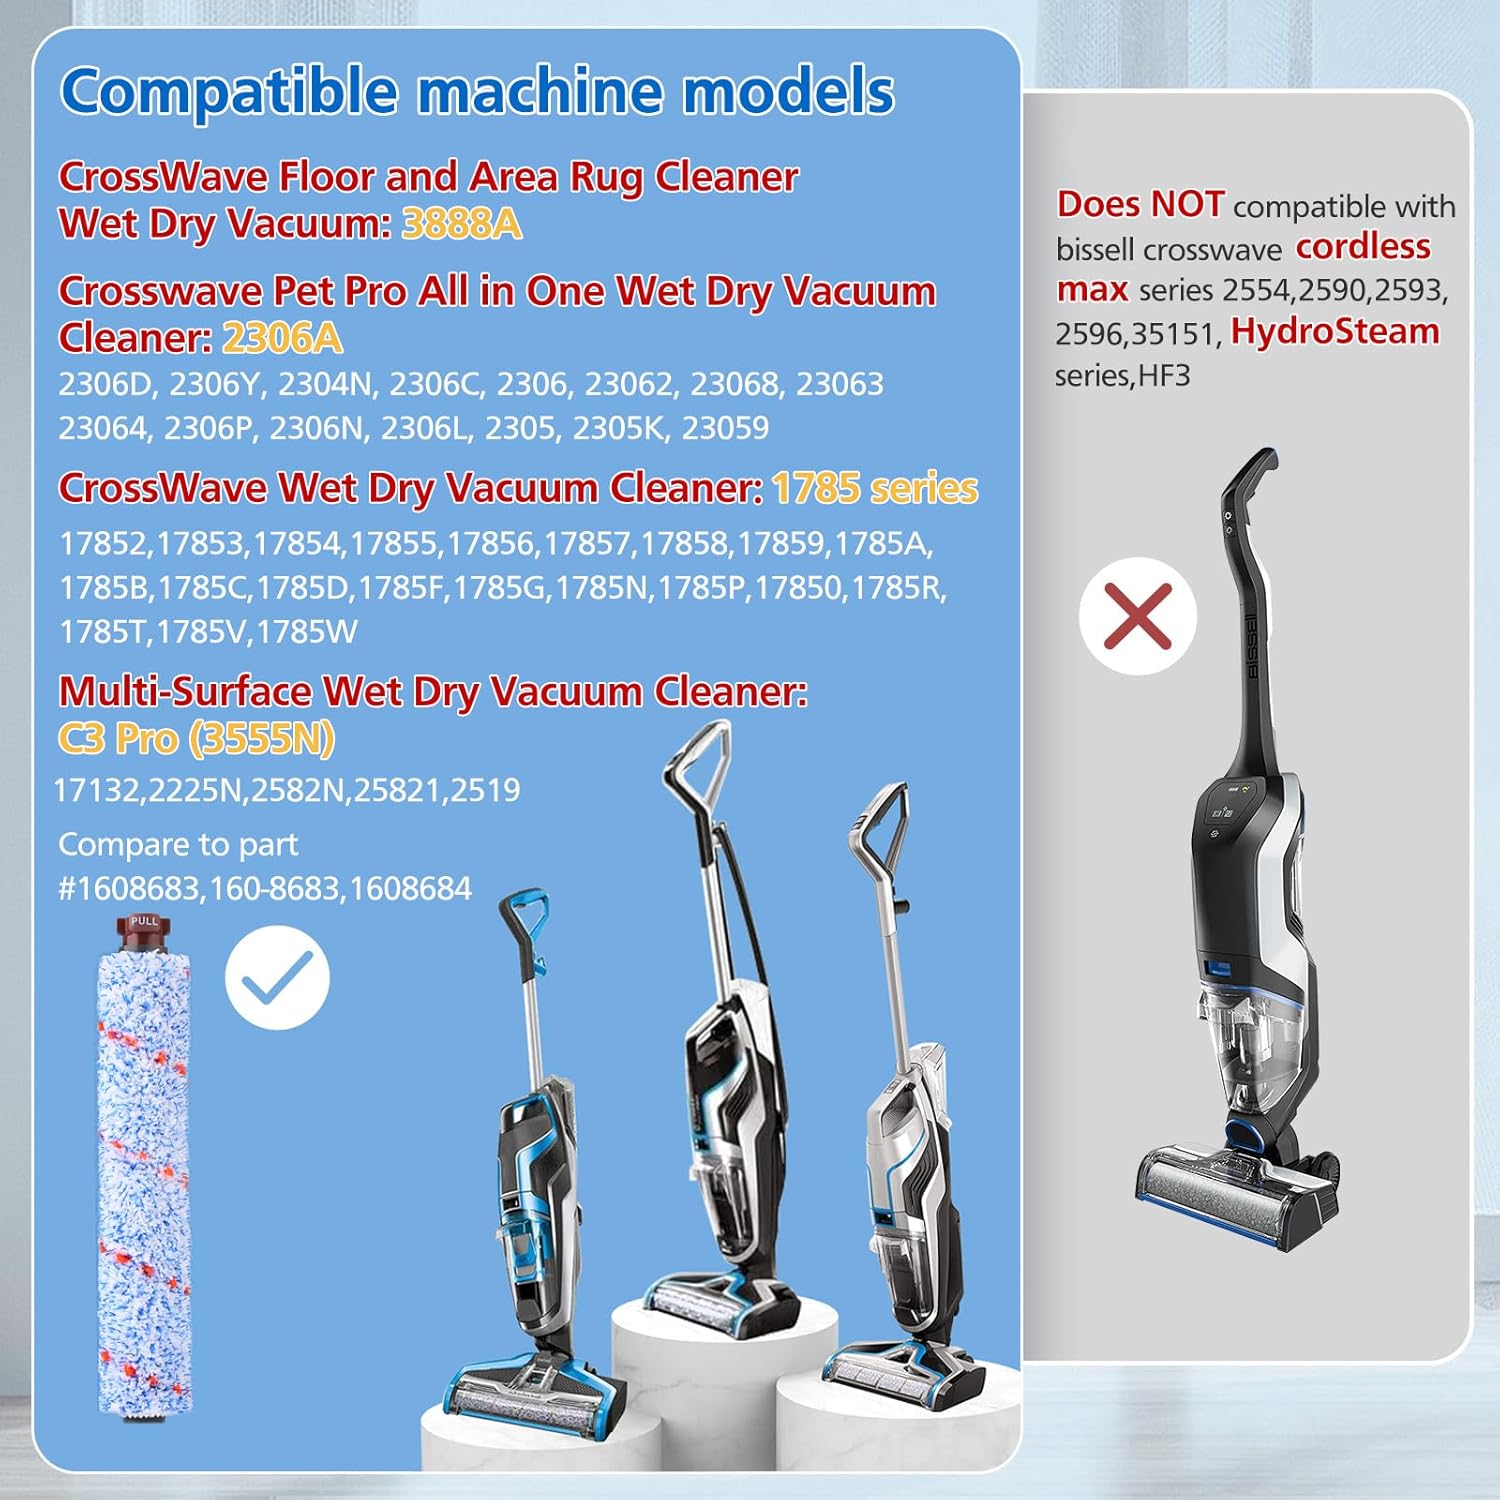
This image illustrates various compatible Bissell CrossWave vacuum models and explicitly marks models that are not compatible with these replacement parts.
3. Package Contents
Your package includes the following items:
- 3 x Multi-Surface Brush Rolls (Part 1868)
- 3 x Vacuum Filters (Part 1866)
- 1 x Cleaning Brush

The complete package contents, including brush rolls, filters, and a cleaning tool.
4. Installation Instructions
Follow these steps to replace the brush roll and filter in your Bissell CrossWave vacuum:
- Power Off and Unplug: Ensure your vacuum cleaner is turned off and unplugged from the power outlet before beginning any maintenance.
- Remove Dirty Water Tank: Press the button at the top of the dirty water tank and pull it out to remove.
- Access Brush Roll Area: Locate the brush roll window on the foot of the vacuum. Lift the tab to open the brush roll cover.
- Remove Old Brush Roll: Grasp the brush roll tab and pull it upwards to remove the old brush roll.
- Install New Brush Roll: Align the new JORAIR multi-surface brush roll with the brush roll foot. Ensure the end with the "PULL" tab is facing outwards. Push down firmly until it clicks into place.
- Close Brush Roll Cover: Close the brush roll cover, ensuring it is securely latched.
- Replace Filter: Open the filter compartment, remove the old filter, and insert the new JORAIR filter. Ensure it fits snugly.
- Reassemble: Reinsert the dirty water tank and ensure all components are securely in place before operating the vacuum.

Visual guide for brush roll removal and installation.
5. Maintenance
Regular maintenance of your JORAIR replacement parts ensures optimal performance and extends the life of your vacuum cleaner.
5.1. Brush Roll Cleaning
- After each use, remove the brush roll as described in the installation steps.
- Rinse the brush roll under running water to remove debris, hair, and dirt.
- Use the provided cleaning brush to remove any tangled hair or stubborn debris from the bristles and ends of the brush roll. The cleaning brush features a razor end for cutting tangled hair.
- Allow the brush roll to air dry completely before reinstalling it into the vacuum.
5.2. Filter Cleaning and Replacement
- Remove the filter from the vacuum.
- Tap the filter gently over a trash can to dislodge loose dirt and debris.
- Important: The filter should NOT be cleaned with water. Water can damage the filter material and reduce its effectiveness.
- For optimal performance, it is recommended to replace the vacuum filter every 2-3 months, or more frequently with heavy use.

The included cleaning brush assists in maintaining both the brush roll and filter.

Visual representation of cleaning the brush roll with water, and a reminder that the filter should remain dry.
6. Specifications
| Component | Description |
|---|---|
| Brush Roll Type | Multi-Surface (Part 1868) |
| Filter Type | Vacuum Filter (Part 1866) |
| Material (Brush Roll) | Polyester and premium PP (Polypropylene) |
| Material (Filter) | FSC-Certified paper and other filtration media |
| Filtration Efficiency | H12 grade HEPA filter, absorbs 99.97% of particles as small as 0.3 microns. |
| Brush Roll Dimensions | Approximately 10.1 inches (L) x 1.5 inches (Diameter) |
| Reusability | Brush rolls are reusable after cleaning; filters are disposable and should be replaced. |

Dimensions of the multi-surface brush roll.

Comparison of particulate matter sizes and the filter's absorption capability.
7. Troubleshooting
| Problem | Possible Cause | Solution |
|---|---|---|
| Reduced Suction | Clogged filter or brush roll. | Clean or replace the filter. Clean the brush roll thoroughly, removing any hair or debris. |
| Brush Roll Not Spinning | Hair or debris tangled around the brush roll. Incorrect installation. | Remove and clean the brush roll. Ensure it is correctly seated and clicked into place. |
| Unpleasant Odor | Dirty brush roll or filter. | Clean the brush roll and replace the filter. Ensure all parts are dry before reassembly. |
8. Warranty and Support
For any questions regarding the JORAIR replacement parts, please refer to the seller's return policy or contact JORAIR customer support through the platform where the purchase was made. Please note that specific warranty details for third-party replacement parts may vary.
For general information about JORAIR products, you may visit the JORAIR Store on Amazon.
Ask a question about this manual
Ask about setup, troubleshooting, compatibility, parts, safety, or missing instructions. Manuals+ will review the question and use this page’s manual context to help answer it.