SXDD B08ZKV8CWP
SXDD Electric Dog Fence System User Manual
Model: B08ZKV8CWP
For 1, 2, or 3 Dogs
1. Introduction
This manual provides detailed instructions for the installation, operation, and maintenance of your SXDD Electric Dog Fence System. This system is designed to create a safe and reliable containment area for your dog(s) using a buried or above-ground wire that transmits a harmless radio signal. When your dog approaches the boundary, the receiver collar will emit a warning tone, followed by a gentle static correction if the dog continues to advance. This encourages your dog to stay within the designated area.
Please read this manual thoroughly before setting up and using the system to ensure proper function and the safety of your pet.
2. Package Contents
Verify that all items listed below are included in your package:
- 1 x Indoor Wall-Mounted Transmitter
- 1 x Power Plug for Transmitter
- 1/2/3 x Adjustable Rechargeable Receiver Collar (Quantity depends on model purchased)
- 1 x USB Cable (for collar charging)
- 1 x 300m Boundary Wire
- 2 x Additional Metal Contact Points (longer set)
- 20 x Training Flags
- 1 x Test Bulb
- 2 x Mounting Screws for Transmitter

Image: All components of the SXDD Electric Dog Fence System, including the main transmitter unit, rechargeable receiver collars, boundary wire, power adapter, training flags, and contact points.
3. Safety Information
- This system is intended for use with dogs only. Do not use on aggressive dogs or dogs under 6 months old.
- Do not leave the receiver collar on your dog for more than 12 consecutive hours.
- Regularly check your dog's neck for signs of irritation or sores from the contact points. If irritation occurs, discontinue use until the skin heals.
- Ensure the collar is fitted correctly – snug enough for contact points to touch the skin, but loose enough for two fingers to fit underneath.
- Never attempt to repair or modify the system components yourself. Contact customer support for assistance.
- Keep the transmitter and power adapter away from water and extreme temperatures.
- This system is a training aid, not a foolproof barrier. Consistent training is crucial for effectiveness.
4. Setup Guide
4.1 Transmitter Installation
- Choose a dry, protected location for the transmitter, such as a garage or utility room, near a standard electrical outlet.
- Mount the transmitter to a wall using the provided screws. Ensure it is out of reach of children and pets.
- Plug the power adapter into the transmitter and then into a wall outlet. The power indicator light on the transmitter should illuminate.

Image: Detailed view of the transmitter unit, showing the power indicator, circuit break indicator, closed circuit indicator, ON/OFF and power adjustable knob, and wire input port.
- 1. Circuit Break Indicator: Illuminates when there is a break in the boundary wire.
- 2. Closed Circuit Indicator: Illuminates when the boundary wire forms a complete, unbroken loop.
- 3. Power Indicator: Shows the unit is powered on.
- 4. ON/OFF and Power Adjustable Knob: Controls the system's power and adjusts the field width (correction intensity/range).
- 5. Wire Input: Port for connecting the boundary wire.
4.2 Boundary Wire Installation
The boundary wire creates the containment area. It must form a continuous loop back to the transmitter. You can install it above ground or bury it.
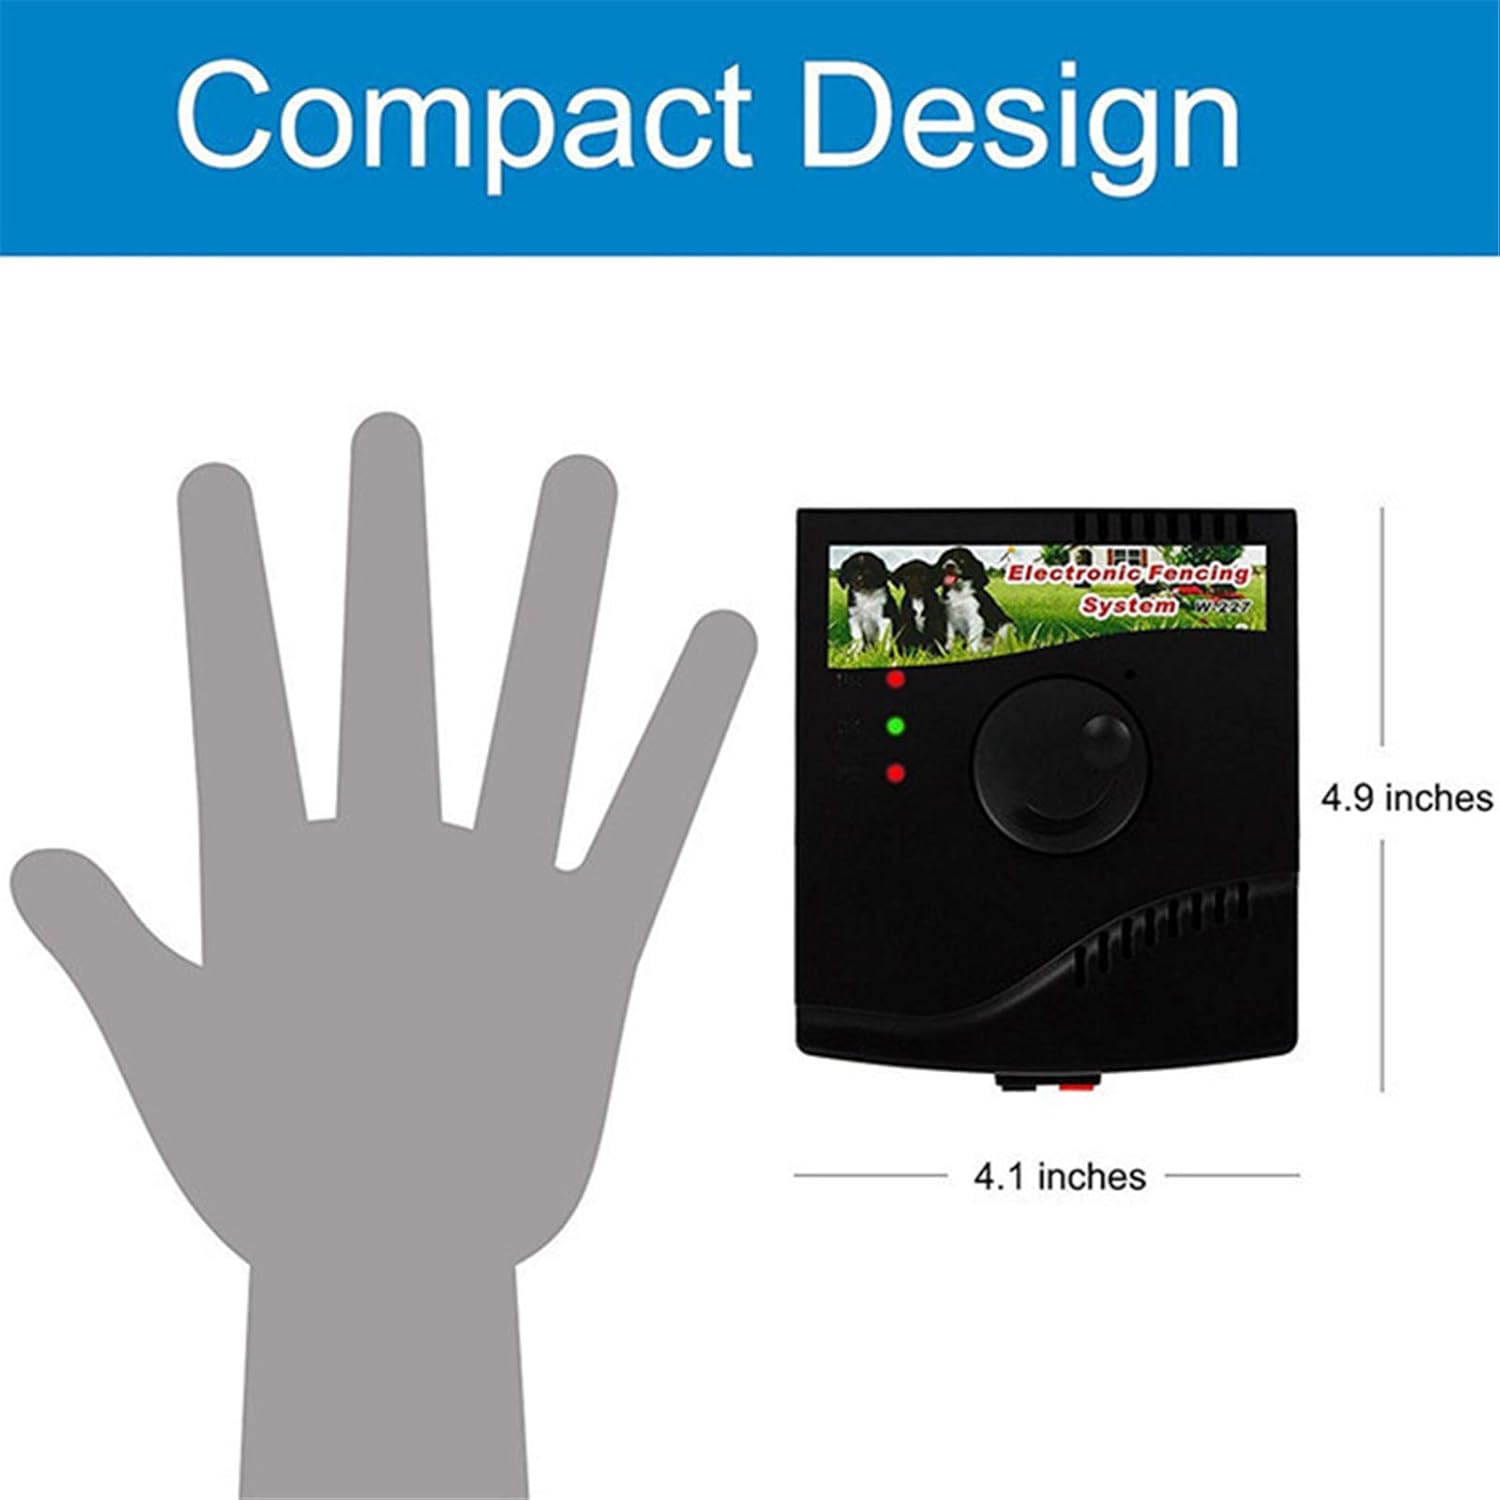
Image: Examples of customizable boundary layouts, including single loop, double loop, dual zone, and zone within zone configurations, illustrating how the wire can be adapted to different yard shapes.
4.2.1 Planning Your Layout
- Sketch your yard and desired containment area.
- Avoid sharp corners; use gentle curves.
- Ensure the wire does not cross itself, except when returning to the transmitter from an island or internal loop.
- Maintain a minimum distance of 5-10 feet between parallel wires to prevent signal cancellation.
4.2.2 Above-Ground Installation
- Lay the wire directly on the ground along your planned boundary.
- Secure the wire with landscape staples or by burying it shallowly in areas where it might be disturbed.
- This method is quicker but the wire is more susceptible to damage.
4.2.3 Underground Installation
- Dig a shallow trench (1-3 inches deep) along your planned boundary.
- Place the wire in the trench and cover it with soil.
- Use a spade or edger for easier trenching.
- Ensure the wire is not stretched too tightly to prevent breakage from ground movement.
4.2.4 Connecting the Wire to the Transmitter
- Strip about 1/2 inch of insulation from both ends of the boundary wire.
- Insert the stripped ends into the "Wire Input" terminals on the transmitter (labeled 5 in the diagram).
- Ensure a secure connection. The "Closed Circuit Indicator" (labeled 2) on the transmitter should illuminate, indicating a complete loop. If not, check for breaks in the wire or loose connections.
4.3 Receiver Collar Setup
4.3.1 Charging the Collar
- Before first use, fully charge the receiver collar(s) using the provided USB cable.
- A red light typically indicates charging, and a green light indicates a full charge.
4.3.2 Attaching Contact Points
- Select the appropriate length of metal contact points for your dog's coat length (shorter for short coats, longer for thick coats).
- Screw the contact points firmly onto the receiver collar.
4.3.3 Testing the Collar
- Hold the receiver collar near the boundary wire.
- The collar should emit a warning tone as it approaches the wire.
- If you continue to move the collar closer, it should activate the static correction. Use the test bulb by placing it over the contact points to visually confirm the static correction.

Image: Illustrates the concept of the dog fence system with two dogs in a yard, one wearing a collar that emits a signal, indicating the active containment area.
4.4 Training Flags Placement
- Place the training flags along the boundary wire, approximately 5-10 feet apart.
- These flags serve as a visual cue for your dog during the initial training phase, helping them identify the boundary.
5. Operating Instructions
5.1 Adjusting Field Width (Correction Range)
- The "ON/OFF and Power Adjustable Knob" (labeled 4 on the transmitter) controls the width of the warning zone.
- Turn the knob clockwise to increase the field width (larger warning zone) and counter-clockwise to decrease it.
- Test the range with the collar in hand to determine the appropriate setting for your yard and dog.
5.2 Dog Training Protocol
Effective training is essential for your dog to understand and respect the boundary. This process typically takes 1-2 weeks.
Phase 1: Introduction to the Boundary (1-3 days)
- With your dog on a leash, walk them around the perimeter of the boundary flags.
- When your dog approaches the flags and hears the warning tone, immediately pull them back into the safe zone and praise them.
- Do not allow your dog to receive a static correction during this phase. The goal is for them to associate the flags and tone with the boundary.
- Keep training sessions short (10-15 minutes) and positive.
Phase 2: Introducing Correction (3-5 days)
- Continue walking your dog on a leash near the boundary.
- Allow your dog to step into the warning zone to receive the tone and a mild static correction.
- Immediately pull them back into the safe zone, praise them, and offer a treat.
- Never scold or punish your dog for receiving a correction; this can create fear of the system or you.
- Repeat this process until your dog consistently stops at the warning tone.
Phase 3: Off-Leash Supervision (5-7 days)
- Once your dog reliably responds to the warning tone, begin supervised off-leash sessions within the containment area.
- Observe their behavior closely. If they approach the boundary, reinforce their understanding by calling them back or gently guiding them away.
- Gradually increase the duration of off-leash time.
Phase 4: Removing Flags and Continued Monitoring
- After your dog consistently respects the boundary for several days, you can gradually remove the training flags.
- Continue to monitor your dog, especially during the first few weeks after flag removal.
- Periodically test the system to ensure it is functioning correctly.
6. Maintenance
6.1 Collar Care and Charging
- Regularly clean the receiver collar and contact points with a damp cloth.
- Ensure the charging port cover is securely closed to maintain waterproofing.
- Charge the collar as needed. Battery life varies based on usage.
- The collar is waterproof, allowing your dog to swim. However, prolonged submersion or high-pressure water jets should be avoided.
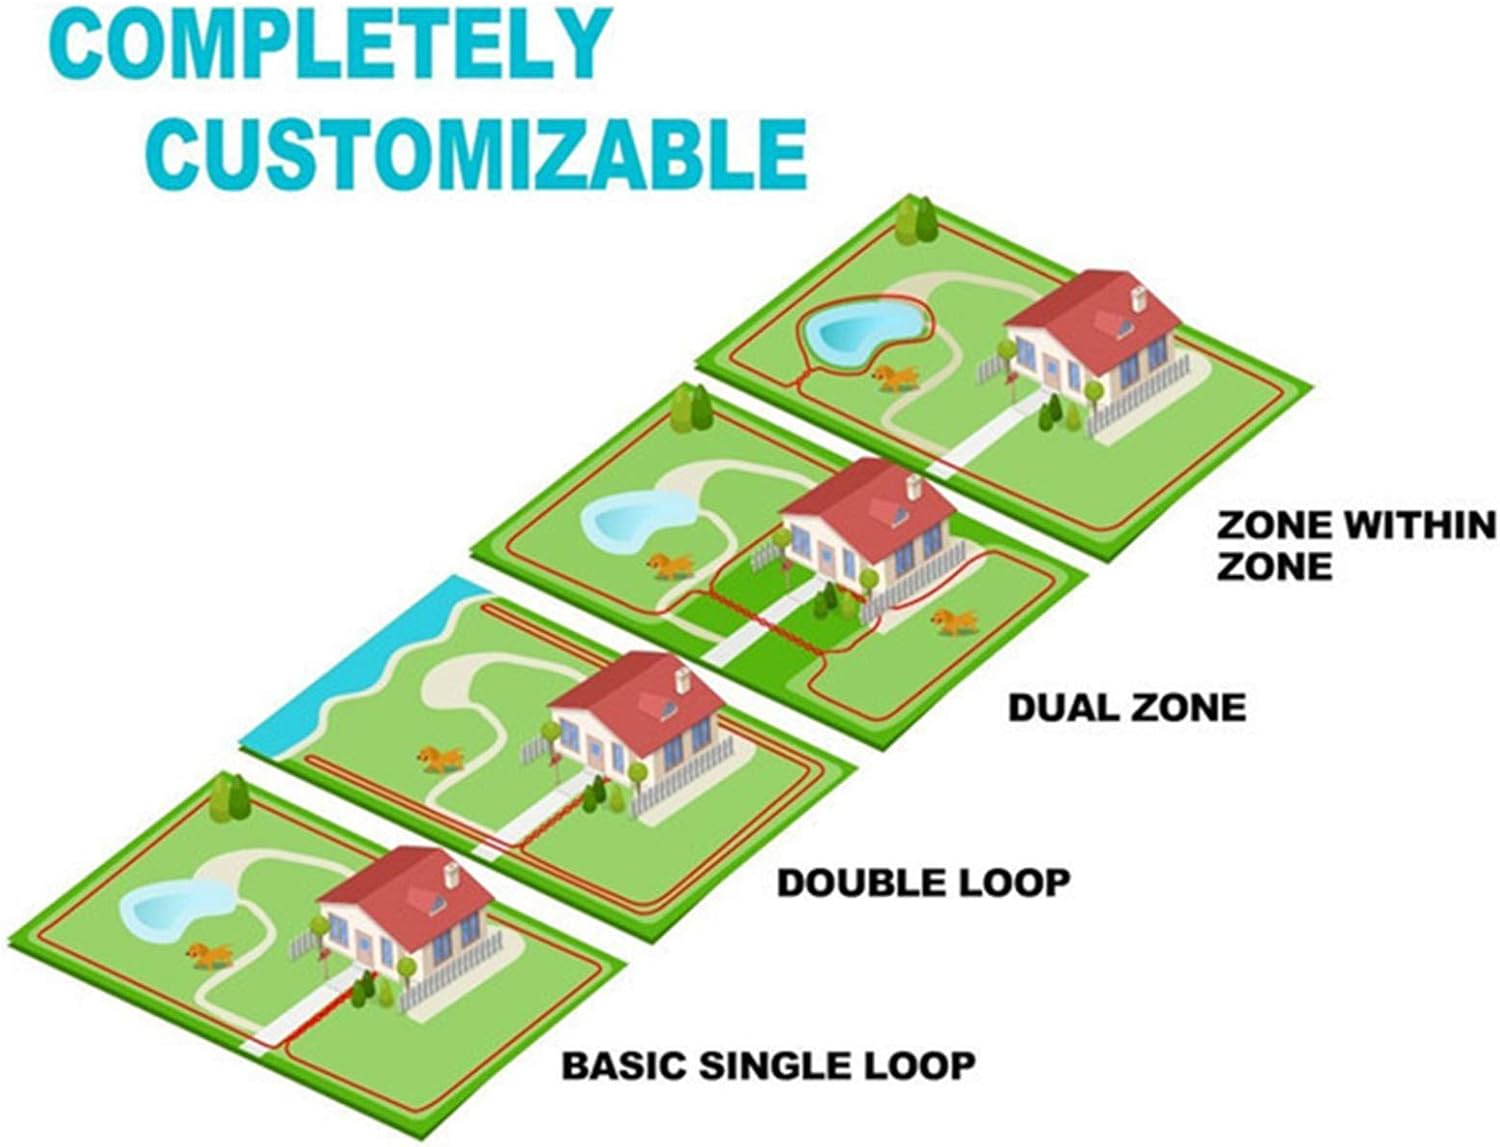
Image: Close-up of the waterproof receiver collar, demonstrating its ability to withstand water exposure, making it suitable for dogs who swim or play in wet conditions.
6.2 Boundary Wire Inspection
- Periodically inspect the boundary wire for any visible damage, especially if installed above ground.
- If the "Circuit Break Indicator" (labeled 1 on the transmitter) illuminates, it means there is a break in the wire. You will need to locate and repair the break.
- Use a wire repair kit (not included) or splice the wire using waterproof connectors.
7. Troubleshooting
| Problem | Possible Cause | Solution |
|---|---|---|
| Transmitter has no power. | Power adapter unplugged or faulty outlet. | Check power connections. Try a different outlet. |
| "Circuit Break Indicator" is on. | Break in the boundary wire. | Inspect the entire wire for breaks. Repair any damaged sections. Ensure wire ends are securely connected to the transmitter. |
| Collar not correcting or beeping. | Collar battery low/dead, not turned on, contact points not touching skin, or too far from boundary. | Charge the collar. Ensure collar is powered on. Adjust collar fit and contact points. Increase field width on transmitter. |
| Dog crosses the boundary. | Insufficient training, field width too narrow, or dog is highly motivated. | Re-evaluate training protocol. Increase field width. Ensure collar is working correctly. Consider professional training assistance if needed. |
| Correction is inconsistent. | Loose contact points, dirty contact points, or interference. | Tighten and clean contact points. Ensure collar is snug. Check for large metal objects or electrical lines near the boundary that could cause interference. |
8. Specifications
- Brand: SXDD
- Model: B08ZKV8CWP (for 3 dogs)
- Maximum Coverage Area: Up to 1.2 acres (5,000 square meters) with 300m wire.
- Receiver Collar: Rechargeable, Waterproof
- Batteries: 1 Lithium Ion battery required (included in collar)
- Transmitter Dimensions: Approximately 4.1 x 4.9 inches (Compact Design)
- Item Weight: 2.14 pounds (total package)
- Wire Length: 300 meters (approx. 984 feet)

Image: The compact transmitter unit shown next to a human hand, illustrating its small size for easy placement.
9. Warranty and Support
For warranty information, please refer to the documentation included with your product packaging or contact the manufacturer directly. If you encounter any issues or have questions regarding your SXDD Electric Dog Fence System, please reach out to SXDD customer support through their official website or the retailer where the product was purchased.