Kadio KD-white
Kadio Poeroa Digital Alarm Clock (Model KD-white) Instruction Manual
Your guide to setting up and using your digital alarm clock.
1. Introduction
Thank you for purchasing the Kadio Poeroa Digital Alarm Clock. This battery-operated clock features a clear LCD display, date and indoor temperature functions, a smart night light, and a snooze function. This manual provides detailed instructions for setup, operation, and maintenance to ensure optimal performance.
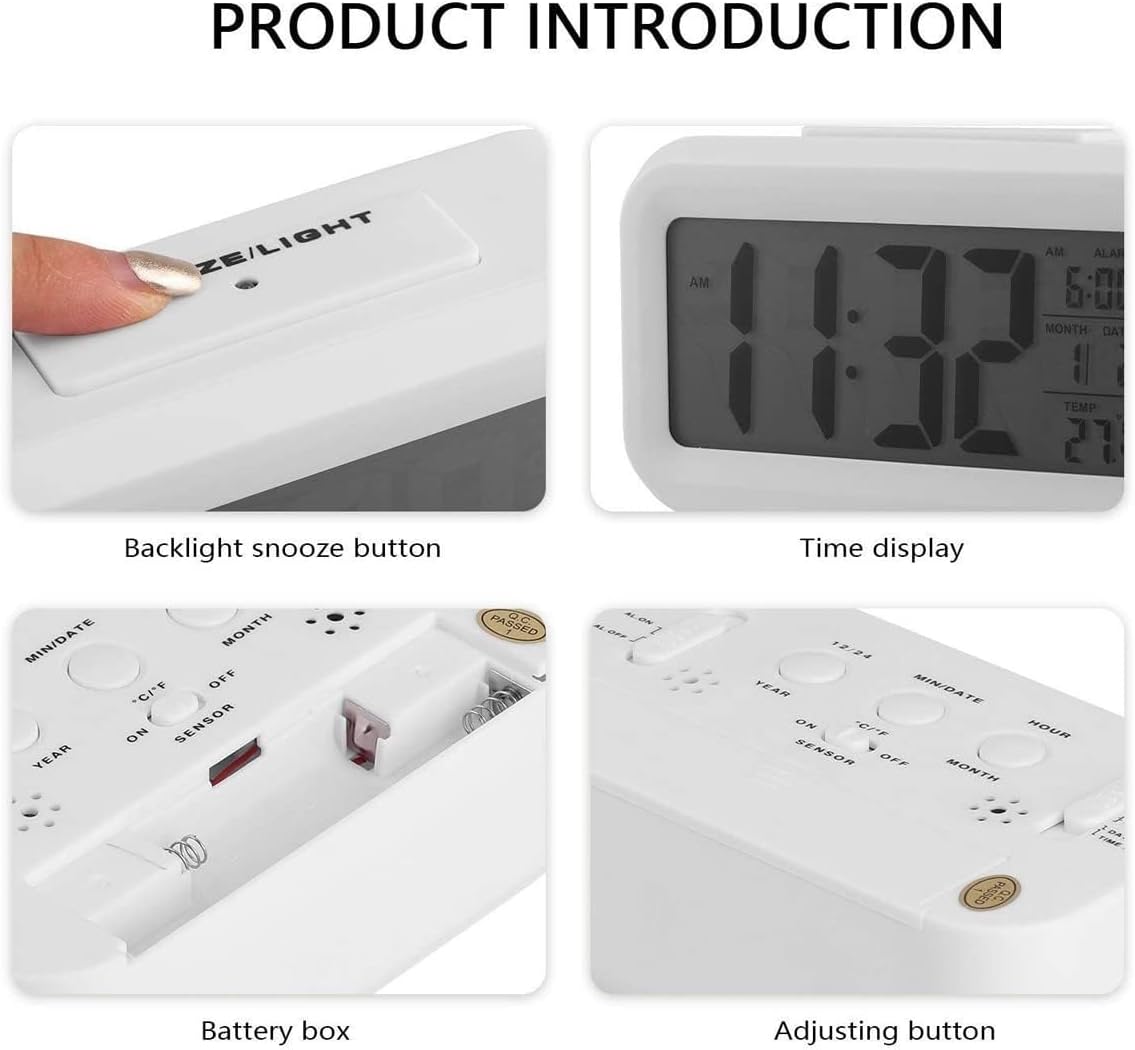
Image 1.1: Front view of the Poeroa Digital Alarm Clock, displaying time, alarm, date, and temperature.
2. Product Overview
Familiarize yourself with the components and controls of your alarm clock.

Image 2.1: Rear view of the alarm clock showing control buttons and battery compartment.
Controls and Display:
- SNOOZE/LIGHT Button: Located on top. Activates backlight for 5 seconds; functions as snooze button when alarm sounds.
- MIN/DATE Button: Adjusts minutes, switches between date and temperature display, and toggles °C/°F.
- HOUR/MONTH Button: Adjusts hours, switches between month and day display.
- YEAR/12/24 Button: Adjusts year, switches between 12-hour and 24-hour time format.
- AL. ON/OFF Switch: Toggles the alarm function on or off.
- SENSOR ON/OFF Switch: Activates or deactivates the smart night light sensor.
- LOCK/AL.SET/DATE SET/TIME SET Switch: Mode selector for setting time, date, and alarm.
- Battery Compartment: Located on the back, requires 3 AAA batteries.
3. Setup
3.1 Battery Installation
- Open the battery compartment cover on the back of the clock.
- Insert 3 new AAA batteries, ensuring correct polarity (+/-).
- Close the battery compartment cover securely.
Video 3.1: This video demonstrates the unboxing and battery installation process for the Poeroa Digital Alarm Clock. It shows how to open the battery compartment and insert 3 AAA batteries.
Note: Batteries are not included with the alarm clock. Use high-quality AAA batteries for optimal performance.
4. Operating Instructions
4.1 Setting Time
- Slide the mode selector switch on the back to TIME SET.
- Press the HOUR/MONTH button to adjust the hour.
- Press the MIN/DATE button to adjust the minute.
- To switch between 12-hour (AM/PM) and 24-hour format, press the YEAR/12/24 button.
- Once the time is set, slide the mode selector switch back to LOCK to save.

Image 4.1: The 12/24H button allows switching between time formats.
4.2 Setting Date
- Slide the mode selector switch on the back to DATE SET.
- Press the YEAR/12/24 button to adjust the year.
- Press the HOUR/MONTH button to adjust the month.
- Press the MIN/DATE button to adjust the day.
- Once the date is set, slide the mode selector switch back to LOCK to save.

Image 4.2: The alarm clock display showing the current date.
4.3 Setting Alarm
- Slide the mode selector switch on the back to AL.SET.
- Press the HOUR/MONTH button to adjust the alarm hour.
- Press the MIN/DATE button to adjust the alarm minute.
- Once the alarm time is set, slide the mode selector switch back to LOCK.
- To activate the alarm, slide the AL. ON/OFF switch to AL. ON. An alarm icon will appear on the display.
- To deactivate the alarm, slide the AL. ON/OFF switch to AL. OFF. The alarm icon will disappear.

Image 4.3: The alarm clock showing the set alarm time.
4.4 Snooze Function
When the alarm sounds, press the large SNOOZE/LIGHT button on top of the clock. The alarm will pause for 5 minutes and then sound again. To turn off the alarm completely, press any other button on the clock.

Image 4.4: A hand pressing the top SNOOZE/LIGHT button to activate the snooze function or backlight.
4.5 Temperature Display (°C/°F Mode)
The clock displays the indoor temperature. To switch between Celsius (°C) and Fahrenheit (°F), press the MIN/DATE button while in normal time display mode.

Image 4.5: The temperature display on the clock, with an indicator for the °C/°F button.
4.6 Night Light Function
- Smart Night Light: Slide the SENSOR ON/OFF switch to ON. The clock will automatically emit a soft backlight in dark environments for easy reading.
- Manual Night Light: When the sensor is off, manually press the SNOOZE/LIGHT button on top to illuminate the screen for 5 seconds.

Image 4.6: Comparison showing the display with the night light off and with the night light activated.
5. Maintenance
5.1 Battery Replacement
When the display becomes dim or the clock functions irregularly, it is time to replace the batteries. Follow the battery installation steps in Section 3.1. Always replace all 3 AAA batteries at the same time with new ones.
5.2 Cleaning
Wipe the clock with a soft, dry cloth. Do not use abrasive cleaners or solvents, as these may damage the casing or display.
6. Troubleshooting
| Problem | Solution |
|---|---|
| Clock display is dim or blank. | Replace all 3 AAA batteries with new ones. Ensure correct polarity. |
| Alarm does not sound. | Check if the AL. ON/OFF switch is set to AL. ON. Verify the alarm time is set correctly. |
| Night light is not working automatically. | Ensure the SENSOR ON/OFF switch is set to ON. The sensor requires a dark environment to activate. |
| Incorrect time or date displayed. | Refer to Sections 4.1 and 4.2 to reset the time and date. Ensure the mode selector switch is returned to LOCK after setting. |
7. Specifications
| Feature | Detail |
|---|---|
| Brand | Kadio |
| Model Number | KD-white |
| Display Type | Digital LCD |
| Power Source | 3 x AAA Batteries (not included) |
| Product Dimensions | 5.4"W x 3.11"H |
| Item Weight | 4.6 ounces |
| Functions | Time, Date, Alarm, Snooze, Indoor Temperature (°C/°F), Smart Night Light |
| Material | Plastic |
8. Warranty and Support
This product comes with a manufacturer's warranty. For specific warranty details or technical support, please refer to the contact information provided with your purchase or visit the official Kadio website.
Related Documents - KD-white
 |
Product Catalog - Measuring Instruments A comprehensive catalog of various measuring instruments including alcohol testers, sensors, air quality meters, laser distance meters, temperature and humidity meters, timers, lux meters, sound level meters, anemometers, tachometers, vernier calipers, micrometers, refractometers, binoculars, data loggers, thermal cameras, weighing scales, metal detectors, moisture meters, magnifying glasses, thickness gauges, voltage testers, telescopes, electrical testing equipment, and non-electrical testing equipment. |
 |
Katio Kadio Pet Grooming Kit User Manual - Comprehensive Guide Detailed user manual for the Katio Kadio Pet Grooming Kit, including operation instructions, safety guidelines, maintenance, troubleshooting, and specifications for the electric clipper and vacuum. |
Ask a question about this manual
Ask about setup, troubleshooting, compatibility, parts, safety, or missing instructions. Manuals+ will review the question and use this page’s manual context to help answer it.