
Introduction
This manual provides detailed instructions for the installation, operation, and maintenance of your Nemesis Audio NA-1KD Monoblock Car Stereo Amplifier. Please read this manual thoroughly before attempting installation or operation to ensure proper use and to prevent damage to the unit or your vehicle's audio system. Keep this manual for future reference.
Safety Information
Always observe the following safety precautions during installation and operation:
- Disconnect the vehicle's negative battery terminal before starting any electrical work to prevent short circuits.
- Ensure all wiring is properly routed and secured to prevent pinching or damage.
- Use appropriate gauge wiring for power and ground connections as specified in this manual to avoid overheating and potential fire hazards.
- Install the amplifier in a location that allows for adequate ventilation to prevent overheating.
- Avoid installing the amplifier in areas exposed to moisture or excessive vibration.
- Consult a professional car audio installer if you are unsure about any part of the installation process.
Setup and Installation
Proper installation is crucial for optimal performance and safety. Follow these steps carefully.
1. Unpacking and Inspection
Carefully remove the amplifier from its packaging. Inspect the unit for any signs of damage that may have occurred during shipping. Retain the packaging for future use or in case of return.
Package Contents:
- Nemesis Audio NA-1KD Monoblock Amplifier
- User Manual (this document)
- Mounting hardware (screws)
- Remote bass control knob (if included)
2. Mounting the Amplifier
Choose a mounting location that is dry, well-ventilated, and secure. Common locations include under a seat, in the trunk, or behind a panel. Ensure the amplifier is mounted firmly to prevent movement during vehicle operation.
- Place the amplifier in the desired mounting location and mark the screw holes.
- Drill pilot holes if necessary, being careful not to damage any vehicle wiring or components.
- Secure the amplifier using the provided mounting screws.
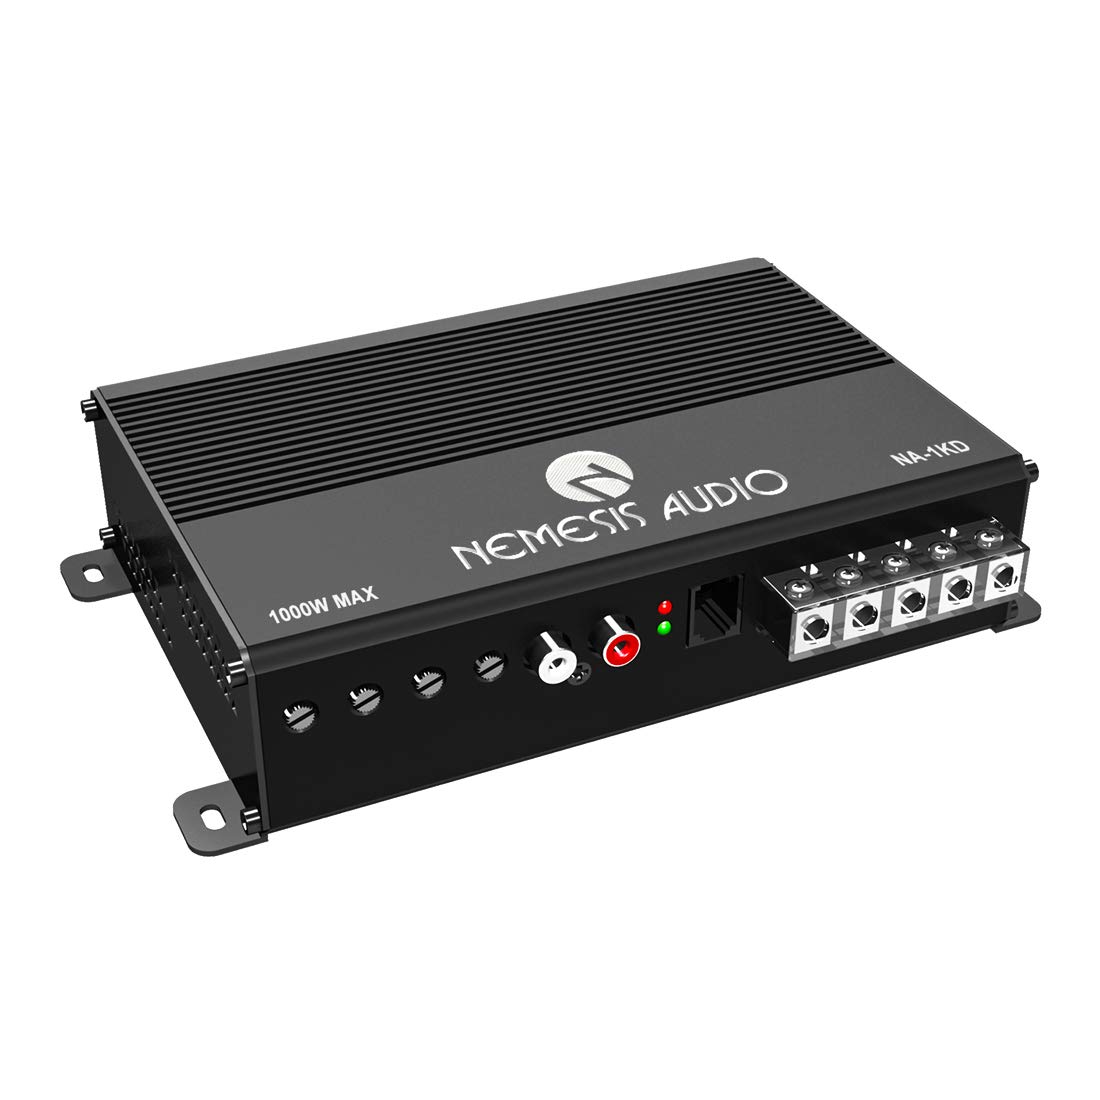
Image: Nemesis Audio NA-1KD Monoblock Car Stereo Amplifier. This image shows the overall design and connection terminals of the amplifier.
3. Wiring Connections
All wiring should be done with the vehicle's battery disconnected. Use high-quality wiring for all connections.
- Power (B+): Connect a heavy gauge power cable (e.g., 4 AWG or 8 AWG depending on power requirements) directly from the positive terminal of the vehicle's battery to the B+ terminal on the amplifier. Install an in-line fuse holder (rated appropriately for the amplifier's maximum current draw) within 18 inches of the battery.
- Ground (GND): Connect a heavy gauge ground cable of the same size as the power cable from the GND terminal on the amplifier to a clean, unpainted metal surface on the vehicle chassis. Ensure a good electrical connection.
- Remote (REM): Connect a smaller gauge wire (e.g., 18 AWG) from the REM terminal on the amplifier to the remote turn-on output of your head unit. This wire turns the amplifier on and off with your head unit.
- RCA Input: Connect RCA cables from the pre-out (subwoofer output) of your head unit to the RCA input jacks on the amplifier.
- Speaker Output: Connect your subwoofer speaker wires to the speaker output terminals on the amplifier. Ensure correct polarity (+ to + and - to -). The NA-1KD is a monoblock amplifier designed for a single subwoofer or multiple subwoofers wired to a 1 Ohm minimum stable load.
- Remote Bass Control (Optional): If your amplifier came with a remote bass control knob, connect it to the designated port on the amplifier.
4. Initial Power-Up
Once all connections are secure, reconnect the vehicle's negative battery terminal. Turn on your head unit. The amplifier's power indicator light should illuminate, indicating it is receiving power and has turned on.
Operating the Amplifier
Adjust the amplifier settings for optimal sound performance.
1. Controls and Adjustments
- Input Level (Gain): This control matches the amplifier's input sensitivity to the output voltage of your head unit. Start with the gain set to minimum. Play a familiar track at about 75% of your head unit's maximum volume. Slowly increase the amplifier's gain until you hear distortion, then back it off slightly. Do not use the gain control as a volume knob.
- Low Pass Filter (LPF): (Range: 50Hz – 250Hz) This filter allows frequencies below the set point to pass through to the subwoofer. Adjust this to blend the subwoofer's output with your main speakers. A common starting point is 80Hz.
- Subsonic Filter: (Range: 10Hz – 50Hz) This filter removes extremely low frequencies that are inaudible and can cause your subwoofer to over-excurt, potentially damaging it. Set this typically around 20Hz-30Hz, slightly below your LPF setting.
- Bass Boost Frequency: (Range: 40Hz – 100Hz) This selects the center frequency for the bass boost.
- Bass Boost Level: (Range: 0-15dB) This increases the output at the selected bass boost frequency. Use sparingly to avoid distortion and potential speaker damage.
2. Audio Source Connection
Ensure your head unit's subwoofer output settings (if available) are configured correctly to send a full-range or low-pass signal to the amplifier.
Maintenance
Regular maintenance helps ensure the longevity and performance of your amplifier.
- Cleaning: Periodically wipe the amplifier's exterior with a soft, dry cloth to remove dust and dirt. Do not use harsh chemicals or abrasive cleaners.
- Inspection: Annually inspect all wiring connections to ensure they are secure and free from corrosion. Check for any signs of wear or damage to cables.
- Ventilation: Ensure that the amplifier's cooling fins are not obstructed by debris or other objects to maintain proper airflow and prevent overheating.
Troubleshooting
If you experience issues with your amplifier, refer to the following common problems and solutions:
| Problem | Possible Cause | Solution |
|---|---|---|
| No Power / Amplifier does not turn on |
|
|
| No Sound Output |
|
|
| Distorted Sound |
|
|
| Amplifier Overheating / Protection Mode |
|
|
Specifications
The following are the technical specifications for the Nemesis Audio NA-1KD amplifier:
| Feature | Specification |
|---|---|
| RMS Power @ 4 Ohm | 200W |
| MAX Power @ 4 Ohm | 400W |
| RMS Power @ 2 Ohm | 375W |
| MAX Power @ 2 Ohm | 750W |
| RMS Power @ 1 Ohm | 575W |
| MAX Power @ 1 Ohm | 1150W |
| Input Level | 0.2V – 5V |
| Frequency Response | 15Hz – 250Hz |
| Low Pass Filter (LPF) | 50Hz – 250Hz |
| Subsonic Filter | 10Hz – 50Hz |
| Bass Boost Frequency | 40Hz – 100Hz |
| Bass Boost Level | 0-15dB |
| THD at 4 Ohm load 30% Rated Power | <0.2% |
| Signal to Noise Ratio | >80dB |
| Best Efficiency | >85% |
| Minimum Load | 1 Ohm |
| Number of Channels | 1 |
| Product Dimensions (L x W x H) | 9 x 3 x 7 inches |
| Minimum Supply Voltage | 12 Volts |
| Maximum Supply Voltage | 5 Volts (DC) |
| Mounting Type | Surface Mount |
Warranty Information
Specific warranty details for the Nemesis Audio NA-1KD amplifier are typically provided with the product at the time of purchase or can be found on the official Nemesis Audio website. Please refer to these resources for information regarding warranty duration, coverage, and claims procedures.
Customer Support
For technical assistance, troubleshooting beyond this manual, or general inquiries, please visit the official Nemesis Audio website or contact their customer support directly. Contact information and support resources are usually available on the manufacturer's website.