1. Introduction
This manual provides detailed instructions for the installation, operation, and maintenance of your Evertech 8 Channel H.265 Hybrid Digital Video Recorder (DVR) security system. Please read this manual thoroughly before using the product to ensure proper setup and functionality.
The Evertech 8 Channel DVR is designed to provide a comprehensive security solution, supporting up to eight cameras with H.265 video compression for efficient storage. It is compatible with various camera types including TVI, AHD, CVI, and traditional analog cameras up to 2.4MP resolution.
2. Package Contents
Verify that all items listed below are included in your package. If any items are missing or damaged, please contact customer support.
- 8 Channel DVR Unit (with 4TB Hard Drive installed)
- Power Supply Adapter
- USB Mouse
- CD for PC Software and Video Instructions

Figure 2.1: Package Contents. Includes the DVR unit with a 4TB hard drive, a power supply adapter, a USB mouse, and a CD containing PC software and video instructions.
3. Camera Compatibility
The Evertech DVR is designed for broad compatibility with various security camera technologies. Please review the compatibility information below to ensure your cameras are supported.
- Compatible: 1080P, 960P, 720P TVI, AHD, CVI, and Traditional Analog Cameras.
- Not Compatible: HD-SDI cameras and cameras with resolutions over 2.4MP.

Figure 3.1: DVR Camera Compatibility. This image shows that the DVR is compatible with AHD, TVI, CVI, and Analog cameras up to 2.4MP resolution. It is not compatible with SDI, 3MP, 4MP, or 5MP security cameras.
4. Setup and Connections
Follow these steps to properly connect your DVR system.
- Connect Cameras: Connect your security cameras to the BNC video input ports on the back of the DVR.
- Connect Audio (Optional): If using microphones, connect them to the audio input (MIC) port. Connect speakers to the audio output port.
- Connect Monitor: Connect a monitor to the DVR using either the HDMI or VGA port.
- Connect USB Mouse: Plug the included USB mouse into one of the USB ports for navigation.
- Connect Network (Optional): For remote viewing and network features, connect an Ethernet cable from your router to the LAN port on the DVR.
- Connect Power: Plug the power adapter into the DVR's DC 12V power input, then plug the adapter into a power outlet. The DVR will power on automatically.

Figure 4.1: DVR Connections. This diagram illustrates the various ports on the back of the DVR, including video inputs for cameras, audio input (MIC), audio output, HDMI and VGA for monitors, LAN for network connection, USB ports for mouse/backup, and the power adapter input.
5. Operating Instructions
5.1 Recording Modes
The DVR supports several recording modes to suit your security needs:
- Continuous Recording: Records constantly without interruption.
- Manual Recording: Initiated and stopped manually by the user.
- Motion Detection Recording: Records only when motion is detected by the cameras.
- Schedule Recording: Records according to a pre-set schedule.
Refer to the included CD for detailed instructions on configuring these recording modes via the DVR's interface.
5.2 Remote Viewing
You can view live and recorded video remotely on various devices. This feature requires the DVR to be connected to your network via the LAN port.
- Smartphone/Tablet: Download the free application (available for iOS and Android) to access your security cameras.
- PC: Use a web browser or the provided CMS Client Software on your computer to access the system.

Figure 5.1: Remote Viewing. This image demonstrates how live video or playback can be viewed remotely on smartphones, tablets, and personal computers.
5.3 Motion Detection and Email Alerts
Configure motion detection settings to receive email alerts when unexpected motion is detected. This feature helps you stay informed of security events.
5.4 USB Backup
Video files can be transferred to external storage media via the USB port for backup purposes.
6. Maintenance
Regular maintenance ensures the longevity and optimal performance of your DVR system.
- Cleaning: Keep the DVR unit clean and free from dust. Use a soft, dry cloth for cleaning. Do not use liquid cleaners directly on the unit.
- Ventilation: Ensure the DVR is placed in a well-ventilated area to prevent overheating. Do not block ventilation openings.
- Firmware Updates: Periodically check the Evertech website for firmware updates to ensure your system has the latest features and security patches.
- Hard Drive Management: The 4TB hard drive provides ample storage. Regularly review and back up important footage. The DVR will typically overwrite the oldest footage when the hard drive is full, depending on your settings.
7. Troubleshooting
If you encounter issues with your DVR system, refer to the following common troubleshooting tips:
- No Video Display:
- Check all video cable connections (BNC, HDMI, VGA).
- Ensure the monitor is powered on and set to the correct input source.
- Verify cameras are powered and functioning.
- No Recording:
- Check recording schedule and settings.
- Ensure the hard drive is properly installed and recognized by the DVR.
- Verify motion detection settings if using motion-activated recording.
- Remote Access Issues:
- Ensure the DVR is connected to the internet via the LAN port.
- Check network settings on the DVR and your router.
- Verify correct port forwarding settings on your router if applicable.
- Ensure the mobile app or CMS software is up to date.
- System Freezing/Unresponsive:
- Restart the DVR by disconnecting and reconnecting the power.
- Ensure adequate ventilation to prevent overheating.
For further assistance, please contact Evertech technical support.
8. Specifications
| Feature | Specification |
|---|---|
| Brand | Evertech |
| Number of Channels | 8 |
| Video Compression | H.265 |
| Hard Disk Size | 4 TB (4000 GB) |
| Connectivity Technology | USB, Ethernet (LAN) |
| Compatible Camera Types | TVI, AHD, CVI, Analog (up to 2.4MP) |
| Dimensions (Approx.) | 10" (Width) x 8.4" (Depth) x 1.6" (Height) |
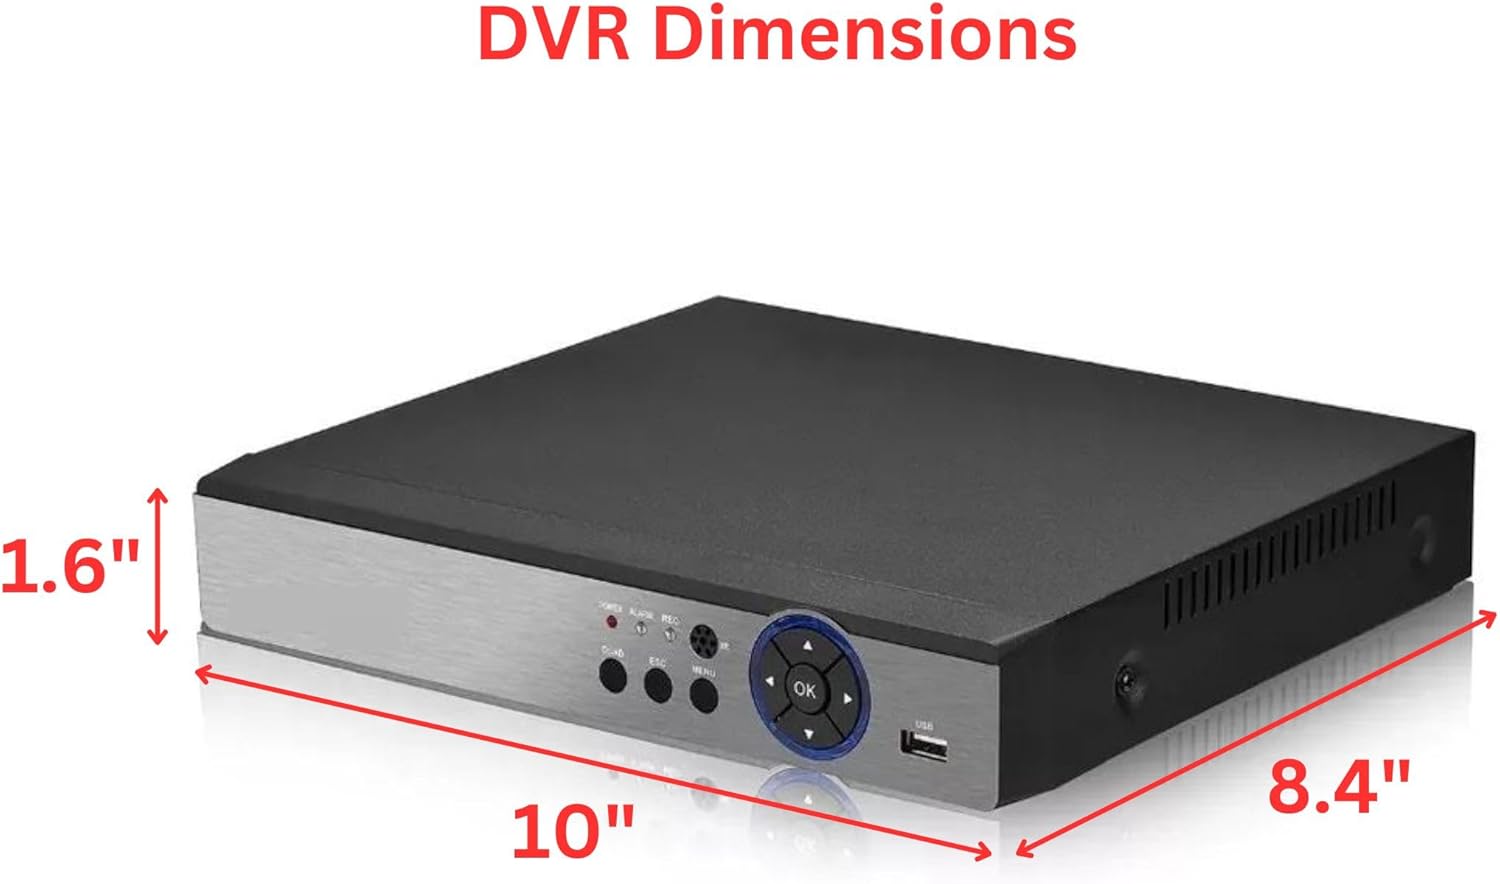
Figure 8.1: DVR Dimensions. The DVR measures approximately 10 inches in width, 8.4 inches in depth, and 1.6 inches in height.
9. Warranty and Support
Your Evertech DVR comes with a One Year Warranty from the date of purchase.
For any questions, technical assistance, or warranty claims, please contact Evertech customer support. Free technical support is available to assist you with setup, troubleshooting, and general inquiries.
Contact information can typically be found on the Evertech website or on the product packaging.