1. Introduction
This manual provides essential instructions for the safe and effective use of your OUBO Strong 210 Electric Nail Drill Machine. Please read this manual thoroughly before operation and retain it for future reference. This device is designed for professional and personal manicure and pedicure applications, including carving, engraving, routing, grinding, sharpening, sanding, and polishing of various nail types.
2. Safety Information
Important Safety Precautions:
- Always wear safety glasses when using the nail drill.
- Keep hands and other body parts away from the rotating bit during operation.
- Do not use the device on excessively hard materials.
- Store the nail drill in a cool, dry place when not in use.
- Ensure the power box is placed on a stable surface to prevent accidental movement.
- Before connecting the power, verify that the voltage selection switch matches your local power supply (110V or 220V). Incorrect voltage selection can damage the unit.
3. Package Contents
Carefully unpack your OUBO Strong 210 Electric Nail Drill Machine and ensure all items listed below are present and undamaged.
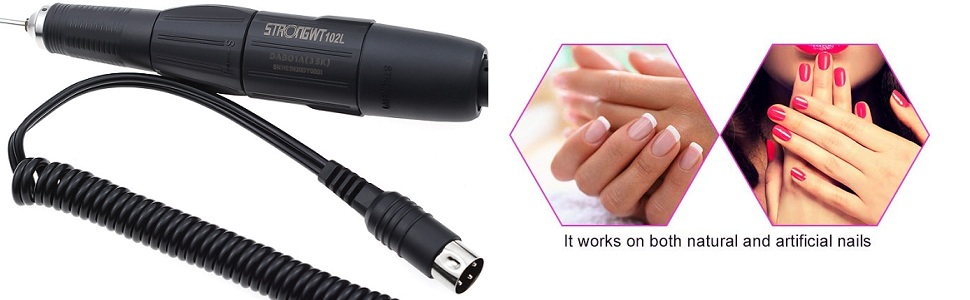
Figure 3.1: Included components of the OUBO Strong 210 Electric Nail Drill Machine.
- 1 x Main Machine (Control Box)
- 1 x Handpiece (102L)
- 1 x Foot Switch
- 1 x Handpiece Support
- 1 x Wrench
- 1 x User Manual (English)
- Spare Carbon Brushes (quantity may vary)
4. Product Overview
Familiarize yourself with the components and controls of your nail drill machine.
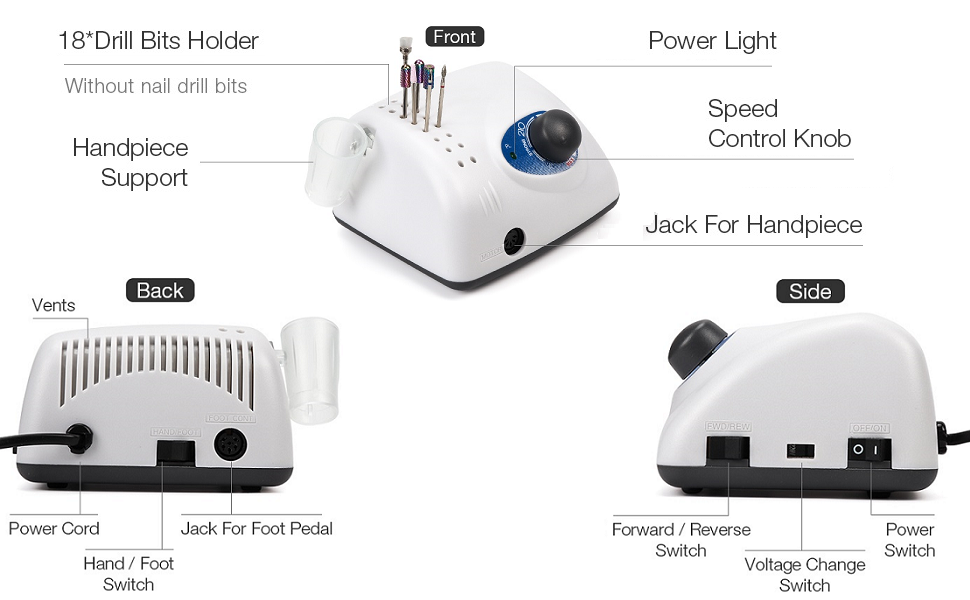
Figure 4.1: Control Box Components and Functions.
Control Box Features:
- Power Light: Indicates when the unit is powered on.
- Speed Control Knob: Adjusts the rotation speed of the handpiece from minimum to maximum (0-35000 RPM).
- Jack for Handpiece: Connection port for the handpiece.
- Vents: For heat dissipation. Ensure these are not obstructed.
- Power Cord: Connects the unit to a power outlet.
- Jack for Foot Pedal: Connection port for the optional foot pedal.
- Hand/Foot Switch: Selects between hand control (using the speed knob) or foot pedal control.
- Forward/Reverse Switch: Changes the rotation direction of the drill bit.
- Voltage Change Switch: Allows selection between 110V and 220V power input.
- Power Switch: Turns the main power to the unit ON or OFF.
5. Setup Instructions
Follow these steps to set up your nail drill machine for first use.
5.1. Voltage Selection
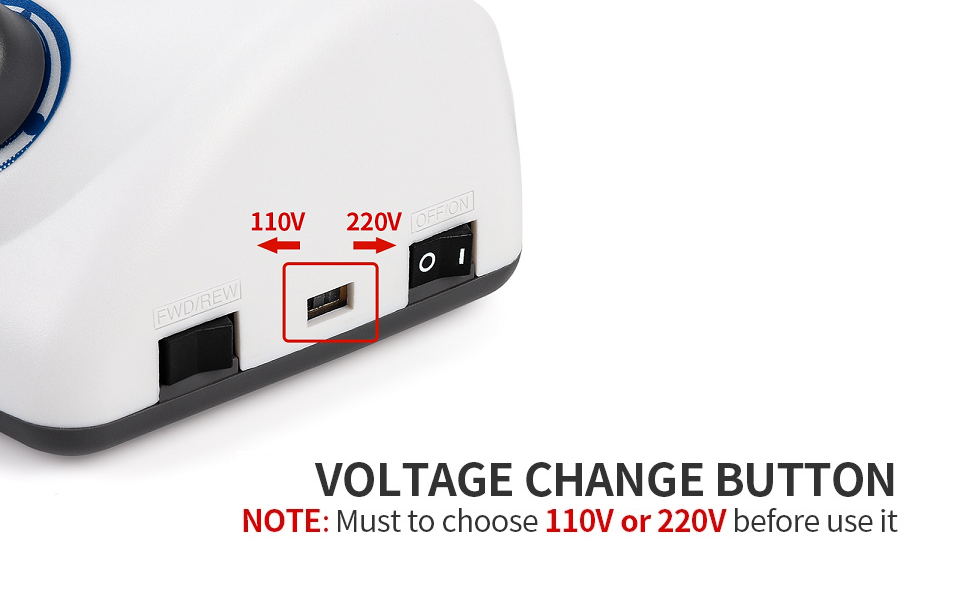
Figure 5.1: Voltage Selection Switch.
- Locate the Voltage Change Switch on the side of the control box.
- Using a small tool (e.g., a flathead screwdriver), slide the switch to match your local power supply (110V or 220V). Failure to select the correct voltage will damage the unit.
5.2. Connecting Components
- Ensure the main power switch is in the OFF position.
- Connect the handpiece cable to the Jack for Handpiece on the front of the control box.
- If using the foot pedal, connect its cable to the Jack for Foot Pedal on the back of the control box.
- Place the handpiece into the provided handpiece support.
- Plug the power cord into a suitable electrical outlet.
5.3. Inserting Drill Bits
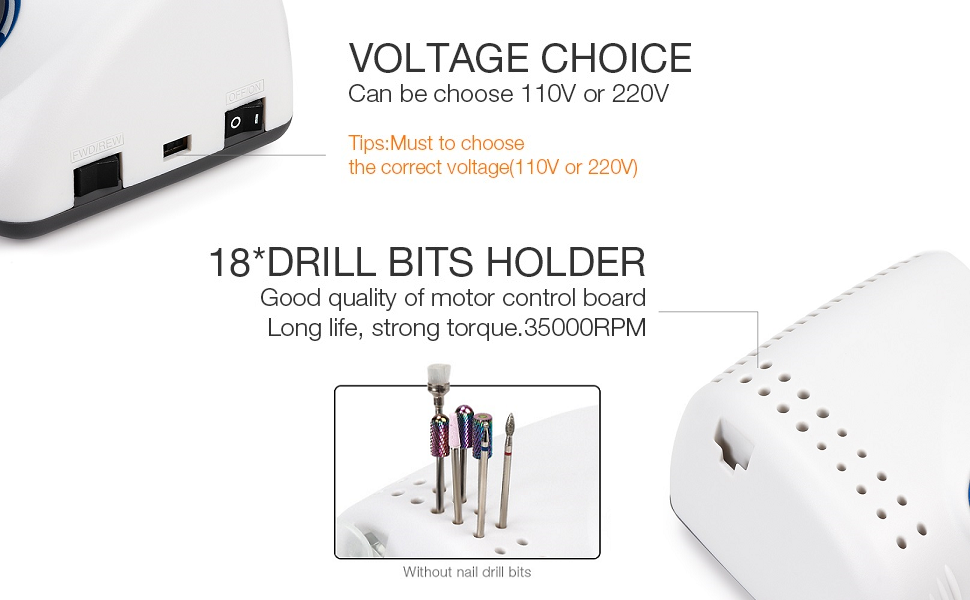
Figure 5.2: Drill Bits Holder.
- Ensure the handpiece is powered off and stationary.
- Twist the handpiece collar counter-clockwise to unlock the chuck.
- Insert the desired drill bit firmly into the chuck.
- Twist the handpiece collar clockwise to lock the chuck and secure the drill bit. Ensure the bit is securely fastened before operation.
6. Operating Instructions
This section details how to operate your OUBO Strong 210 Electric Nail Drill Machine.
6.1. Powering On and Off
- After completing the setup, turn the Power Switch on the side of the control box to the ON position. The Power Light will illuminate.
- To turn off the unit, switch the Power Switch to the OFF position.
6.2. Selecting Control Mode (Hand or Foot)
- Use the Hand/Foot Switch on the back of the control box to select your preferred control method.
- In Hand mode, the speed is controlled by the Speed Control Knob.
- In Foot mode, the speed is controlled by the foot pedal.
6.3. Adjusting Speed and Rotation Direction
- Speed Adjustment: Rotate the Speed Control Knob on the front of the control box to increase or decrease the rotation speed of the handpiece. Start with a low speed and gradually increase as needed.
- Rotation Direction: Use the Forward/Reverse Switch on the side of the control box to change the direction of the drill bit's rotation. It is recommended to change direction only when the handpiece is stationary.
6.4. Usage Guidelines
- The machine provides stable functioning, high speed, and fast polishing capabilities.
- It is suitable for carving, engraving, routing, grinding, sharpening, sanding, and polishing of acrylic nails, gel nails, artificial nails, natural nails, and even pets' nails.
- Avoid using the drill on excessively hard materials to prevent damage to the bits or the machine.
- The power box includes overload protection for safe operation.
7. Maintenance
Proper maintenance ensures the longevity and optimal performance of your nail drill machine.
- Cleaning: After each use, disconnect the power and gently wipe the handpiece and control box with a soft, dry cloth. Remove any dust or debris from the vents. Do not use harsh chemicals or abrasive cleaners.
- Bit Care: Clean drill bits after each use. Store them properly to prevent damage. Replace worn or dull bits to maintain efficiency and prevent strain on the handpiece motor.
- Storage: Store the unit in a clean, dry environment away from direct sunlight and extreme temperatures.
8. Troubleshooting
If you encounter issues with your nail drill, refer to the following common problems and solutions.
| Problem | Possible Cause | Solution |
|---|---|---|
| Unit does not power on | Power cord not connected; Power switch off; Incorrect voltage selection; Power outlet issue | Check power cord connection; Ensure Power switch is ON; Verify Voltage Change Switch setting; Test power outlet with another device |
| Handpiece not rotating | Handpiece not connected properly; Hand/Foot switch in wrong position; Speed knob at minimum; Foot pedal not pressed (if in Foot mode) | Ensure handpiece cable is fully inserted; Select correct Hand/Foot mode; Increase speed with knob; Press foot pedal |
| Drill bit loose or vibrating | Drill bit not inserted correctly; Chuck not locked; Damaged drill bit | Re-insert drill bit and ensure it is fully seated; Twist handpiece collar to lock chuck; Replace damaged drill bit |
| Excessive noise or heat | Obstructed vents; Worn carbon brushes; Overuse | Clear vents; Contact customer support for carbon brush replacement; Allow unit to cool down between uses |
If the problem persists after attempting these solutions, please contact customer support.
9. Specifications
Technical details of the OUBO Strong 210 Electric Nail Drill Machine.
| Feature | Specification |
|---|---|
| Model Name | 210 |
| Input Power | 65 Watts |
| Rotate Speed | 0-35000 RPM |
| Power Source | Corded Electric |
| Material | Aluminum, Plastic |
| Manufacturer | OUBO |
| Package Dimensions | 11.26 x 9.33 x 4.09 inches |
| Weight | 4.92 Pounds |
| UPC | 792057375421 |
10. Warranty and Support
Specific warranty details and direct support contact information are not provided in the product data. For warranty claims, technical assistance, or replacement parts, please refer to the purchase documentation or contact the retailer or manufacturer directly. Keep your proof of purchase for any warranty-related inquiries.