Bulipu SI829
Bulipu SI4732 All Band Full Frequency Radio Receiver User Manual
Model: SI829
Introduction
This manual provides comprehensive instructions for the operation and maintenance of your Bulipu SI4732 All Band Full Frequency Radio Receiver. Designed for versatility, this receiver supports FM, AM (MW and SW), and SSB (LSB and USB) bands, offering a wide range of listening experiences. Please read this manual thoroughly to ensure proper use and to maximize the performance of your device.
Product Features
- Supports FM, AM (MW and SW), and SSB (LSB and USB) reception.
- Adjustable audio bandwidth filters: 0.5, 1, 1.2, 2.2, 3, and 4 KHz.
- 22 commercial and ham radio bands pre-configured.
- Equipped with BFO Control for fine-tuning SSB signals.
- Frequency step switch for 1, 5, and 10 KHz adjustments.
- Powered by a 3.6V lithium battery with USB charging support.
- FM reception supports earphone antenna for enhanced portability.
- Audio output via 3.5mm headphone jack.
- Integrated 8-ohm speaker with 1W output.
- PCB designed to retain SI4735 package, allowing for chip replacement and software compatibility.
Product Overview


Controls and Connections

- TUNE/BFO/ATS Multifunction Knob: Rotate to adjust frequency. Press for key functions. In FM mode, press for automatic station search (ATS). In SSB mode, use for BFO adjustment.
- BAND+ / BAND- Buttons: Select radio bands.
- VOL+ / VOL- Buttons: Adjust the volume level.
- STEP Button: Set the frequency tuning step.
- BW Button: Set the audio bandwidth.
- AGC Button: Select signal attenuation strength.
- MODE Button: Select reception mode (AM-LSB-USB).
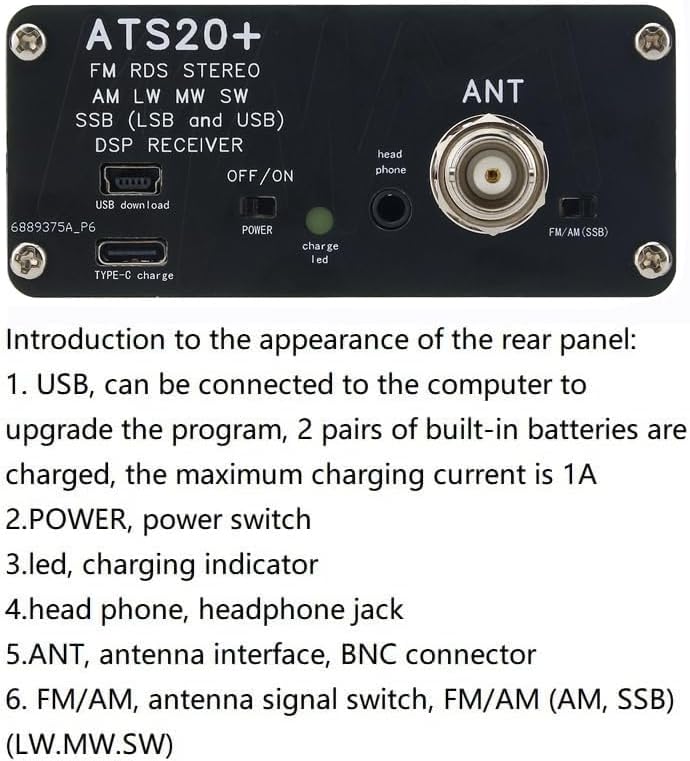
- USB (Type-C): Connect to a computer for program upgrades. Also used for charging the built-in batteries (max 1A charging current).
- POWER (OFF/ON) Switch: Power switch for the device.
- Charge LED: Charging indicator light.
- Headphone Jack (3.5mm): Audio output for headphones.
- ANT (BNC Connector): Antenna interface.
- FM/AM (SSB) Switch: Antenna signal switch for FM/AM (AM, SSB) and LW/MW/SW bands.
Setup and First Use
- Charging the Battery: Connect the radio to a USB power source using the provided Type-C USB cable. The "Charge LED" (Figure 6, item 3) will illuminate during charging. Ensure the battery is fully charged before first use for optimal performance.
- Connecting the Antenna: Attach the included antenna to the "ANT" BNC connector (Figure 6, item 5) on the rear panel. Ensure it is securely fastened. For FM reception, you may also use an earphone cable as an antenna by plugging it into the 3.5mm headphone jack.
- Powering On: Locate the "POWER" switch (Figure 6, item 2) on the rear panel and slide it to the "ON" position. The display on the front panel will light up.
- Selecting Antenna Mode: Use the "FM/AM (SSB)" switch (Figure 6, item 6) to select the appropriate antenna input for the desired band (FM/AM/SSB or LW/MW/SW).
Operating Instructions
Basic Operation
- Tuning to a Frequency: Rotate the "TUNE/BFO/ATS" multifunction knob (Figure 5, item 1) to adjust the reception frequency. The current frequency will be displayed on the LCD screen.
- Adjusting Volume: Use the "VOL+" and "VOL-" buttons (Figure 5, item 3) to increase or decrease the audio volume.
- Changing Bands: Press the "BAND+" or "BAND-" buttons (Figure 5, item 2) to cycle through the available frequency bands (e.g., FM, AM, SW).
- Selecting Mode: Press the "MODE" button (Figure 5, item 7) to switch between different reception modes such as AM, LSB (Lower Sideband), and USB (Upper Sideband).
Advanced Settings
- Frequency Step Adjustment: Press the "STEP" button (Figure 5, item 4) to change the tuning step size (e.g., 1 KHz, 5 KHz, 10 KHz). This allows for more precise or rapid tuning.
- Audio Bandwidth (BW) Control: Press the "BW" button (Figure 5, item 5) to cycle through different audio bandwidth filters (0.5, 1, 1.2, 2.2, 3, and 4 KHz). Selecting a narrower bandwidth can help reduce interference, especially in SSB mode.
- Automatic Gain Control (AGC): Use the "AGC" button (Figure 5, item 6) to adjust the signal attenuation strength. This feature helps maintain a consistent audio level despite variations in signal strength.
- BFO Control (SSB Mode): When in LSB or USB mode, rotate the "TUNE/BFO/ATS" knob to fine-tune the BFO (Beat Frequency Oscillator) for clear voice reception.
- Automatic Tuning System (ATS) for FM: In FM mode, press the "TUNE/BFO/ATS" knob to initiate an automatic scan for available FM stations.
Demonstration Video
Video 1: A demonstration of the Bulipu SI4732 radio receiver in operation, showcasing its tuning capabilities and audio output across different bands.
Maintenance
- Cleaning: Use a soft, dry cloth to clean the exterior of the radio. Do not use liquid cleaners or abrasive materials.
- Battery Care: To prolong battery life, avoid fully discharging the battery frequently. Charge the device regularly, especially if it will not be used for an extended period.
- Storage: Store the radio in a cool, dry place away from direct sunlight, extreme temperatures, and high humidity.
- Antenna Care: Handle the antenna gently to prevent bending or breaking. Retract the telescopic antenna when not in use.
Troubleshooting
| Problem | Possible Cause | Solution |
|---|---|---|
| Radio does not power on. | Battery is depleted or power switch is off. | Ensure the power switch is in the "ON" position. Charge the battery using the USB Type-C port. |
| Poor reception or static. | Antenna not extended, incorrect antenna switch setting, or weak signal. | Fully extend the antenna. Check the "FM/AM (SSB)" switch position. Try relocating to an area with better signal. Adjust BW and AGC settings. |
| No audio from speaker. | Volume too low or headphones connected. | Increase the volume using "VOL+" button. Disconnect headphones if you wish to use the speaker. |
| SSB signals are distorted. | BFO not properly adjusted. | Fine-tune the BFO using the TUNE/BFO/ATS knob in LSB or USB mode until the audio is clear. |
Specifications
- Product Dimensions: 3.94 x 3.94 x 1.57 inches (10 x 10 x 4 cm)
- Item Weight: 7.1 ounces (200-250g)
- Model Number: SI829
- Brand: Bulipu
- Color: Black
- Connectivity Technology: USB
- Power Source: Battery Powered (3.6V lithium battery)
- Tuner Technology: AM, FM, SSB
- Radio Bands Supported: FM, AM (MW, SW), SSB (LSB, USB)
- Audio Bandwidth Filters: 0.5, 1, 1.2, 2.2, 3, 4 KHz
- Speaker Output: 8-ohm, 1W
- Headphone Output: 3.5mm jack
- Water Resistance Level: Not Water Resistant
- First Available Date: March 16, 2021
What's in the Box
The Bulipu SI4732 All Band Full Frequency Radio Receiver package includes:
- 1 x SI4732 Radio Receiver Unit
- 1 x Telescopic Antenna (BNC connector)
- 1 x USB Type-C Charging Cable
- 1 x Built-in 3.6V Lithium Battery
Warranty and Support
For warranty information and technical support, please refer to the contact details provided by your retailer or visit the official Bulipu website. Keep your purchase receipt as proof of purchase for any warranty claims.
Ask a question about this manual
Ask about setup, troubleshooting, compatibility, parts, safety, or missing instructions. Manuals+ will review the question and use this page’s manual context to help answer it.