1. Introduction
This manual provides instructions for the XENX P3-1060 Graphic Drawing Tablet. It covers product features, setup, operation, maintenance, and troubleshooting to ensure optimal performance and user experience. The XENX P3-1060 is designed for digital art, painting, photo editing, graphic design, document annotation, online classes, and electronic signature applications.

Image: The XENX P3-1060 Graphic Drawing Tablet with its battery-free pen, showcasing its sleek design.
2. Package Contents
Verify that all items listed below are included in your package:
- XENX P3-1060 Graphic Drawing Tablet
- Battery-Free Pen
- USB Cable (Type-C)
- Pen Nibs (Replacement)
- Pen Nib Clip
- OTG Adapter (for Android connection)
- Quick Start Guide

Image: A visual representation of the XENX P3-1060 tablet and its included accessories, such as the pen, USB cable, and replacement nibs.
3. Product Features
- Large Drawing Area: The tablet features a 10 by 6.22 inches active drawing area, providing ample space for creative work.
- Battery-Free Pen: Equipped with a highly precise pressure sensor, offering 8192 levels of pressure sensitivity for natural and accurate drawing. The pen includes two customizable side buttons for quick access to functions.
- Customizable Shortcut Keys: Ten programmable buttons on the tablet allow users to assign their preferred shortcuts, enhancing workflow efficiency. These shortcuts can be configured and saved per application.
- High Report Rate: Captures 266 sets of pen coordinates and pressure data per second, ensuring smooth and responsive input.
- Wide Compatibility: Compatible with Mac OS 10.12 or later, Windows 7 64-bit or later, and Android 6.0 or later. Offers driver-free pen experience with Windows 10 and Android 6.0 or later.
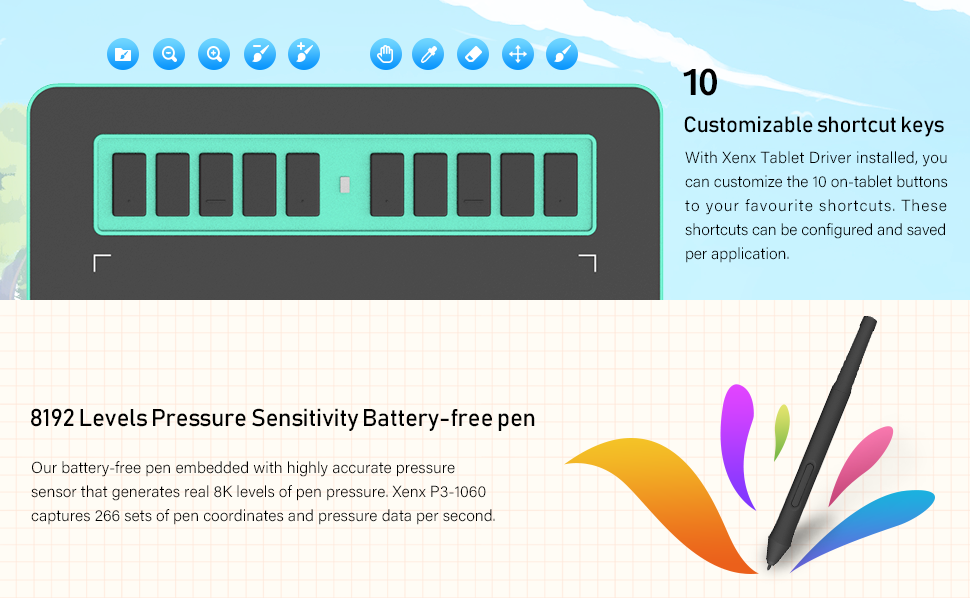
Image: An illustration highlighting the 10 customizable shortcut keys on the tablet and the 8192 pressure levels of the battery-free pen.

Image: Icons indicating the tablet's compatibility with MacOS, Windows, and Android operating systems.
4. Setup
4.1 Driver Installation (Windows/MacOS)
- Connect the XENX P3-1060 tablet to your computer using the provided USB cable.
- Visit the official XENX website to download the latest driver software for your operating system (Windows or MacOS).
- Follow the on-screen instructions to install the driver. It is recommended to close all drawing software before installation.
- Restart your computer after installation is complete.
- Open the XENX Tablet Driver application to customize pen pressure, shortcut keys, and other settings.
4.2 Android Connection
- Ensure your Android device supports OTG (On-The-Go) functionality.
- Connect the XENX P3-1060 tablet to your Android phone using the provided Type-C OTG adapter and USB cable.
- The tablet will automatically switch to portrait mode to fit your phone's orientation.
- For optimal use, press and hold both the top and bottom buttons on the tablet simultaneously for 5 seconds to adjust the tablet's active area to match your phone's screen.

Image: A step-by-step guide illustrating how to connect the XENX tablet to an Android phone using an OTG adapter and how to adjust the tablet's active area for phone use.
5. Operating Instructions
5.1 Basic Usage
Once the driver is installed and the tablet is connected, you can use the battery-free pen to interact with your computer or Android device. The pen acts as a mouse, with its tip functioning as a left-click and the side buttons customizable for various functions like right-click, undo, or zoom.

Image: A user actively drawing on the XENX P3-1060 tablet, demonstrating the pen's interaction with the surface.
5.2 Customizing Shortcut Keys
Open the XENX Tablet Driver software. Within the driver interface, you can assign specific functions or keyboard shortcuts to each of the 10 physical buttons on the tablet. You can also configure different key settings for different applications.
5.3 Specific Applications
- Digital Art & Design: Use with popular software like Photoshop, Illustrator, Clip Studio Paint, Krita, and more. The 8192 pressure levels allow for precise control over line thickness and opacity.
- E-learning & Online Classes: Utilize the tablet for handwritten notes, annotations on documents, and interactive whiteboarding during online lectures or meetings.
- OSU! Gaming: The tablet supports OSU! Enhance mode, providing a responsive and accurate experience for rhythm gaming.

Image: A user engaged in OSU! gaming, demonstrating the tablet's use for precise cursor control in rhythm games.

Image: An infographic showcasing diverse applications of the XENX P3-1060 tablet, from creative design to educational purposes.
Video: An official product video demonstrating the XENX P-Series Graphics Tablet in various use cases, including digital art, online learning, and portability.
6. Maintenance
6.1 Cleaning the Tablet
Use a soft, dry cloth to gently wipe the tablet surface. Avoid using harsh chemicals or abrasive materials, as they may damage the surface. For stubborn smudges, a slightly damp cloth can be used, followed by immediate drying.
6.2 Replacing Pen Nibs
Over time, the pen nib may wear down. To replace it:
- Use the pen nib clip to carefully pull out the old nib from the pen.
- Insert a new replacement nib firmly into the pen until it is secure.
7. Troubleshooting
7.1 Pen Not Responding
- Ensure the tablet is properly connected to your device.
- Verify that the driver is correctly installed and running. Try reinstalling the driver if issues persist.
- Check if the pen nib is worn out and replace it if necessary.
- Test the tablet on a different USB port or computer to rule out port or system issues.
7.2 Driver Issues
- Uninstall any other tablet drivers on your system before installing the XENX driver to avoid conflicts.
- Download the latest driver from the official XENX website.
- Run the driver installer as an administrator.
7.3 Android Connection Problems
- Confirm your Android device supports OTG functionality.
- Ensure the OTG adapter and USB cable are functioning correctly.
- Try connecting to a different Android device if possible.
8. Specifications
| Feature | Detail |
|---|---|
| Product Dimensions | 13.19 x 7.99 x 0.31 inches |
| Item Weight | 12.8 ounces |
| Item Model Number | P3-1060 |
| Brand | XENX |
| Connectivity Technology | USB |
| Pressure Sensitivity | 8192 Levels |
| Operating System | Android 6.0 or later, Mac OS X 10 or later, Windows 7 or later |
| Manufacturer | Xenx Technology Limited |
| Date First Available | September 25, 2021 |

Image: A diagram illustrating the physical dimensions of the XENX P3-1060 tablet, including its 10x6.25 inch active area.
9. Warranty and Support
For warranty information, please refer to the documentation included with your product or visit the official XENX website. If you encounter any issues or require technical assistance, please contact XENX customer support through their official channels. Keep your purchase receipt for warranty claims.
You can visit the XENX Store for more product information and support resources.