1. Introduction
This manual provides essential information for the safe and efficient installation, operation, and maintenance of your HOFTRONIC LED Batten 60cm 15W 3000K. Please read these instructions carefully before use and retain them for future reference.
The HOFTRONIC LED Batten is an ultra-flat, energy-efficient lighting solution designed for indoor use. It features high-quality SMD LEDs, providing 2400 lumens of warm white light (3000K) with a power consumption of only 15 Watts. Its slim design allows for versatile installation in various indoor environments.
2. Safety Instructions
- Electrical Safety: Always disconnect power at the main circuit breaker before installation, maintenance, or cleaning. Installation should be performed by a qualified electrician if you are unsure.
- Indoor Use Only: This product is rated IP20 and is designed exclusively for indoor environments. Do not expose to moisture or outdoor conditions.
- Voltage: Ensure the supply voltage matches the product's requirement (230 Volts).
- Handling: Handle the LED batten with care to avoid damage to the housing or internal components.
- Heat: While LED lights produce less heat than traditional bulbs, ensure adequate ventilation around the fixture.
- Disposal: Dispose of the product according to local regulations for electronic waste at the end of its lifespan.
3. Package Contents
Verify that all components are present before beginning installation:
- 1x HOFTRONIC LED Batten (Integrated LED light source)
- Mounting brackets
- Screws and wall plugs
- Quick connector for daisy-chaining (if applicable)
4. Setup and Installation
The HOFTRONIC LED Batten is designed for straightforward installation. Follow these steps carefully:
4.1. Preparation
- Power Disconnection: Before starting, ensure the power supply to the installation area is switched off at the main circuit breaker.
- Location Selection: Choose a suitable indoor location for mounting. Consider the beam angle (Downlight) and desired light distribution.
- Unpack: Carefully remove the LED batten and all accessories from the packaging.
4.2. Mounting the Batten
The batten can be mounted directly to a ceiling or wall using the provided mounting clips.

Image: HOFTRONIC LED Batten installed as under-cabinet lighting in a modern kitchen. This illustrates a typical application for the product.

Image: Multiple HOFTRONIC LED Battens providing illumination in a workshop setting, mounted above a workbench. This demonstrates the product's suitability for task lighting.
- Marking: Hold the LED batten in the desired position and mark the locations for the mounting clips. Ensure the marks are level and spaced correctly for the batten's length (60cm).
- Drilling: Drill holes at the marked positions. Insert the wall plugs if mounting into drywall or masonry.
- Attach Clips: Secure the mounting clips to the surface using the provided screws.
- Secure Batten: Gently press the LED batten into the mounted clips until it clicks securely into place.
4.3. Electrical Connection
The LED batten is designed for direct connection to a 230V AC power supply.

Image: The underside of the HOFTRONIC LED Batten, revealing the internal wiring and connection points. This view is relevant for understanding the electrical hookup.
- Wiring: Connect the live (L), neutral (N), and earth (E) wires from your power supply to the corresponding terminals on the LED batten. Ensure connections are secure.
- Daisy-Chaining (Optional): If connecting multiple battens in series, use the quick connectors provided to link them. Ensure the total wattage does not exceed the circuit's capacity.
- Power On: Once all connections are secure and the batten is mounted, restore power at the main circuit breaker. The LED batten should illuminate.
5. Operating Instructions
The HOFTRONIC LED Batten operates immediately upon receiving power. There are no external controls on the unit itself.
- Switching On/Off: Control the light by using the wall switch connected to its power supply.
- Light Quality: The batten provides a warm white light at 3000 Kelvin, suitable for creating a comfortable and inviting atmosphere.
- Flicker-Free: Equipped with high-quality SMD LED chips, the light output is completely flicker-free, reducing eye strain and making it suitable for professional applications.

Image: A graphic illustrating the key features of the HOFTRONIC LED Batten, including its high performance, use of Samsung LED chips, 160 Lumen/Watt efficiency, and 110-degree beam angle.
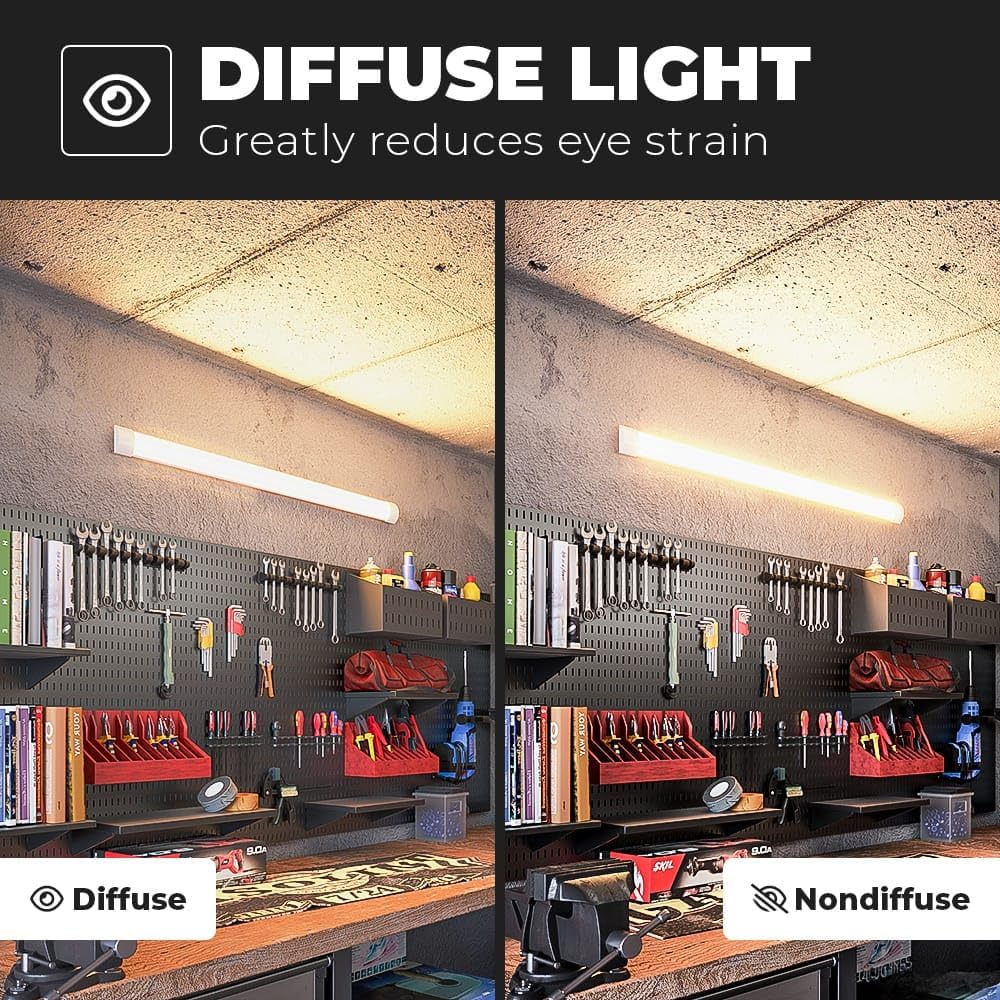
Image: A side-by-side comparison demonstrating the benefit of diffuse light. The left side shows diffuse lighting, which greatly reduces eye strain, while the right side shows non-diffuse lighting, highlighting the difference in visual comfort.
6. Maintenance
The HOFTRONIC LED Batten requires minimal maintenance.
- Cleaning: Ensure the power is off before cleaning. Wipe the fixture with a soft, dry, or slightly damp cloth. Do not use abrasive cleaners or solvents.
- LED Lifespan: The integrated LED light source has a long lifespan of approximately 30,000 hours, meaning it does not require frequent replacement.
- No User-Serviceable Parts: Do not attempt to open or repair the fixture. There are no user-serviceable parts inside.
7. Troubleshooting
If you encounter issues with your LED batten, refer to the following common problems and solutions:
- Light does not turn on:
- Check if the power supply is connected and switched on.
- Verify the circuit breaker has not tripped.
- Ensure all electrical connections are secure.
- Light flickers:
- While designed to be flicker-free, check for unstable power supply or loose connections.
- Ensure the batten is not connected to a dimmer switch, as it is not designed for dimming unless explicitly stated.
- Reduced light output:
- Clean the diffuser cover if it appears dirty.
- If the issue persists, the LED chips may be nearing the end of their operational life.
If these steps do not resolve the issue, please contact customer support.
8. Specifications
Detailed technical specifications for the HOFTRONIC LED Batten 60cm 15W 3000K:

Image: A technical drawing of the HOFTRONIC LED Batten with key dimensions labeled: 600 mm length, 74 mm width, and 25 mm height. This provides precise measurements for installation planning.
| Feature | Specification |
|---|---|
| Brand | HOFTRONIC |
| Model Number | 4406394 |
| Dimensions (L x W x H) | 60 x 7.4 x 2.5 cm |
| Weight | 0.5 Kilograms |
| Power Consumption | 15 Watts |
| Luminous Flux | 2400 Lumens |
| Luminous Efficacy | 160 lm/W |
| Color Temperature | 3000 Kelvin (Warm White) |
| Voltage | 230 Volts |
| IP Rating | IP20 (Indoor use only) |
| Average Lifespan | 30,000 Hours |
| Beam Angle | Downlight |
| Material | Plastic |
| Special Features | Ultra-flat (2.5 cm height), Easy to connect, Flicker-free |
For more detailed energy information, please refer to the EPREL product page.

Image: The EU Energy Label for the HOFTRONIC LED Batten, indicating an energy efficiency class of D and an energy consumption of 15 kWh per 1000 hours.
9. Warranty and Support
HOFTRONIC offers a 5-year warranty on this LED Batten, covering manufacturing defects and material faults under normal use conditions.
For warranty claims, technical assistance, or any questions not covered in this manual, please contact HOFTRONIC customer support through your retailer or the official HOFTRONIC website.